MSI X79A driver and firmware

Related MSI X79A Manual Pages
Download the free PDF manual for MSI X79A and other MSI manuals at ManualOwl.com
User Guide - Page 2
... contents. Our products are under continual improvement and we reserve the right to make changes without notice.
Trademarks
All trademarks in this manual are properties of their respective owners. ■ MSI® is registered trademark of Micro-Star Int'l Co.,Ltd. ■ NVIDIA® is registered trademark of NVIDIA Corporation. ■ ATI...
User Guide - Page 3
... help resources for further guidance.
◙ Visit the MSI website for technical guide, BIOS updates, driver updates, and
other information: http://www.msi.com/service/download
◙ Contact our technical staff at: http://support.msi.com
Safety Instructions
■ Always read the safety instructions carefully. ■ Keep this User's Manual for future reference. ■ Keep this equipment...
User Guide - Page 4
... the user's authority to operate the equipment. Notice 2 Shielded interface cables and A.C. power cord, if any, must be used in order to comply with the emission limits.
VOIR LA NOTICE D'INSTALLATION AVANT DE RACCORDER AU RESEAU.
Micro-Star International MS-7760
This device complies with Part 15 of the FCC Rules. Operation is subject...
User Guide - Page 10
Preface ECO 2-16 BROWSER 2-17 Installing Winki 2-17 UTILITIES 2-18 Updating the BIOS with Live Update 2-20 SECURITY 2-21
Appendix A Realtek Audio A-1 Installing the Realtek HD Audio Driver A-2 Software Configuration A-3 Hardware Default Setting A-5
Appendix B Intel RAID B-1 Introduction B-2 Using Intel RSTe Option ROM B-3 Installing Driver B-9 Degraded RAID Array B-11
User Guide - Page 12
Getting Started
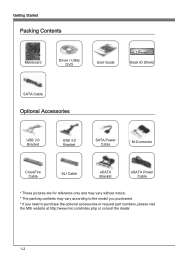
Packing Contents
Mainboard
Driver / Utility DVD
User Guide
Back IO Shield
SATA Cable
Optional Accessories
USB 2.0 Bracket
USB 3.0 Bracket
SATA Power Cable
M-Connector
CrossFire Cable
SLI Cable
eSATA Bracket
eSATA Power Cable
* These pictures are for reference only and may vary without notice.
* The packing contents may vary according to the model you purchased.
* If ...
User Guide - Page 13
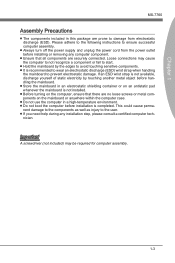
... this package are prone to damage from electrostatic discharge (ESD). Please adhere to the following instructions to ensure successful computer assembly.
■ Always turn off the power supply and unplug the power cord from the power outlet before installing or removing any computer component.
■ Ensure that all components are securely connected. Loose connections may cause the...
User Guide - Page 21
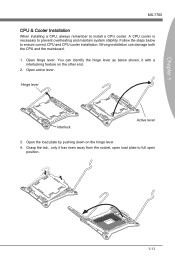
... steps below to ensure correct CPU and CPU cooler installation. Wrong installation can damage both the CPU and the mainboard.
1. Open hinge lever. You can identify the hinge lever as below shown, it with a interlocking feature on the other end.
2. Open active lever.
Hinge lever
Interlock
Active lever
3. Open the load plate by pushing down on...
User Guide - Page 30
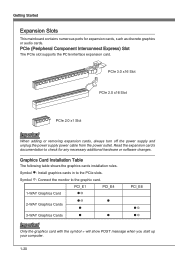
... PCIe slot supports the PCIe interface expansion card.
PCIe 3.0 x16 Slot
PCIe 2.0 x16 Slot
PCIe 2.0 x1 Slot
Important
When adding or removing expansion cards, always turn off the power supply and unplug the power supply power cable from the power outlet. Read the expansion card's documentation to check for any necessary additional hardware or software changes.
Graphics Card Installation Table...
User Guide - Page 31
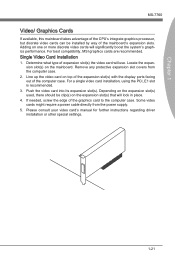
... the expansion slot(s) used, there should be clip(s) on the expansion slot(s) that will lock in place.
4. If needed, screw the edge of the graphics card to the computer case. Some video cards might require a power cable directly from the power supply.
5. Please consult your video card's manual for further instructions regarding driver installation or other special settings.
1-21
User Guide - Page 32
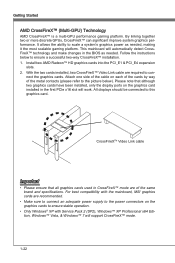
.... For best compatibility with the mainboard, MSI graphics cards are recommended.
• Make sure to connect an adequate power supply to the power connectors on the graphics cards to ensure stable operation.
• Only Windows® XP with Service Pack 2 (SP2), Windows™ XP Professional x64 Edition, Windows™ Vista, & Windows™ 7 will support CrossFireX™ mode.
1-22
User Guide - Page 33
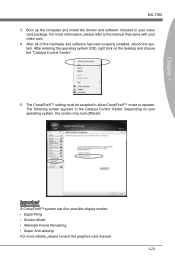
... computer and install the drivers and software included in your video
card package. For more information, please refer to the manual that came with your video card. 4. After all of the hardware and software has been properly installed, reboot the system. After entering the operating system (OS), right click on the desktop and choose the "Catalyst Control Center".
5. The CrossFireX™ setting...
User Guide - Page 34
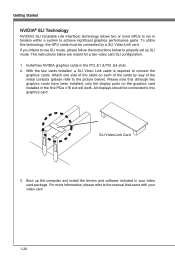
... note that although two graphics cards have been installed, only the display ports on the graphics card installed in the first PCIe x16 slot will work. All displays should be connected to this graphics card.
SLI Video Link Card
3. Boot up the computer and install the drivers and software included in your video card package. For more information, please refer to the manual that came with your...
User Guide - Page 35
Chapter 1
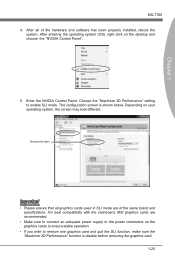
MS-7760 4. After all of the hardware and software has been properly installed, reboot the
system. After entering the operating system (OS), right click on the desktop and choose the "NVIDIA Control Panel".
5. Enter the NVIDIA Control Panel. Choose the "Maximize 3D Performance" setting to enable SLI mode. The configuration screen is shown below. Depending on your...
User Guide - Page 67
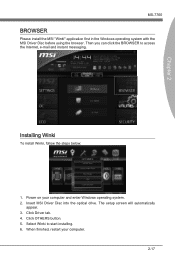
... application first in the Windows operating system with the MSI Driver Disc before using the browser. Then you can click the BROWSER to access the Internet, e-mail and instant messaging.
Installing Winki
To install Winki, follow the steps below:
1. Power on your computer and enter Windows operating system. 2. Insert MSI Driver Disc into the optical drive. The setup screen will automatically
appear...
User Guide - Page 68
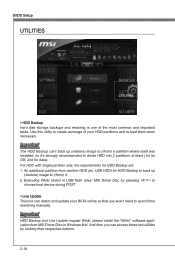
...) it. 2. Executing Winki stored in USB flash drive/ MSI Driver Disc by pressing to
choose boot device during POST. ▶ Live Update This tool can detect and update your BIOS online so that you won't need to spend time searching manually.
Important
HDD Backup and Live Update request Winki, please install the "Winki" software application from MSI Driver Disc in Windows first. And then you can...
User Guide - Page 70
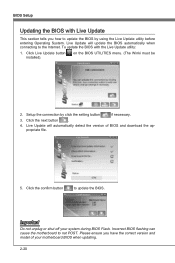
...Update button installed).
on the BIOS UTILITIES menu. (The Winki must be
2. Setup the connection by click the setting button
if necessary.
3. Click the next button
.
4. Live Update will automatically detect the version of BIOS and download the appropriate file.
5. Click the confirm button
to update the BIOS.
Important
Do not unplug or shut off your system during BIOS Flash. Incorrect BIOS...
User Guide - Page 74
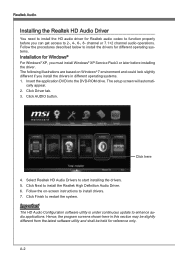
.... 1. Insert the application DVD into the DVD-ROM drive. The setup screen will automati-
cally appear. 2. Click Driver tab. 3. Click AUDIO button.
Click here
4. Select Realtek HD Audio Drivers to start installing the drivers. 5. Click Next to install the Realtek High Definition Audio Driver. 6. Follow the on-screen instructions to install drivers. 7. Click Finish to restart the system.
Important...
User Guide - Page 75
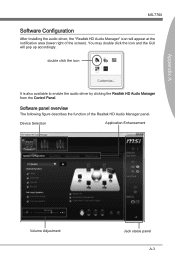
... installing the audio driver, the "Realtek HD Audio Manager" icon will appear at the notification area (lower right of the screen). You may double click the icon and the GUI will pop up accordingly.
double click the icon
It is also available to enable the audio driver by clicking the Realtek HD Audio Manager from the Control Panel.
Software...
User Guide - Page 87
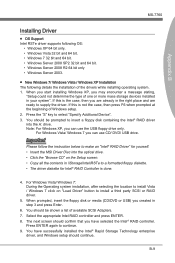
... MSI Driver Disc into the optical drive. • Click the "Browse CD" on the Setup screen. • Copy all the contents in \\Storage\Intel\RSTe to a formatted floppy diskette. • The driver diskette for Intel® RAID Controller is done.
4. For Windows Vista/ Windows 7: During the Operating system installation, after selecting the location to install Vista / Windows 7 click on "Load...
User Guide - Page 88
...and Windows setup starts copying files. ■ Existing Windows Driver Installation 1. Insert the MSI Driver Disc into the optical drive. 2. The setup screen will automatically appear. 3. Under the Driver tab, click on Intel RAID Drivers. 4. The drivers will be automatically installed. ■ Confirming Windows Driver Installation 1. From Windows, open the Control Panel from My Computer followed...