Samsung NE58K9500SG/AA driver and firmware
Drivers and firmware downloads for this Samsung item
Related Samsung NE58K9500SG/AA Manual Pages
Download the free PDF manual for Samsung NE58K9500SG/AA and other Samsung manuals at ManualOwl.com
User Manual - Page 2

... range, the range must be WARNING secured by a properly installed Anti-Tip device. AFTER THE RANGE
HAS BEEN INSTALLED, CONFIRM THAT THE ANTI-TIP DEVICE HAS BEEN PROPERLY INSTALLED AND VERIFY THAT THE ANTITIP DEVICE IS PROPERLY ENGAGED. Refer to the installation manual for instructions. a) If the anti-tip device is not installed, a child or adult can tip the range
and...
User Manual - Page 3
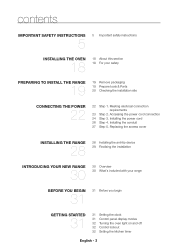
... power cord 26 Step 4. Installing the conduit 27 Step 5. Replacing the access cover
INSTALLING THE RANGE
28
28 Installing the anti-tip device 29 Finalizing the installation
INTRODUCING YOUR NEW RANGE
30
30 Overview 30 What's included with your range
BEFORE YOU BEGIN
31
31 Before you begin
GETTING STARTED
31
31 Setting the clock 31 Control panel display...
User Manual - Page 5
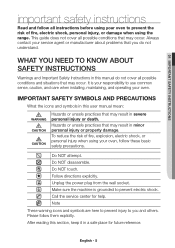
...guide does not cover all possible conditions that may occur. Always contact your service agent or manufacturer about problems that you do not understand.
WHAT YOU NEED TO KNOW ABOUT SAFETY INSTRUCTIONS
Warnings and Important Safety Instructions in this manual.... Unplug the power plug from the wall socket. Make sure the machine is grounded to prevent electric shock. Call the service center for help...
User Manual - Page 6
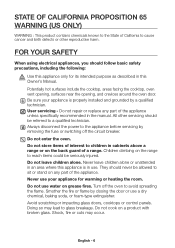
...installed and grounded by a qualified technician. User servicing - Do not repair or replace any part of the appliance unless specifically recommended in the manual. All other servicing should be referred to a qualified technician. Always disconnect the power to the appliance before servicing... scratching or impacting glass doors, cooktops or control panels. Doing so may lead to glass breakage. Do ...
User Manual - Page 9
... or a serious malfunction. If your appliance is in need of repair, contact a Samsung authorized service center. Failure to follow these instructions may result in damage and void the warranty. Flush - mounted appliances may be operated only after they have been installed in cabinets and workplaces that conform to the relevant electrical and building codes...
User Manual - Page 10
... to cause burns. Among these surfaces are oven vent openings and surfaces near these openings, the oven door, and the window of the oven door.
Do not heat unopened food containers. The build-up of pressure may cause the container to burst...oven to dry newspapers. If overheated, newspapers can catch on fire.
Do not use the oven for a storage area. Items stored in an oven can ignite.
English - 10
User Manual - Page 11
...to line the oven bottoms, except as suggested in the manual. Improper installation of these liners may result in a risk of electric... shock or fire.
Keep oven vent ducts unobstructed. The oven vent is located below the control... power failure. If the
CAUTION
power fails, always turn the oven off. If the oven is not turned off and the power ...
User Manual - Page 12
...the self-clean mode malfunctions, turn the oven off and disconnect the power supply. Have it serviced by a qualified technician.
Excess spillage must be removed before cleaning....to a hot surface.
WARNING CRITICAL INSTALLATION WARNINGS
This appliance must be installed by a qualified technician or service company. - Failing to have a qualified technician install the range may result in
electric shock...
User Manual - Page 13
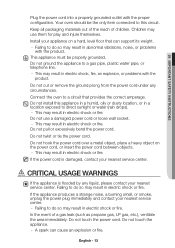
...power cord into a properly grounded outlet with the proper configuration. Your oven should be the only item connected to this circuit.
Keep all packaging materials out of the reach of children. Children may use them for play and injure themselves.
Install your appliance on a hard, level floor that can support..., unplug the power plug immediately and contact your nearest service center. - Failing...
User Manual - Page 18
... storage space
above the cooktop. • The range should not be placed on a base.
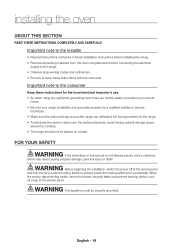
FOR YOUR SAFETY
WARNING WARNING
If the information in this manual is not followed exactly, a fire or electrical
shock may result causing property damage, personal injury or death.
WARNING WARNING
Before beginning the installation, switch the power off at the service...
User Manual - Page 19

... materials could result in damage to the appliance.
02 INISNTTARLOLDINUGCITNHGEYOOVUERNN&EPWRERPAANRGIENG TO INSTALL THE RANGE
PREPARE TOOLS & PARTS The tools you will need
Drill
Adjustable Wrench
Pliers
Phillips Screwdriver
Flat Screwdriver
What's included with your range
Pencil
1/4˝ Nut Driver Level
Template
Anti-Tip Bracket
Screws (short:2 ea, Filler Kit & Screws (3 ea...
User Manual - Page 20
...
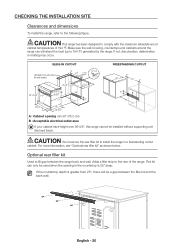
Clearances and dimensions
To install the range, refer to the following figure.
CAUTION CAUTION
This range has ... electrical outlet area
If your cabinet have height over 36-4/5", this range cannot be installed without supporting unit like hard block.
CAUTION CAUTION
You must use the rear filler kit to install the range in a freestanding cutout
cabinet. For more information, see "Optional rear ...
User Manual - Page 21
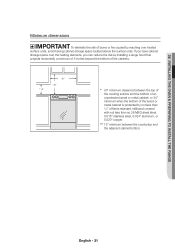
... risk of burns or fire caused by reaching over heated
surface units, avoid having cabinet storage space located above the surface units. If you have cabinet storage space over the heating elements, you can reduce the risk by installing a range hood that projects horizontally a minimum of 5 inches beyond the bottom of the cabinets...
User Manual - Page 22

...No. 70-Latest Edition. You can get a copy by writing:
National Fire Protection Association
Batterymarch Park
...cable. • Because range terminals are not accessible after the range is in position, a flexible service conduit or
cord must be used.
NOTE If conduit is being used, go to Step 4 on page 25.
ALL NEW BRANCH-CIRCUIT CONSTRUCTIONS, MOBILE HOMES, RECREATIONAL VEHICLES AND INSTALLATIONS...
User Manual - Page 23
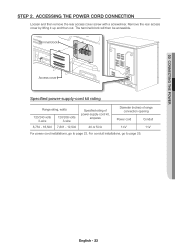
... rating, watts
120/240 volts 3-wire
120/208 volts 3-wire
Specified rating of power-supply-cord kit,
amperes
Diameter (inches) of range connection opening
Power cord
Conduit
8,750 - 16,500 7,801 - 12,500
40 or 50 A
13/8"
11/8"
For power cord installations, go to page 23. For conduit installations, go to page 25.
English - 23
User Manual - Page 24
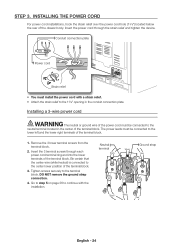
STEP 3. INSTALLING THE POWER CORD
For power cord installations, hook the strain relief over the power cord hole (13/8") located below the rear of the drawer body. Insert the power cord through the strain relief and tighten the device.
Conduit connection plate
Power cord
Strain relief
• You must install the power cord with a strain relief. • Attach the strain relief...
User Manual - Page 25
...
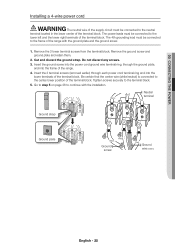
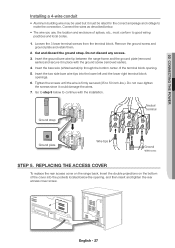
Installing a 4-wire power cord
WARNING WARNING
The neutral wire of the supply circuit must be connected to the neutral
terminal located in the lower center of the terminal block. The power ...discard the ground strap. Do not discard any screws.
3. Insert the ground screw into the power cord ground wire terminal ring, through the ground plate, and into the frame of the range.
...
User Manual - Page 26
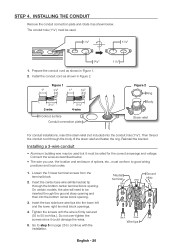
... hole (11/8") must be used.
11/8"
13/8"
13/8"
1. Prepare the conduit cord as shown in Figure 1. 2. Install the conduit cord as shown in Figure 2.
Figure 1
1"
3/8"
1"
3/8"
31/2" 3 wire
31/2" 4 wire
Knockout ... cord through the body of the strain relief and fasten the ring. Reinstall the bracket.
Installing a 3-wire conduit
• Aluminum building wire may be used but it must be rated...
User Manual - Page 27
03 COSUNRNFEACCTEINCGOTOHKEINPGOWER
Installing a 4-wire conduit
• Aluminum building wire may be used but it must be rated for ... Do not over-tighten the screws since it could damage the wires.
7. Go to step 5 below to continue with the installation.
Black White
Red
Neutral
terminal
Ground strap
Ground plate
Wire tips
White
Black
Red
Ground wire (Green)
STEP 5. REPLACING THE ACCESS...
User Manual - Page 28
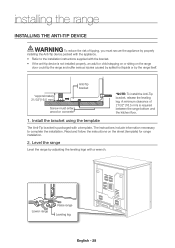
... WARNING
To reduce the risk of tipping, you must secure the appliance by properly
installing the Anti-Tip device packed with the appliance.
• Refer to the installation instructions supplied with the bracket.
• If the anti-tip device is not installed properly, an adult or child stepping on or sitting on the range door could...