Samsung NE58K9850WS/AA driver and firmware
Drivers and firmware downloads for this Samsung item

Related Samsung NE58K9850WS/AA Manual Pages
Download the free PDF manual for Samsung NE58K9850WS/AA and other Samsung manuals at ManualOwl.com
User Manual - Page 2

.... For more information, visit www.samsung.com.
Downloading and Installing the App
1. Download the Samsung Smart Home application from the Google Play Store (Android devices) or from the Apple AppStore (iOS devices). To find the app, use the keyword "Samsung Smart Home."
2. Install the app on your smart device.
NOTE • The Samsung Smart Home app requires Android 4.0 (ICS) or later, and is...
User Manual - Page 4
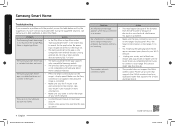
... app supports only compatible Samsung models. The previous Samsung Smart Oven app is not compatible with Samsung Smart Home-compliant devices.
Press the Smart Control button on the range's display panel. Make sure the Easy Connection icon appears indicating the range is connected. Make sure your Wi-Fi router is ON and connected to the Internet. (See your router's user manual...
Installation Guide - Page 1
Electric Range
installation manual
imagine the possibilities
Thank you for purchasing this Samsung product.
Installation Guide - Page 2
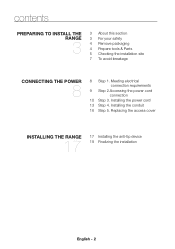
...& Parts 5 Checking the installation site 7 To avoid breakage
CONNECTING THE POWER
8
8 Step 1. Meeting electrical connection requirements
9 Step 2.Accessing the power cord connection
10 Step 3. Installing the power cord 13 Step 4. Installing the conduit 16 Step 5. Replacing the access cover
INSTALLING THE RANGE
17
17 Installing the anti-tip device 19 Finalizing the installation
English - 2
Installation Guide - Page 3
...
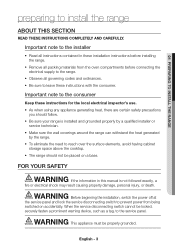
storage space above the cooktop. • The range should not be placed on a base.
FOR YOUR SAFETY
WARNING WARNING
If the information in this manual is not followed exactly, a
fire or electrical shock may result causing property damage, personal injury, or death.
WARNING WARNING
Before beginning the installation, switch the power off at
the service...
Installation Guide - Page 4
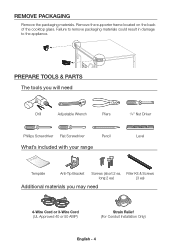
REMOVE PACKAGING
Remove the packaging materials. Remove the supporter frame located on the back of the cooktop glass. Failure to remove packaging materials could result in damage to the appliance.
PREPARE TOOLS & PARTS The tools you will need
Drill
Adjustable Wrench
Pliers
1/4" Nut Driver
Phillips Screwdriver Flat Screwdriver
Pencil
Level
What's included with...
Installation Guide - Page 5
..." 25"
B
6"
A
3"
25"
24"
3"
6"
B
A
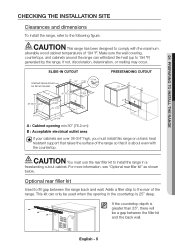
A : Cabinet opening min 30" (76.2 cm) B : Acceptable electrical outlet area
If your cabinets are over 36-3/4" high, you must install this range on a hard, heat resistant support that raises the surface of the range so that it is about even with the countertop.
CAUTION CAUTION
You must use the...
Installation Guide - Page 6
... risk of burns or fire caused by reaching
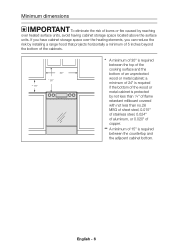
over heated surface units, avoid having cabinet storage space located above the surface units. If you have cabinet storage space over the heating elements, you can reduce the risk by installing a range hood that projects horizontally a minimum of 5 inches beyond the bottom of the cabinets...
Installation Guide - Page 7
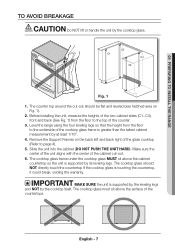
...counter top around the cut-out should be flat and leveled (see hatched area on Fig. 1).
2. Before installing the unit, measure the heights of the two cabinet sides (C1~C4), front and back (See Fig. ...cooktop glass frame under the cooktop glass MUST sit above the cabinet countertop so the unit is supported by its leveling legs. The cooktop glass should NOT directly touch the countertop If the cooktop...
Installation Guide - Page 8
...power
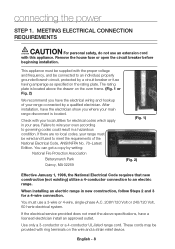
STEP 1. MEETING ELECTRICAL CONNECTION REQUIREMENTS
CAUTION CAUTION
For personal safety, do not use an extension cord
with this appliance. Remove the house fuse or open the circuit breaker before
beginning installation...installation... a copy by...an electric range.
When installing an electric range in new...service provided does not meet the above specifications, have a licensed electrician install...
Installation Guide - Page 9
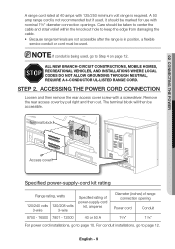
... the edge from damaging the cable. • Because range terminals are not accessible after the range is in position, a flexible
service conduit or cord must be used.
NOTE If conduit is being used, go to Step 4 on page 12.
ALL NEW BRANCH-CIRCUIT CONSTRUCTIONS, MOBILE HOMES, RECREATIONAL VEHICLES, AND INSTALLATIONS WHERE LOCAL CODES DO...
Installation Guide - Page 10
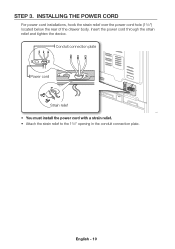
... hole (13/8") located below the rear of the drawer body. Insert the power cord through the strain relief and tighten the device.
Conduit connection plate
Power cord Strain relief
• You must install the power cord with a strain relief. • Attach the strain relief to the 13/8" opening in the conduit connection plate.
English - 10
Installation Guide - Page 11
...THE POWER
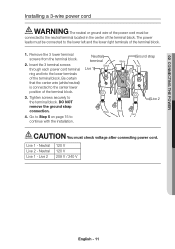
Installing a 3-wire power cord
WARNING WARNING
The neutral or ground wire of the power cord must be
connected to the neutral terminal located in the center of the terminal block. The power
leads...3 lower terminal screws from the terminal block.
2. Insert the 3 terminal screws through each power cord terminal ring and into the lower terminals of the terminal block. Be certain that the ...
Installation Guide - Page 12
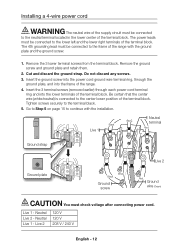
Installing a 4-wire power cord
WARNING WARNING
The neutral wire of the supply circuit must be connected
to the neutral terminal located in the lower center of the terminal block. The power leads
...securely to the terminal black.
5. Go to Step 5 on page 15 to continue with the installation.
Neutral
Black
White
terminal
Red
Live 1
Ground strap
Live 2
Ground plate
White Black
Ground screw...
Installation Guide - Page 13
...POWER
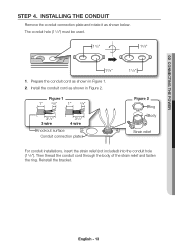
STEP 4. INSTALLING THE CONDUIT
Remove the conduit connection plate and rotate it as shown below. The conduit hole (11/8") must be used.
11/8"
13/8"
13/8"
1. Prepare the conduit cord as shown in Figure 1. 2. Install... surface Conduit connection plate
11/8"
Figure 2 Ring Body
Strain relief
For conduit installations, insert the strain relief (not included) into the conduit hole (11/8"). ...
Installation Guide - Page 14
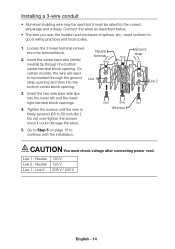
Installing a 3-wire conduit
• Aluminum building wire may be used but it must be rated for the correct...since it could damage the wires.
Black
White
Wire tips
5. Go to Step 5 on page 15 to continue with the installation.
Ground strap
Red
Live 2
Red
CAUTION CAUTION
You must check voltage after connecting power cord.
Live 1 - Neutral Live 2 - Neutral Live 1 - Live 2
120 V 120 V 208 V / ...
Installation Guide - Page 15
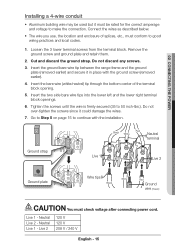
02 CONNECTING THE POWER
Installing a 4-wire conduit
• Aluminum building wire may be used but it must be rated for the correct ... not over-tighten the screws since it could damage the wires.
7. Go to Step 5 on page 15 to continue with the installation.
Black White
Red
Neutral terminal
Ground strap
Live 1
Live 2
Ground plate
Wire tips
White
Black
Red
Ground wire (Green)
CAUTION ...
Installation Guide - Page 17
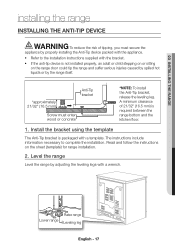
... WARNING
To reduce the risk of tipping, you must secure the
appliance by properly installing the Anti-Tip device packed with the appliance.
• Refer to the installation instructions supplied with the bracket.
• If the anti-tip device is not installed properly, an adult or child stepping on or sitting on the range door could...
Installation Guide - Page 19

... RANGE
FINALIZING THE INSTALLATION
• Move range close enough to the opening to plug into the receptacle. • Slide the range into position ensuring ...forward to insure that the Anti-Tip bracket engages the back
brace and prevents tip-over. • Turn on the electrical power. Check the range for proper operation as described in the
user manual. Anti-Tip bracket Leveling leg
English - 19
Installation Guide - Page 20

Scan the QR code* or visit www.samsung.com/spsn to view our helpful
How-to Videos and Live Shows
*Requires reader to be installed on your smartphone
QUESTIONS OR COMMENTS?
COUNTRY
CALL
U.S.A Consumer Electronics
1-800-SAMSUNG (726-7864)
CANADA
1-800-SAMSUNG (726-7864)
OR VISIT US ONLINE AT
www.samsung.com/us/support
www.samsung.com/ca/support (English) www.samsung.com...