Samsung WA45K7600AW/A2 driver and firmware
Drivers and firmware downloads for this Samsung item
Related Samsung WA45K7600AW/A2 Manual Pages
Download the free PDF manual for Samsung WA45K7600AW/A2 and other Samsung manuals at ManualOwl.com
User Manual - Page 2
... your washer Overview of your washer Basic location requirements Important note to installer Step-by-step installation
Operating instructions
Loading your washer Getting started
Washing a load of laundry
Control panel Cycle overview Options Washing clothes using the option button ATC (Auto Temperature Control) The basics Detergent use Features
Maintaining your washer
Cleaning the exterior Cleaning...
User Manual - Page 4
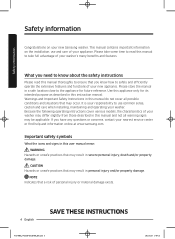
..., caution and care when installing, maintaining and operating your washer. Because the following operating instructions cover various models, the characteristics of your washer may differ slightly from those described in this manual and not all warning signs may be applicable. If you have any questions or concerns, contact your nearest service center or find help...
User Manual - Page 5
...reading this manual, store it in a safe place for future reference. Read all instructions before ...install or store this appliance where it will be exposed to the weather. 7. Do not tamper with the controls. 8. Do not repair or replace any part of the appliance or attempt any servicing unless it is specifically recommended in the user-maintenance instructions or in published userrepair instructions...
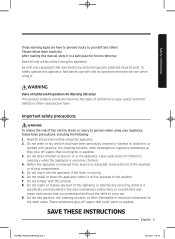
User Manual - Page 6

...power voltage, frequency, and current match the product's specifications.
Failing to do so may result in electric shock or fire. Have this appliance installed by a qualified technician or service...8226; If you plug the power plug into the socket in the opposite direction, the electric wires
within the cable may be damaged and this may...
SAVE THESE INSTRUCTIONS
8",@8",4@&/JOEE
User Manual - Page 7
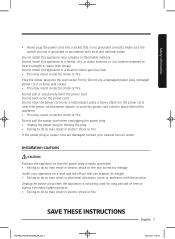
... are damaged, contact your nearest service center.
Installation cautions
CAUTION
Position the appliance so that the power plug is easily accessible. • Failing to do so may result in electric shock or fire due to electric leakage.
Install your appliance on a level and hard floor that can support its weight. • Failing to do so...
User Manual - Page 13
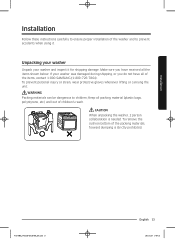
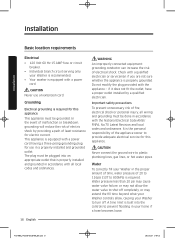
Installation
Installation
Follow these instructions carefully to ensure proper installation of the... washer and to prevent accidents when using it.
Unpacking your washer
Unpack your washer and inspect it for shipping damage. Make sure you have received all the items shown below. If your washer was damaged during shipping, or you do not have all of the items, contact 1-800-SAMSUNG...
User Manual - Page 14
... the washer or the parts, contact a local Samsung customer center or the retailer.
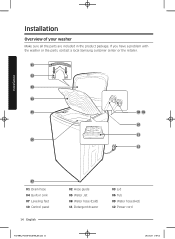
01 02 03 04
05
08 09
10
06
MAX
MAX
11
12
07
01 Drain hose 04 Built-in sink 07 Leveling feet 10 Control panel
14 English
8",@8",4@&/JOEE
02 Hose guide 05 Water Jet 08 Water hose (Cold...
User Manual - Page 15
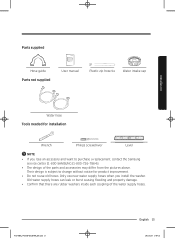
Parts supplied
Hose guide Parts not supplied
User manual
Plastic zip hose tie
Water intake cap
Installation
Water hose Tools needed for installation
Wrench
Philips screwdriver
Level
NOTE
• If you lose an accessory and want to purchase a replacement, contact the Samsung service center (1-800-SAMSUNG (1-800-726-7864)).
• The design of the parts and accessories may...
User Manual - Page 16
...appliance is equipped with a power cord having a three-prong grounding plug for use in a properly installed and grounded outlet. The... responsibility of the appliance owner to provide adequate electrical service for this appliance.
CAUTION
Never connect the ground wire... what your Washer controls allow, causing your Washer to turn off. A time limit is built into the controls to prevent flooding...
User Manual - Page 17
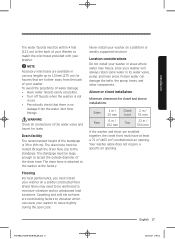
... tile surfaces are contributing factors to vibration which can cause your washer to move slightly during the spin cycle.
Never install your washer on a platform or weakly supported structure.
Location considerations Do not install your washer in areas where water may freeze, since your washer will always retain some water in its water...
User Manual - Page 18
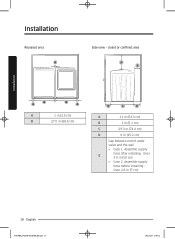
....3 cm)
B
2 in (5.1 cm)
C
29.3 in (74.4 cm)
D
6 in (15.2 cm)
Gap between end of water
valve and the wall
• Case 1. Assemble supply
E
hose after installing : Over 3.9 in (10 cm).
• Case 2. Assemble supply
hose before...
User Manual - Page 19
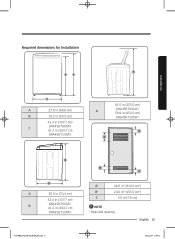
Required dimensions for Installation
A
B
C
Installation
A
A
27.0 in (68.6 cm)
B
39.2 in (99.5 cm)
42.4 in (107.7 cm)
C
(WA45K7600A*) 41.2 in (104.7 cm
(WA45K7100A*)
61.0 in (155.0 cm)
A
(WA45K7600A*) 59.8 in (...
User Manual - Page 20
...
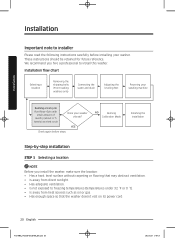
Please read the following instructions carefully before installing your washer. These instructions should be retained for future reference. We recommend you hire a professional to install this washer.
Installation flow chart
Selecting a location
Removing the shipping bolts (Front loading washers only)
Connecting the water and drain
Adjusting the leveling feet
Powering your washing machine...
User Manual - Page 21
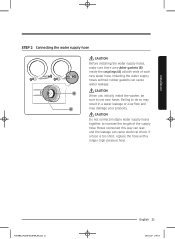
..., make sure there are rubber gaskets (B) inside the couplings (A) at both ends of each new water hose. Installing the water supply hoses without rubber gaskets can cause water leakage.
CAUTION
B
When you initially install the washer, be
sure to use new hoses. Failing to do so may
result in a water leakage or...
User Manual - Page 22
Installation
Installation
A
B
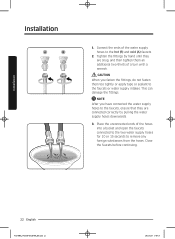
1. Connect the ends of the water supply hoses to the hot (B) and cold (A) faucets.
2. Tighten the fittings by hand until they are snug, and then ...
User Manual - Page 23
..., connect both the hot and cold water faucets. If either or both are not connected, an "4C" (no fill) code can be displayed.
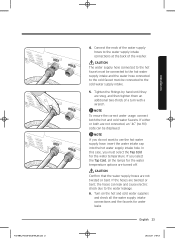
NOTE If you do not want to use the hot water supply hose, insert the water intake cap into the hot water supply intake hole...Turn on the hot and cold water supplies
and check all the water supply intake connections and the faucets for water leaks.
English 23
Installation
User Manual - Page 24
Installation
Installation
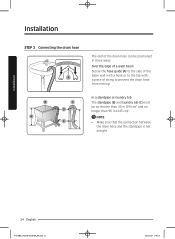
STEP 3 Connecting the drain hose
A
B
*
C D
E
The end of the drain hose can be positioned in three ways: Over the edge of a wash basin Secure the hose guide (A) to the side of the basin wall with a hook or to the tap with a piece of string to prevent the drain hose from moving.
In...
User Manual - Page 25
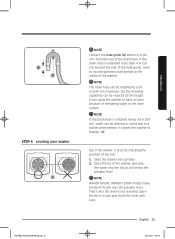
...than 4 in (10 cm) beyond the end of the hose guide, mold or microorganisms could spread to the inside of the washer.
NOTE The drain hose can be installed to a 96 in (245 cm) maximum, but the draining...the drain system.
NOTE If the drain hose is installed below 39 in (99 cm), water can be drained in cycles due to a siphon phenomenon. It causes the washer to display "4C".
See if the washer is level by...
User Manual - Page 26
... or counterclockwise as necessary.
NOTE
Turn the front leveling feet clockwise (B) to lower the washer, and counterclockwise (C) to raise the washer.
Installation
B
C
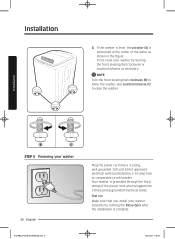
STEP 5 Powering your washer
26 English
8",@8",4@&/JOEE
Plug the power cord into a 3-prong, well grounded 120 volt 60 Hz approved electrical outlet protected by a 15-amp fuse or comparable circuit breaker...
User Manual - Page 27

...cycle as follows to check if your washer is properly installed. 1. Load about 6 pounds of laundry into the tub. 2. Press Power to turn on your washer. 3. Select Rinse+Spin ...on page 25 for instructions.
STEP 7 Calibration Mode
Your Samsung washer detects the laundry weight automatically. For more accurate weight detection, please run Calibration Mode after the installation. To run Calibration Mode...