Samsung WF45K6200AW/A2 driver and firmware
Drivers and firmware downloads for this Samsung item

Related Samsung WF45K6200AW/A2 Manual Pages
Download the free PDF manual for Samsung WF45K6200AW/A2 and other Samsung manuals at ManualOwl.com
User Manual - Page 2
...
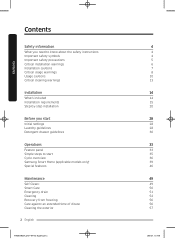
What's included Installation requirements Step-by-step installation
Before you start
Initial settings Laundry guidelines Detergent drawer guidelines
Operations
Feature panel Simple steps to start Cycle overview Samsung Smart Home (applicable models only) Special features
Maintenance
Self Clean+ Smart Care Emergency drain Cleaning Recovery from freezing Care against an extended time of disuse...
User Manual - Page 4
..., caution, and care when installing, maintaining and operating your washer. Because the following operating instructions cover various models, the characteristics of your washer may differ slightly from those described in this manual and not all warning signs may be applicable. If you have any questions or concerns, contact your nearest service center or find help...
User Manual - Page 5
... is moving.
6. Do not install or store this appliance where it will be exposed to the weather.
7. Do not tamper with controls.
8. Do not repair or replace any part of the appliance or attempt any servicing unless specifically recommended in the user-maintenance instructions or in published user repair instructions that you understand and have...
User Manual - Page 6
...The installation of this appliance must be performed by a qualified technician or service ...with other appliances, using a power strip, or extending the
power cord may result in electric ...power plug into the socket in the opposite direction, the electric wires
within the cable... the appliance, power plug, or power cord is damaged, contact your nearest Samsung service center for service.
This appliance ...
User Manual - Page 7
... power the washer. • This may result in electric shock or fire. Do not use a damaged power plug, damaged power cord...fire. Do not pull the power cord when unplugging the power plug. • Unplug the power plug by pulling the plug...power plug, the water supply taps, and the drain pipes are accessible.
Installation cautions
CAUTION
This appliance should be positioned in such a way that the power...
User Manual - Page 8
...Install your appliance on a solid, level floor that can support its weight. • Failure to do so may result in abnormal vibrations, movement, noise, or problems with
the product.
Critical usage warnings
WARNING If the appliance is flooded, turn off the water and power supplies immediately and contact your nearest Samsung service....
SAVE THESE INSTRUCTIONS
8 English
8',"7 JOEE
User Manual - Page 14
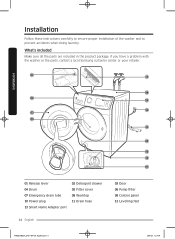
... a problem with the washer or the parts, contact a local Samsung customer center or your retailer.
01 13
08 02
09
10 03 04
11
05
06 12 07
01 Release lever 04 Drum 07 Emergency drain tube 10 Power plug 13 Smart Home Adapter port
02 Detergent drawer 05 Filter cover 08 Worktop 11...
User Manual - Page 15
...)
Installation
Tie straps
Water hoses (sold separately)
Smart Home Adapter (sold separately)
NOTE
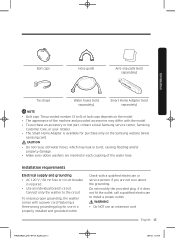
• Bolt caps: The provided number (3 to 6) of bolt caps depends on the model. • The appearance of the machine and provided accessories may differ with the model. • To purchase an accessory or lost part, contact a local Samsung service center, Samsung...
User Manual - Page 16
Installation
Installation
• Use only the power...ordinances. It is your responsibility to provide adequate electrical service for your washer.
Water supply Proper water pressure for...the water valve and taps for any leaks.
Drain Samsung recommends a standpipe 18 in (46 cm) high. ...Do NOT install the washer on a platform or a poorly supported structure.
Water temperature Do not install the washer...
User Manual - Page 17
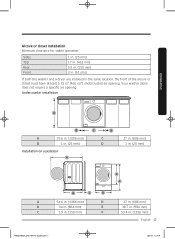
...150 mm) 2 in. (51 mm)
If both the washer and a dryer are installed in the same location, the front of the alcove or closet must have at least...(465 cm²) unobstructed air opening. Your washer alone does not require a specific air opening.
Undercounter installation
Installation
A
B
A
39.6 in. (1006 mm)
B
1 in. (25 mm)
Installation on a pedestal
A
C
D
C D
27 in. (686 mm) 1 in. (25 mm)...
User Manual - Page 18
Installation
Installation
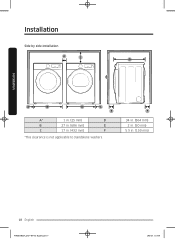
Side by side installation
A
C
D
A
B
B
A
E
A*
1 in. (25 mm)
D
B
27 in. (686 mm)
E
C
17 in. (432 mm)
F
*This clearance is not applicable to standalone washers.
F
34 in. (864 mm) 2 in. (50 mm)
5.9 in. (150 mm)
18 English
8',"7 JOEE
User Manual - Page 19
Installation
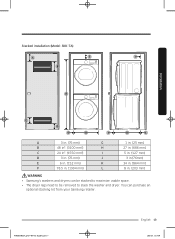
Stacked installation (Model: SKK-7A)
A
E
I
B
F
C
D
G
H
J
K
L
A
3 in. (76 mm)
G
B
48 in². (3100 mm²)
H
C
24 in². (1550 mm²)
I
D
3 in. (76 mm)
J
E
6 in. (152 mm)
K
F
78.5 in. (1994 mm)
L
1 in. (25 mm) 27 in. (686 mm) 5 in. (127 mm)
3 in.(76mm) 34 in. (864 mm) 8 in. (203 mm)
WARNING • Samsung's washers...
User Manual - Page 20
Installation
Installation
Step-by-step installation
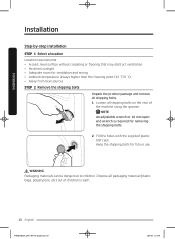
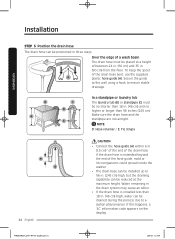
STEP 1 Select a location Location requirements: • A solid, level surface without carpeting or flooring that may obstruct ventilation • No direct sunlight • Adequate room for ...
User Manual - Page 21
Installation
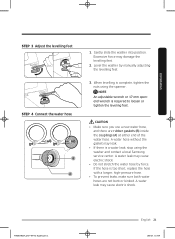
STEP 3 Adjust the levelling feet
STEP 4 Connect the water hose
B A
1. Gently slide the washer into position. Excessive force may damage the levelling feet.
2. Level the washer by manually adjusting the.... • If there is a water leak, stop using the washer and contact a local Samsung service center. A water leak may cause electric shock. • Do not stretch the water hose by...
User Manual - Page 22
Installation
A
B
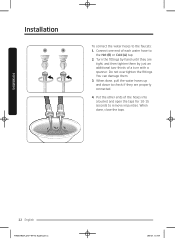
To connect the water hoses to the faucets: 1. Connect one end of each water hose to
the Hot (B) or Cold (A) tap. 2. Turn the fittings by ....
4. Put the other ends of the hoses into a bucket and open the taps for 10-15 seconds to remove impurities. When done, close the taps.
Installation
22 English
8',"7 JOEE
User Manual - Page 23
Installation
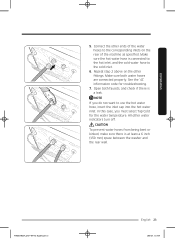
5. Connect the other ends of the water hoses to the corresponding inlets on the rear of the machine as specified. Make sure the hot water ...
User Manual - Page 24
Installation
Installation...drain hose bent, use the supplied
A
plastic hose guide (A). Secure the guide
to the wall using a hook to ensure stable
...English
CAUTION
• Connect the hose guide (A) within 6 in. (15 cm)* of ...guide, mold or microorganisms could spread inside the washer.
• The drain hose can be installed...
• If the drain hose is installed less than 18 in. (46 cm...
User Manual - Page 25
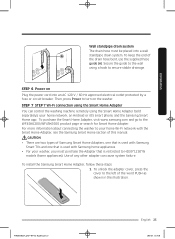
... circuit breaker. Then, press Power to turn on the washer.
STEP 7 STEP 7 Wi-Fi connection using the Smart Home Adapter
You can control the washing machine remotely using the Smart Home Adapter (sold separately), your home network, an Android or iOS smart phone, and the Samsung Smart Home app. To purchase the Smart Home Adapter, visit www.samsung.com and go to...
User Manual - Page 39

... is subject to change without notice.
Samsung account
Operations
Android
iOS
You are required to register your Samsung account to use the app. If you don't have a
Samsung account, follow the app's onscreen instructions to create a free Samsung account.
Getting started 1. Turn on your Washer. 2. Insert the SmartHome Adapter into the cSmart Home Adapter port of your washing
machine. 3. Run...
User Manual - Page 50
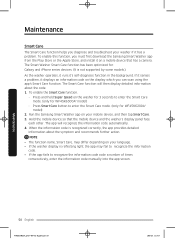
... install it on a mobile device that has a camera. The Smart Washer Smart Care function has been optimized for: Galaxy and iPhone series devices. (It is not supported by some models.)
As the washer operates, it runs it's self-diagnosis function in the background. If it senses a problem, it displays an information code on the display which you can scan...