Samsung YP-T9JQU - 2 GB, Digital Player driver and firmware
Drivers and firmware downloads for this Samsung item


Related Samsung YP-T9JQU Manual Pages
Download the free PDF manual for Samsung YP-T9JQU and other Samsung manuals at ManualOwl.com
User Manual (ENGLISH) - Page 4

...
Basic Information 6 Components 6 Screen Display Information 9 Button Functions 10
Charging the battery 11 Basic Use 12
Chapter 2. Loading Your Desired File
Loading Your Desired File 16 Installing Samsung Media Studio 16 Connecting to your PC 17 Adding Folders/Files in Samsung Media Studio 18 Transferring Files to the Player with Samsung Media Studio 20
4
Chapter 3. Multimedia...
User Manual (ENGLISH) - Page 6

Basic Information
Components
Checking the Accessories
Player
Earphones AH30-00087D
USB Cable AH39-00899A
Installation CD AH80-00138A
s Design of accessories is subject to change for the purpose of improvement, without notice.
6
User Manual (ENGLISH) - Page 16

... to the player.
Before you start! Insert the installation CD provided with the player into the CD-ROM drive of your PC.
1 Click .
2 Click . s Media Studio installation starts. s An icon is created on the desktop after installation is complete and Media Studio starts.
The T9 gives you freedom! - Fill up your T9 now, free! - Get Unlimited Downloads - Choose from...
User Manual (ENGLISH) - Page 17

... screen display of the player.
s If you connect the player through a USB hub, the connection may be unstable. Please connect the CAUTION player to the computer directly.
PC Requirements
For use in conjunction with your PC, the following is required:
s Pentium 300MHz or higher
s 100MB of free hard disc space
s USB Port 2.0
s CD Rom Drive (2X or higher)
s Windows XP Service Pack...
User Manual (ENGLISH) - Page 19

Chapter 2. Loading Your Desired File Adding Folders/Files in Samsung Media Studio
Before you start! s Connect the player to your PC. s Media Studio must be installed on your PC.
1 Media Studio will automatically start when the player is connected to your PC.
s If the program does not start automatically, double Click the Media Studio icon on...
User Manual (ENGLISH) - Page 20

Loading Your Desired File
Transferring Files to the Player with Samsung Media Studio
Perform the following steps to transfer files from your PC to the player.
2 [YP-T9[MTP]] [YP-T9] 3
4
Portable window
NOTE
s Music recognition technology and related data are provided by Gracenote and Gracenote CDDB® Music Recognition ServiceSM.
s CDDB is a registered trademark of Gracenote. The...
User Manual (ENGLISH) - Page 21

Chapter 2. Loading Your Desired File Transferring Files to the Player with Samsung Media Studio
Before you start! s Connect the player to your PC. s Media Studio must be installed on your PC.
1 Media Studio will automatically start when the player is connected to your PC.
s If the program does not start automatically, double click the Media Studio icon...
User Manual (ENGLISH) - Page 25

... for language learning.
Audio Track 1 00:01:42
00:05:06
To set a section to repeat
1 Play a file of your choice.
2 Press the [A B/ ] button at the beginning of the section you want to repeat.
s The starting point is set and will appear in the screen display window.
3 Press the [A B/ ] button again to set the
2,3
ending of...
User Manual (ENGLISH) - Page 26

Listening to Music
Creating a Playlist Using Samsung Media Studio
A playlist is a list of your favorite songs.
1
[YP-T9[MTP]]
3 3
2
1 Click on the top of Media Studio. s The window appears.
2 Click on the bottom. s The Creation window appears.
3 Type in the album title and click .
26
s A new album (playlist) will be created and stored in the...
User Manual (ENGLISH) - Page 27

... Creating a Playlist Using Samsung Media Studio
Adding Music files to a Playlist
1
3
2
5
s A maximum of 999 playlists
NOTE
transferred to the player can be played.
1 Click on the top of Media Studio. s The My PC window appears. Click on to the right.
2 Click in the right corner of the window.
s The My Album window appears.
3 Double click...
User Manual (ENGLISH) - Page 38

...! Connect the earphones, then turn on the player, and check the battery.
1 Press the [
] button to select and
then press the [ ] button.
s The photo preview window appears.
2 Press the [
] button to select the desired
photo and then press the [ ] button.
s The selected photo is displayed.
To move to the previous/next photo
Press...
User Manual (ENGLISH) - Page 39

Chapter 3. Multimedia Function Photo Viewing
Photo Display Window
Photo
1
3
1 Preview Pane 2 File Name 3 Thumbnails 4 The current file number/total number of photos
2
test0
1/20
4
Slideshow Viewing
Start Slideshow Zoom As Music Backgr..
1 Press ...
User Manual (ENGLISH) - Page 45

... a text.
2 Press the [
] button to select and
then press the [ ] button.
s The Confirmation window will appear.
3 Press the [ ] button to select and press the
[ ] button.
s This will move to the first... page of the text file.
To set the scroll option
Go to 1st Page Bookmark Scroll By Text Viewer Type Text Viewer Color
1 Press the [MENU...
User Manual (ENGLISH) - Page 49

... appear.
3 Press the [
] button to select and then press the
[ ] button.
s The window will appear and up to 30 frequencies will be set automatically.
To cancel during setting
To cancel the setting, press the [ ] button. s The auto preset setting is canceled and frequencies set up to then are
stored.
s If is selected after presets have already...
User Manual (ENGLISH) - Page 51

Chapter 3. Multimedia Function Setting a Frequency/ To Delete Presets
Listening to FM Radio
To Delete Presets
Before ...Press the [
] button to select the frequency that you
want to remove from the PRESET list and press the [ ]
button.
s The Delete Preset window will appear.
4 Press the [
] button to select and press
the [ ] button.
s The selected preset number will be deleted.
s If you...
User Manual (ENGLISH) - Page 53

...3
and [ ] buttons to set your recording options.
2 Press the [
] button to select the desired
recording mode and press the [ ] button.
s The appropriate window appears.
3 Press the [A B/ ] button. s Recording starts and the file name is displayed.
Chapter 3. Multimedia Function Using FM Radio menu/ Recording
s : you can make a voice recording.
s : you can record the FM radio broadcast you...
User Manual (ENGLISH) - Page 62

.../Time Setting
Time
Date/Time Set Sleep LCD Off Auto Power Off Screen Saver
1 Press the [
] button to select and
then press the [ ] button.
2 Press the [
] button to move to and press the [
] to set it.
Date/Time Set
AM/PM Hour Min
AM
3
8
Year 2006
Month Date
5
19
3 Press the [ ] button.
s The Confirmation window will...
User Manual (ENGLISH) - Page 65
... maximum volume level up to 20. The maximum volume level when Volume Limit is set to is 40.
s : Returns all settings to the default value. Select from and . √ Page 66
s : Indicates the remaining memory capacity. indicates the usage, indicates the remaining capacity and indicates the total memory capacity.
s : Displays the current firmware version.
65
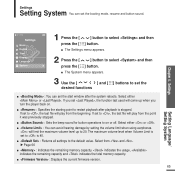
Setting Language/ Setting System
User Manual (ENGLISH) - Page 66

... Booting Mode Resume Button Sound Default Set Memory Firmware Version
Press the [ ] button to select either or and then press the [ ] button. s : Initializes all settings to default (original factory settings). s : Cancels default settings.
s Regarding the Built-In Memory NOTE The actual built-in memory available is slightly less than indicated as the internal firmware uses a portion
of the...
User Manual (ENGLISH) - Page 67

... vary, depending on the sound mode and display setting.
s Product life may be shortened when left for extended periods in low or high temperatures.
Please check if your PC requirements are met.
Press on the toolbar of your PC to run Windows Update. Select Key Updates and Service Packs, then update all. Reboot your PC and reconnect...