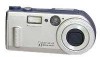
Sony DSC P1 - 3.2MP Digital Camera driver and firmware
Drivers and firmware downloads for this Sony item
Related Sony DSC P1 Manual Pages
Download the free PDF manual for Sony DSC P1 and other Sony manuals at ManualOwl.com
Operating Instructions - Page 2
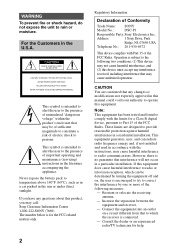
... have any questions about this product, you may call: Sony Customer Information Center 1-800-222-SONY (7669) The number below is for the FCC related matters only.
Regulatory Information
Declaration of Conformity
Trade Name: SONY
Model No.:
DSC-P1
Responsible Party:Sony Electronics Inc.
Address:
1 Sony Drive, Park
Ridge, NJ, 07656 USA
Telephone No.: 201-930-6972
This device complies with...
Operating Instructions - Page 4
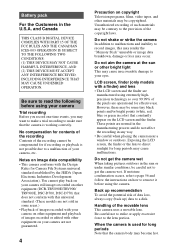
... moisture condensation occurs, refer to page 56 and follow the instructions on how to remove it before using the camera.
Back up recommendation To avoid the potential risk of data loss, always copy (back up) data to a disk.
Handling of the movable lens This camera uses a movable lens. Be careful not to strike or apply...
Operating Instructions - Page 5
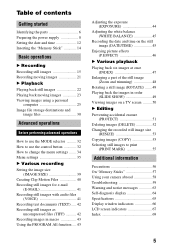
... started
Identifying the parts 6 Preparing the power supply 8 Setting the date and time 12 Inserting the "Memory Stick 14
Basic operations
B Recording
Recording still images 15 Recording moving images 21
B Playback
Playing back still images 22 Playing back moving images 23 Viewing images using a personal
computer 25 Image file storage destinations and
image files 30
Advanced operations...
Operating Instructions - Page 6

... while recording. E Flash (20) F Photocell window for flash
Do not block while recording.
G Tripod receptacle (bottom surface) Use a tripod with a screw length of less than 9/32 inch (6.5 mm). You will be unable to firmly secure the camera to tripods having longer screws, and may damage the camera.
H Finder window
I Self-timer/ recording lamp (only during recording moving images)
J Display window...
Operating Instructions - Page 8
...power supply
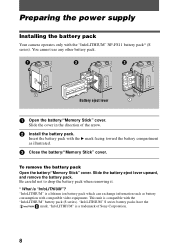
Installing the battery pack
Your camera operates only with the "InfoLITHIUM" NP-FS11 battery pack* (S series). You cannot use any other battery pack.
Battery eject lever
1 Open the battery/"Memory Stick" cover.
Slide the cover in the direction of the arrow.
2 Install...pack (S series). "InfoLITHIUM" S series battery packs have the
mark. "InfoLITHIUM" is a trademark of Sony Corporation.
8
Operating Instructions - Page 9
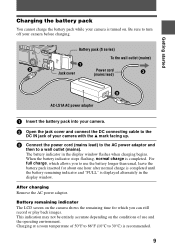
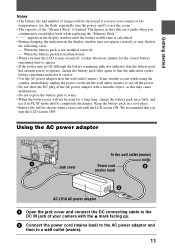
... and connect the DC connecting cable to the
DC IN jack of your camera with the v mark facing up.
3 Connect the power cord (mains lead) to the AC power adaptor and
then to a wall outlet (mains). The battery indicator in the display window flashes when charging begins. When the battery indicator stops flashing, normal charge is completed. For...
Operating Instructions - Page 11
... decreased if you use your camera at low
temperatures, use the flash, repeatedly turn the power on/off or use the zoom. • The capacity of the "Memory Stick" is limited. The figures in the table are a guide when you
continuously record/play back while replacing the "Memory Stick appears in the display window until the battery usable time...
Operating Instructions - Page 25
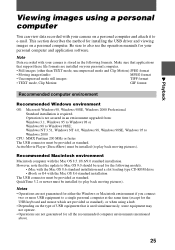
... describes the method for installing the USB driver and viewing images on a personal computer. Be sure to also see the operation manuals for your personal computer and application software.
Note
Data recorded with your camera is stored in the following formats. Make sure that applications
that support these file formats are installed on your personal computer.
• Still images (other...
Operating Instructions - Page 26
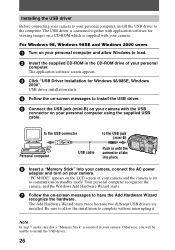
... in the CD-ROM drive of your personal
computer. The application software screen appears.
3 Click "USB Driver Installation for Windows 98/98SE, Windows
2000". USB driver installation starts.
4 Follow the on-screen messages to install the USB driver.
5 Connect the USB jack (mini-B) on your camera with the USB
connector on your personal computer using the supplied USB cable.
to the USB connector
to...
Operating Instructions - Page 27
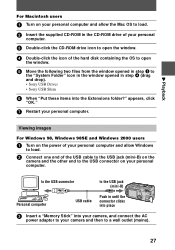
... and drop). • Sony USB Driver • Sony USB Shim
6 When "Put these items into the Extensions folder?" appears, click
"OK."
7 Restart your personal computer.
Viewing images
For Windows 98, Windows 98SE and Windows 2000 users
1 Turn on the power of your personal computer and allow Windows
to load.
2 Connect one end of the USB cable to the USB jack (mini-B) on the
camera and the other...
Operating Instructions - Page 28
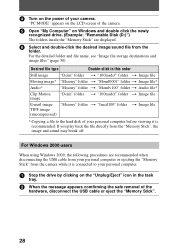
... power of your camera.
"PC MODE" appears on the LCD screen of the camera.
5 Open "My Computer" on Windows and double click the newly
recognized drive. (Example: "Removable Disk (D:)") The folders inside the "Memory Stick" are displayed.
6 Select and double-click the desired image/sound file from the
folder. For the detailed folder and file name, see "Image file storage...
Operating Instructions - Page 29
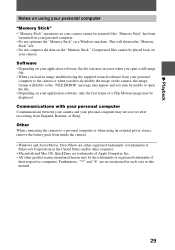
... • Depending on your application software, only the first frame of a Clip Motion image may be displayed.
Communications with your personal computer Communications between your camera and your personal computer may not recover after recovering from Suspend, Resume, or Sleep.
Other When connecting the camera to a personal computer or when using an external power source, remove the battery pack...
Operating Instructions - Page 30
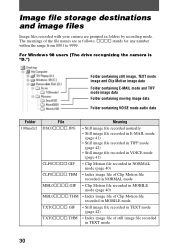
Image file storage destinations and image files
Image files recorded with your camera are grouped in folders by recording mode. The meanings of the file names are as follows. ssss stands for any number within the range from 0001 to 9999.
For Windows 98 users (The drive recognizing the camera is "D.")
Folder containing still image, TEXT mode image...
Operating Instructions - Page 49
... a personal
computer, the image rotation information may not be reflected depending on the application software. • You cannot rotate protected or uncompressed images, Clip Motion images or images recorded in TEXT mode.
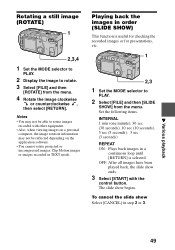
Playing back the images in order (SLIDE SHOW)
This function is useful for checking the recorded images or for presentations, etc.
1
2,3
1 Set the...
Operating Instructions - Page 57
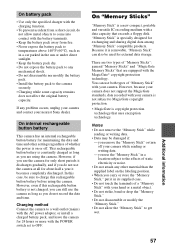
...) with the AC power adaptor, or install a charged battery pack, and leave the camera for 24 hours or more with the POWER switch set to OFF.
On "Memory Sticks"
"Memory Stick" is a new compact, portable and versatile IC recording medium with a data capacity that exceeds a floppy disk. "Memory Stick" is specially designed for exchanging and sharing digital data among "Memory Stick" compatible...
Operating Instructions - Page 60

... other equipment that uses strong magnets. t Move your camera away from the TV, etc.
• You are shooting a subject with a light source behind the subject. t Adjust the exposure (page 43). t Adjust the brightness of the LCD screen (page 38).
• The flash is set to . t Set the flash to auto (no indicator), or (page 20).
•...
Operating Instructions - Page 61
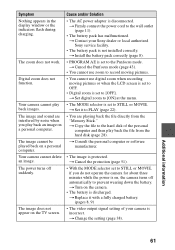
.... t Contact your Sony dealer or local authorized Sony service facility.
• The battery pack is not installed correctly. t Install the battery pack correctly (page 8).
• PROGRAM AE is set to the Panfocus mode. t Cancel the Panfocus mode (page 43).
• You cannot use zoom to record moving pictures.
• You cannot use digital zoom when recording moving pictures or...
Operating Instructions - Page 64
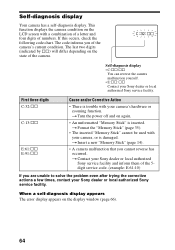
... of the camera.
Self-diagnosis display • C:ss:ss
You can reverse the camera malfunction yourself. • E:ss:ss Contact your Sony dealer or local authorized Sony service facility.
First three digits C:32:ss
C:13:ss
E:61:ss E:91:ss
Cause and/or Corrective Action
• There is trouble with your camera's hardware or zooming function. t Turn the power off...
Operating Instructions - Page 66
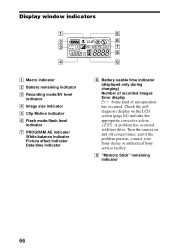
... charging) Number of recorded images Error display : Some kind of misoperation has occurred. Check the selfdiagnosis display on the LCD screen (page 64) and take the appropriate corrective action. : A problem has occurred with lens drive. Turn the camera on and off several times, and if the problem persists, contact your Sony dealer or authorized Sony service facility.
I "Memory Stick" remaining...
Operating Instructions - Page 69
... flash 20 RESIZE 53
S SECAM system 58 Self-diagnosis display ......64 Setting date and time .......12 SHARPNESS 37 Single mode 34 SLIDE SHOW 49 Still images
playback 22 recording 15
T TEXT 42 TIFF 42 TV color system 58
U USB 26 Using the self-timer .........19 Using your camera
abroad 58
V Viewing images
on a TV screen 50 using a personal computer...