Sony FWD-50PX2 driver and firmware
Related Sony FWD-50PX2 Manual Pages
Download the free PDF manual for Sony FWD-50PX2 and other Sony manuals at ManualOwl.com
Brochure - Page 2

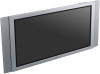
FWD-50PX2
Plasma Display
specifications
Screen Size: 50.0" Audio Power Output: 14W Total (7Wx2 Digital
AMP) Cable Management System: Yes On Screen Controls: Yes Wall/Arm Mount: Yes (capable) Multiple Language Display: English, French,
Spanish, Italian, German, Japanese, Dutch, Swedish, Russian, Chinese Picture and Picture: Yes Picture-in-Picture: Yes Color Systems: NTSC, PAL, SECAM, NTSC4.43, ...
User Manual - Page 2

... the U.S.A.
If you have any questions about this product, you may call; Sony Customer Information Services Center 1-800-222-7669 or http://www.sony.com/
Declaration of Conformity
Trade Name:
SONY
Model:
FWD-50PX2/50PX2A
Responsible Party: Sony Electronics Inc.
Address:
16450 W. Bernardo Dr,
San Diego, CA 92127 U.S.A.
Telephone Number: 858-942-2230
This device complies with Part 15 of...
User Manual - Page 5

...video or imaging software to provide ...Remote Commander or from the function buttons on the unit for a certain period of time after the unit has been switched ON/ STANDBY. After one of these operations, wait about 10 seconds before entering a command.
On cleaning • Be sure to unplug the power cord before cleaning the
display...questions on this unit, contact your authorized Sony dealers.
5 (GB)
User Manual - Page 7

... Section" on page 8 (GB).
2 Control button section For details on the control button section, see "Control Button Section (Top)" on page 8 (GB).
3 SPEAKER Socket Connects the speakers (not supplied) to this socket to output the audio matching the signal displayed on the screen.
4 - AC IN socket Connect the supplied AC power cord to this socket and...
User Manual - Page 8
... Controls
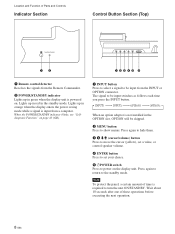
Indicator Section
Control Button Section (Top)
12
12345 6
1 Remote control detector Receives the signals from the Remote Commander.
2 POWER/STANDBY indicator Lights up in green when the display unit is powered on. Lights up in red in the standby mode. Lights up in orange when the display enters the power saving mode while a signal is input from a computer. When the POWER...
User Manual - Page 10

.../output (such as BKMFW10, BKM-FW11, BKM-FW12) as well as optional adaptors with network management capability (such as BKM-FW32, BKM-FW50). These adaptors allow you to control the display unit via the network.
8 OPTION2 (VIDEO) slot This slot supports video signals. A blank panel is attached to this slot when shipped from the factory...
User Manual - Page 12

Location and Function of Parts and Controls
7 PICTURE button Selects Picture mode. Each press toggles between Vivid, Standard, and User 1 to 3.
8 ASPECT button Press to change the aspect ratio.
9 M/m/
User Manual - Page 13

... Front
25 (9 7/8)
10
10
(4)
(4)
Side
25 (9 7/8) 5 (2)
Units: cm (inches)
When mounting the display vertically Front
20 (7 7/8)
25 (9 7/8)
Side
10 (4)
25 (9 7/8)
Make sure that the 1 POWER switch is at the lower position.
5 (2)
Units: cm (inches)
Note
When moving or installing the display when it is attached to the stand (not supplied), do so with at...
User Manual - Page 16

...
Menu operating buttons
Use the buttons on the display unit or the Remote Commander for menu operations.
Remote Commander
MENU
Control button section
ENTER
Operation of the unit is explained in these operating instructions for the case of operation using the Remote Commander. The M/m and ENTER buttons on the Remote Commander have the same functions as the...
User Manual - Page 20

...Model Name: Serial Number: Operation Time: Software Version:
Software Version Indicates the system software version.
IP Address Setup
Sets an IP address for communication between the display unit and an optional adaptor with network management capability (such as BKM-FW32, BKMFW50).
DHCP: Automatically obtain an IP address. Manual: Manually configure an IP address. For details, see "Setting an IP...
User Manual - Page 24

... a DVD signal to the display unit, adjust the "Chroma" setting in the Adjust Picture menu.
• When the phase is readjusted, the resolution will be reduced.
• The signals from the Macintosh computer will not be guaranteed for recognizing the digital RGB input.
• You cannot input the signal indicated with * to DVI IN.
• The...
User Manual - Page 25

... of the location where the unit is installed.
1 Press MENU.
The main menu appears on the screen.
PICTURE/SOUND CONTROL
Picture Mode: Adjust Picture Adjust Sound
Standard
Select
Set ENTER
Exit MENU
2 Press M/m to move the cursor (yellow) to
"PICTURE/SOUND CONTROL" and press ENTER. The PICTURE/SOUND CONTROL menu appears on the screen.
PICTURE...
User Manual - Page 28

...Zoom
Hey! How ya doing?
• Images from a video camera or DVD software with aspect ratio information (ID-1 type)
Images are enlarged to full...CONTROL" and press ENTER. The SCREEN CONTROL menu appears on the screen.
SCREEN CONTROL
Multi Display Setup Wide Setup Aspect: Adjust Screen Over Scan:
Wide Zoom On
Select
Set ENTER
Exit MENU
3 Press M/m to move the cursor (yellow) to "Wide
Setup...
User Manual - Page 35

Adjusting the Sound Quality
When a speaker SS-SP50FW (not supplied) is installed, you can adjust sound treble level, bass level, or balance of the speaker (left and right) volume. The surround mode can also be set.
Adjusting the Treble, Bass, and Balance, etc.
Press MENU to show the main menu and adjust "Treble...
User Manual - Page 42

..., BKM-FW50) is installed in the OPTION1 slot of this unit, the display can be controlled via a network. To use this capability, set the IP address and communication speed as follows.
Note
Setting of an IP address and a communication speed is completed by selecting "Execute" and pressing ENTER. When the setting is not completed properly, an error code will be...
User Manual - Page 44

....
CUSTOM SETUP
Power Saving: Speaker Out: Closed Caption: Display: Color Matrix: HD Mode: RGB Mode: Sync Mode: Remote Input Setting:
Standard Off Off Off Y/PB/PR 1080i DTV H/Comp
Selectable
Select
Set ENTER
Exit MENU
3 Select "Remote" with M/m and press ENTER.
The Remote menu appears on the screen.
CUSTOM SETUP Remote
Index Number: Control Mode:
1 Display + Remote
Select
Set ENTER
Exit...
User Manual - Page 45

....
A protective shutdown has activated due to internal heat buildup in the display. In this case, the power indicator flashes red four times in a row.
Remedy
Try pressing one of the input selection buttons (INPUT1, INPUT2, OPTION1, or OPTION2) once or twice on the remote control.
In this case, also check Troubleshooting problem 9.
Or, switch between...
User Manual - Page 46

..." function has been set.
Check the On/Off Timer setting in the TIMER/CLOCK menu.
For details on the "On/Off Timer" function, see "On/Off Timer Function" on page 38 (GB).
A protective shutdown has activated due to internal heat buildup in the display.
In this case, the power indicator flashes red four times in...