TRENDnet TV-IP762IC driver and firmware
Drivers and firmware downloads for this TRENDnet item
Related TRENDnet TV-IP762IC Manual Pages
Download the free PDF manual for TRENDnet TV-IP762IC and other TRENDnet manuals at ManualOwl.com
User Guide - Page 2
...
Step 1: LAN Settings 31 Step 2: Internet Settings 31 Step 3: DDNS Settings 32 Step 4: Camera Name Settings 32 Step 5: Time Settings 32 Step 6: Setup Complete 35 System...35
© Copyright 2013 TRENDnet. All Rights Reserved.
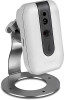
TV-IP762IC
Admin ...36 Time and Date 37 Network ...38 Network...39 Wireless Setup 40 Dynamic DNS 40 Cloud Setting 41 Cloud Status 41 Audio/Video ...41 Audio and...
User Guide - Page 3
TRENDnet User's Guide
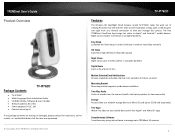
Product Overview
TV-IP762IC Package Contents
TV-IP762IC Multi-Language Quick Installation Guide CD-ROM (Utility, Software & User's Guide) Network cable (1.8m / 6ft) Power adapter (5V DC, 1A) Camera mounting kit If any package contents are missing or damaged, please contact the retail store, online retailer, or reseller/...
User Guide - Page 5

...'s Guide
Wall mount installation
To wall mount the camera, please following the steps below. Use the pencil to mark the three holes of the plate on the wall. Drill the holes Attached the camera to the plate Use the supplied screws to secure the camera stand to the wall.
Application Diagram
TV-IP762IC...
User Guide - Page 6

TRENDnet User's Guide
Using the Autorun Wizard
The Autorun supports both Windows & Mac operating systems. Insert the Installation CD-ROM into your computer's CD-ROM drive to initiate the Autorun program. The Autorun Wizard program will run automatically.
For Windows users: If the autorun wizard does not run, go to the CD-ROM folder and run Autorun.exe to start installation wizard.
TV-IP762IC
2. ...
User Guide - Page 10

... exit.
TV-IP762IC
Option B: Wireless Connection Using WPS Button
1. Click Connect camera to your wireless using Wi-Fi Protected Setup (WPS) button radio button and click Next to continue.
Please refer to Mobile Apps section for additional features information.
2. Connect one end of the included power adapter to the camera and the other end to the power outlet. The Power/Link LED...
User Guide - Page 12

TRENDnet User's Guide
7. The initial setup is complete. Click the link to access the TRENDnet Cloud Server or click the camera icon to create a desktop shortcut for future access. There is a warning message displayed below the camera icon. This warning message is only shown when the internet connection is inactive or the cloud server cannot be found. Make sure the...
User Guide - Page 15

TRENDnet User's Guide
9. The initial setup is complete. Click the link to access the TRENDnet Cloud Server or click camera icon to create a desktop shortcut for future access. There is a warning message displayed below the camera icon. This warning message is only shown when the internet connection is inactive or the cloud server cannot be found. Make sure the internet connection...
User Guide - Page 16

TRENDnet User's Guide
Starting the TRENDnet Cloud Service
Using the Cloud Service to connect the camera from any location or computer.
Follow these steps to setup the process: Ensure the TV-IP762IC has successfully connected to the network and Internet. Look underneath the camera for the cloud service URL. (Example: http://73859116.cam.trendnetcloud.com) on the label. Write it ...
User Guide - Page 25

....
TV-IP762IC
You will be directed to the Google Play™ to download the app.
The app will copy the QR link and provide a HTML link to the TRENDnet CloudView app. Click on the link.
Download the app, install it and use the app on your mobile device to view the TRENDnet camera.
2 Please refer to the TRENDnet CloudVIEW Quick Installation Guide for features supported...
User Guide - Page 26

TRENDnet User's Guide
Apple iOS version Scan the QR Code using one of IOS's QR Code apps. The app will automatically create an HTML link to the iTunes App Store. Click the link.
TV-IP762IC
Web Browser Management
After completing the AutoRun Wizard, you are ready to use your camera. The camera's built-in Web configuration utility is designed to allow...
User Guide - Page 27

TRENDnet User's Guide
After you have logged in, Internet Explorer will prompt you to install the camera add-on required. Click Allow to install the add-on.
TV-IP762IC
These initial steps are using a non-Internet Explorer web browser. After you have logged in, you need to install the plug-in. Click the link below the camera view finder to install the plug...
User Guide - Page 28

TRENDnet User's Guide
Download the plug-in to a folder on the local PC and run the downloaded plug-in installation file after the download. Click Next to continue.
TV-IP762IC
Main Live View Interface
After successfully logging into the Live View Interface of the camera, the following window will appear.
The Camera stream control application will be installed. Note: Please ensure all browsers are...
User Guide - Page 32

TRENDnet User's Guide
Step 3: DDNS Settings
Step 4: Camera Name Settings
TV-IP762IC
On this page users can configure the camera's name. Enter a name for the camera. This feature is helpful when you have more than one camera setup. Click Next to continue.
Step 5: Time Settings
On this page users can configure the Dynamic DNS (DDNS) settings. Click the checkbox to enable this feature. In...
User Guide - Page 53
TRENDnet User's Guide
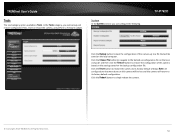
Tools
The next category option available is Tools. In the Tools category, you can backup and restore configuration files, reset or reboot the camera, and perform a firmware update.
System
In the System section, you can configure the following.
TV-IP762IC
Click the Backup button to back the configuration of this camera up to a file that will...
User Guide - Page 54

TRENDnet User's Guide
Firmware Update
In the Firmware section, it displays firmware information.
TV-IP762IC
Advanced
In the Advanced category, it shows the detailed information about the camera as well as the system log file.
In the Firmware Information section, information regarding the current running firmware version will be displayed.
In the Firmware Upgrade section, click the Choose File ...
User Guide - Page 60

...Guide
18. Connecting over wireless Disconnect the Ethernet cable from the camera and wait for 1 minute for the camera to turn to wireless mode then click Next to continue.
TRENDnetVIEW Pro Software
Click Autorun.
TV-IP762IC
19. When the Setup Wizard has finished, the configuration is complete.
Click Install TRENDnetVIEW Pro Software button to start installation.
© Copyright 2013 TRENDnet...
User Guide - Page 61

TRENDnet User's Guide
Using the Proprietary-based configuration interface To install TRENDnetVIEW Pro on a system running Windows, launch the TRENDnetVIEW Pro installation software on the installation CD-ROM and follow the setup instructions. Once the software is installed, the TRENDnetVIEW Pro camera monitoring utility is ready for use. The software can monitor up to 32 network cameras. It also ...
User Guide - Page 62
... you will need to upgrade your Web browser software in order to view the streaming video transmitted by the Network Camera. Try also viewing the video using Java. Ensure that you have the latest version of Java installed before you do. Go to www.java.com for more information.
© Copyright 2013 TRENDnet. All Rights Reserved.
TV-IP762IC
62
User Guide - Page 63
... outdoor radio links and/or for supplying public access to telecommunications and/or network services. This device may not be used for setting up outdoor radio links in France and in some areas the RF output power may be limited to 10 mW EIRP in the frequency range of 2454 - 2483.5 MHz. For detailed information...
User Guide - Page 66
TRENDnet User's Guide
Limited Warranty
TRENDnet warrants its products against defects in material and workmanship, under normal use and service, for the following lengths of time from the date of purchase.
TV-IP762IC - 3 Years Warranty
AC/DC Power Adapter, Cooling Fan, and Power Supply carry 1 year warranty.
If a product does not operate as warranted during the applicable warranty period, TRENDnet...