ZyXEL GS1900 Series driver and firmware


Related ZyXEL GS1900 Series Manual Pages
Download the free PDF manual for ZyXEL GS1900 Series and other ZyXEL manuals at ManualOwl.com
User Guide - Page 2

... system. Every effort has been made to ensure that the information in this manual is accurate.
Note: It is recommended you use the Web Configurator to configure the Switch.
• Web Configurator Online Help Click the help icon in any screen for help in configuring that screen and supplementary information.
2
GS1900 Series User's Guide
User Guide - Page 3

...: MAC Table ...119 Configuration: Link Aggregation ...123 Configuration: Loop Guard ...130 Configuration: Mirror ...133 Configuration: Multicast ...135 Configuration: Spanning Tree ...143 Configuration: LLDP ...153 Configuration: QoS ...166 Configuration: Security ...175 Configuration: AAA ...184 Configuration: Management ...190 Maintenance ...208 Troubleshooting ...219
GS1900 Series User's Guide...
User Guide - Page 4

... ...21 2.2.2 Rack Mounting ...22 2.2.3 Mounting the Switch on a Rack 23
Chapter 3 Hardware Overview ...24
3.1 Front Panel Connections ...24 3.1.1 Ethernet Ports ...25
3.2 Rear Panel ...25 3.2.1 Power Connection ...26
3.3 LEDs ...27
Chapter 4 The Web Configurator ...28
4.1 Overview ...28 4.2 Access ...28 4.3 Navigating the Web Configurator ...29
4.3.1 Title Bar ...29
4
GS1900 Series User's Guide
User Guide - Page 12

... the configuration from a file on your computer 213
31.5 Manage Configuration Files ...213 31.5.1 Overview ...213
31.6 Reset to Factory Defaults ...214 31.6.1 Overview ...214 31.6.2 Reset the Switch to Factory Defaults 214
31.7 Network Diagnostics ...214 31.7.1 Port Test ...214 31.7.2 IPv4 Ping Test ...215 31.7.3 IPv6 Ping Test ...216
12
GS1900 Series User's Guide
User Guide - Page 16

... the Switch.
1.1 Introduction
The GS1900 series is a new generation Gigabit Ethernet (GbE) Web-Managed Switch.
This User's Guide covers the following models:
Table 1 GS1900 Series Comparison Table DESKTOP
MODEL
GS1900-8
GS1900-8HP GS1900-16
PORT COUNT
100/1000 Mbps 100/1000 Mbps PoE
8
-
16
-
8
-
GS1900-24E
24 -
See the datasheet for a full list of firmware features available on the...
User Guide - Page 19

... useful if the device becomes unstable or even crashes. If you forget your password, you will have to reset the Switch to its factory default settings. If you backed up an earlier configuration file, you would not have to totally re-configure the Switch. You could simply restore your last configuration.
GS1900 Series User's Guide
19
User Guide - Page 20

... devices when stacking. Figure 4 Attaching Rubber Feet
Note: Do NOT block the ventilation holes. Leave space between devices when stacking. Note: For proper ventilation, allow at least 4 inches (10 cm) of clearance at the front and
3.4 inches (8 cm) at the back of the Switch. This is especially important for enclosed rack installations.
GS1900 Series User's Guide...
User Guide - Page 21

...for a comparison of the hardware installation methods of each GS1900 model:
Table 2 GS1900 Series Installation Comparison Table
MODEL
HW
Wall-mounting Rack-mounting Power ON/OFF Switch
DESKTOP GS1900-8
GS1900-8HP GS1900-16 GS1900-24E
V
V
V
V
V
V
V
V
V
Note: Ask an authorized technician to attach the Switch to the rack/wall.
For GS1900-8HP, GS1900-16 and GS1900-24E, you can place the...
User Guide - Page 22
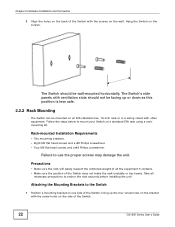
...may damage the unit.
Precautions
• Make sure the rack will safely support the combined weight of all the equipment it contains. • Make sure...installing the unit.
Attaching the Mounting Brackets to the Switch
1 Position a mounting bracket on one side of the Switch, lining up the four screw holes on the bracket with the screw holes on the side of the Switch.
22
GS1900 Series User's Guide
User Guide - Page 23
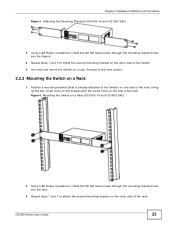
... holes on the side of the rack. Figure 6 Mounting the Switch on a Rack (GS1900-16 and GS1900-24E)
2 Using a #2 Philips screwdriver, install the M5 flat head screws through the mounting bracket holes into the rack.
3 Repeat steps 1 and 2 to attach the second mounting bracket on the other side of the rack.
GS1900 Series User's Guide
23
User Guide - Page 26

... the AC power connection. 1 Connect the female end of the power cord to the AC power socket. 2 Connect the other end of the cord to a power outlet.
Disconnecting the Power
The power input connectors can be disconnected from the power source individually. 1 Disconnect the power cord from the power outlet. 2 Disconnect the power cord from the AC power socket.
26
GS1900 Series User's Guide
User Guide - Page 28

...) • Enable cookies The recommended screen resolution is 1024 x 768 pixels and higher.
4.2 Access
1 Make sure your Switch hardware is properly connected. See the Quick Start Guide. 2 Browse to https://192.168.1.1. The Login screen appears.
Figure 15 The Login Screen
3 Enter the user name (default: "admin") and password (default: "1234").
GS1900 Series User's Guide
28
User Guide - Page 29

... password.
4.3 Navigating the Web Configurator
The following summarizes how to navigate the web configurator from the Getting Start screen. This guide uses the GS1900-...memory. The Switch loses these changes if it is turned off or loses power, so use the Save link on the top navigation panel to save your changes to the non-volatile memory when you are done configuring.
GS1900 Series User's Guide...
User Guide - Page 35

... where you can configure CPU protection and error disable recovery.
HTTP/HTTPS
HTTP
Configure HTTP settings.
HTTPS
Configure HTTPS settings.
Users
Configure users settings.
Remote Access Control
This link takes you to a screen where you can configure global and profile settings.
Maintenance Menu
Use the maintenance menu screens to manage configuration and firmware files, run diagnostics...
User Guide - Page 37

... field displays the serial number of this Switch.
MAC Address Range
This field displays the MAC addresses used by the Switch. Each physical port or wireless radio has one MAC address. The first MAC address is assigned to the Ethernet LAN port, the second MAC address is assigned to the first radio, and so on.
Firmware Version
This field displays the version number and date of the firmware the...
User Guide - Page 208

CHAPTER 31
Maintenance
31.1 Firmware Upgrade
31.1.1 Overview
Firmware updates contain bug fixes and fixes for security vulnerabilities. It is recommended to keep the Switch's firmware up to date. You can upgrade the Switch's firmware manually using a file downloaded on your computer or through the online web configurator. Note: Be sure to upload the correct model firmware as uploading the wrong ...
User Guide - Page 209

... to the firmware versions installed on your Switch. Active and backup firmware versions are saved as images on flash partitions. The backup image is used when the active partition has problems during boot.
From the Maintenance screen, display the Firmware Management screen as shown next. Use this screen to view image information and activate an image.
GS1900 Series User's Guide
209
User Guide - Page 223

... the limits for a Class A digital switch, pursuant to Part 15 of the FCC Rules. These limits are designed to provide reasonable protection against harmful interference in a commercial environment. This device generates, uses, and can radiate radio frequency energy and, if not installed and used in accordance with the instruction manual, may cause harmful interference to...
User Guide - Page 224

.... • Make sure to connect the cables to the correct ports. • Place connecting cables carefully so that no one will step on them or stumble over them. • Always disconnect all cables from this device before servicing or disassembling. • Use ONLY an appropriate power adaptor or cord for your device. Connect it to the right supply...
User Guide - Page 225

...
interfaces as DHCP servers 49, 91, 92, 96, 97, 98, 99, 100, 103, 114
Internet Explorer 28 Internet Protocol version 6, see IPv6 introduction 16 IPv6 18
Neighbor Discovery Protocol 18 ping 18
E
Ethernet ports default settings 25
J
Java permissions 28
JavaScripts 28
F
FCC interference statement 223 Firefox 28 firmware
L
LEDs 27 logout
Web Configurator 29
225
GS1900 Series User's Guide