ZyXEL XGS1910/GS1910 Series driver and firmware
Drivers and firmware downloads for this ZyXEL item


Related ZyXEL XGS1910/GS1910 Series Manual Pages
Download the free PDF manual for ZyXEL XGS1910/GS1910 Series and other ZyXEL manuals at ManualOwl.com
User Guide - Page 2
... your product due to differences in your product firmware or your computer operating system. Every effort has been made to ensure that the information in this manual is accurate.
Related Documentation
• Web Configurator Online Help Click the help icon in any screen for help in configuring that screen and supplementary information.
2
GS1910/XGS1910 Series User's Guide
User Guide - Page 3
...3.1.1 Ethernet Ports ...17 3.1.2 Dual Personality Interfaces ...18 3.1.3 SFP/SFP+ Slots ...18 3.1.4 Console Port ...20
3.2 Rear Panel ...20 3.2.1 Power Connector ...21
3.3 LEDs ...22
Chapter 4 The Web Configurator ...25
4.1 Introduction ...25 4.2 System Login ...25 4.3 The Web Configurator Layout ...26
4.3.1 Change Your Password ...32 4.4 Switch Lockout ...32
GS1910/XGS1910 Series User's Guide
3
User Guide - Page 11
...
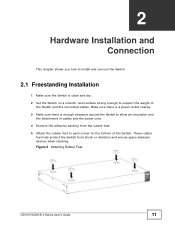
the attachment of cables and the power cord. 4 Remove the adhesive backing from the rubber feet. 5 Attach the rubber feet to each corner on the bottom of the Switch. These rubber
feet help protect the Switch from shock or vibration and ensure space between devices when stacking.
Figure 5 Attaching Rubber Feet
GS1910/XGS1910 Series User's Guide
11
User Guide - Page 12
... to anchor the rack securely before installing the unit.
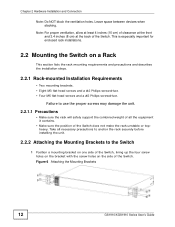
2.2.2 Attaching the Mounting Brackets to the Switch
1 Position a mounting bracket on one side of the Switch, lining up the four screw holes on the bracket with the screw holes on the side of the Switch.
Figure 6 Attaching the Mounting Brackets
12
GS1910/XGS1910 Series User's Guide
User Guide - Page 13

... the mounting bracket holes into the Switch.
3 Repeat steps 1 and 2 to install the second mounting bracket on the other side of the Switch.
4 You may now...2 Using a #2 Philips screwdriver, install the M5 flat head screws through the mounting bracket holes into the rack.
3 Repeat steps 1 and 2 to attach the second mounting bracket on the other side of the rack.
GS1910/XGS1910 Series User's Guide
13
User Guide - Page 14

Chapter 2 Hardware Installation and Connection
14
GS1910/XGS1910 Series User's Guide
User Guide - Page 17
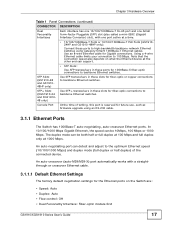
...device.
An auto-crossover (auto-MDI/MDI-X) port automatically works with a straightthrough or crossover Ethernet cable.
3.1.1.1 Default Ethernet Settings
The factory default negotiation settings for the Ethernet ports on the Switch are:
• Speed: Auto • Duplex: Auto • Flow control: Off • Dual Personality Interface: Fiber-optic module first
GS1910/XGS1910 Series User's Guide...
User Guide - Page 18
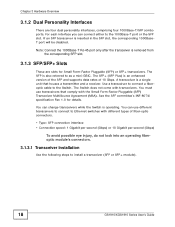
... types of fiber-optic connectors.
• Type: SFP connection interface • Connection speed: 1 Gigabit per second (Gbps) or 10 Gigabit per second (Gbps)
To avoid possible eye injury, do not look into an operating fiberoptic module's connectors.
3.1.3.1 Transceiver Installation
Use the following steps to install a transceiver (SFP or SFP+ module).
18
GS1910/XGS1910 Series User's Guide
User Guide - Page 19
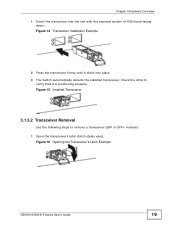
... place. 3 The Switch automatically detects the installed transceiver. Check the LEDs to
verify that it is functioning properly.
Figure 15 Installed Transceiver
3.1.3.2 Transceiver Removal
Use the following steps to remove a transceiver (SFP or SFP+ module). 1 Open the transceiver's latch (latch styles vary).
Figure 16 Opening the Transceiver's Latch Example
GS1910/XGS1910 Series User's Guide
19
User Guide - Page 20
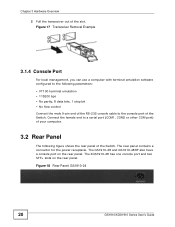
... can use a computer with terminal emulation software configured to the following parameters: • VT100 terminal emulation • 115200 bps • No parity, 8 data bits, 1 stop bit • No flow control Connect the male 9-pin end of the RS-232 console cable to the console port of the Switch. Connect the female end to a serial port (COM1, COM2...
User Guide - Page 21
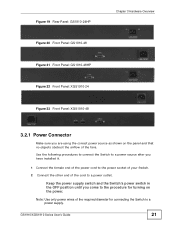
... power socket of your Switch.
2 Connect the other end of the cord to a power outlet.
Keep the power supply switch and the Switch's power switch in the OFF position until you come to the procedure for turning on the power.
Note: Use only power wires of the required diameter for connecting the Switch to a power supply.
GS1910/XGS1910 Series User's Guide...
User Guide - Page 25
... enabled by default in
Windows XP SP (Service Pack) 2. • JavaScript (enabled by default). • Java permissions (enabled by default).
4.2 System Login
1 Start your web browser. 2 Type "http://" and the IP address of the Switch (for example, the default management IP address is
192.168.1.1) in the Location or Address field. Press [ENTER].
GS1910/XGS1910 Series User's Guide
25
User Guide - Page 27
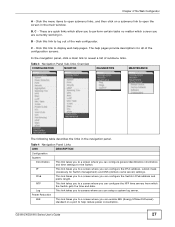
... configure the NTP time servers from which the Switch gets the time and date.
Log
This link takes you to screens where you can setup a system log server.
Power Reduction
EEE
This link takes you to a screen where you can enable EEE (Energy Efficient Ethernet)
standard on a port to help reduce power consumption.
GS1910/XGS1910 Series User's Guide
27
User Guide - Page 31
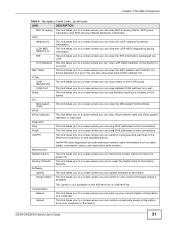
... a screen where you can ping IPv6 addresses to test connections. This link takes you to a screen where you can perform a physical wire-pair test of the Ethernet connections on the specified port(s).
Maintenance Restart Device
Factory Defaults
Software Upload Image Select
VeriPHY® cable diagnostics provide extensive network cable information such as cable length, termination status, and open...
User Guide - Page 34
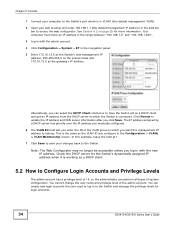
...DHCP server to which the Switch is connected. Click Renew to update the IP address and DNS server information after you click Save. The IP address assigned by a DHCP server has priority over the IP address you manually configured.
6 The VLAN ID field lets you enter the ... the user used to log in to the Switch and manage the privilege levels for login accounts.
34
GS1910/XGS1910 Series User's Guide
User Guide - Page 36

... computer to the Switch.
5.3.1 Backing up a Configuration File
Backing up your Switch configurations allows you to create various "snap shots" of your device from which you may restore at a later date. To backup your configuration file,
1 Click Maintenance > Configuration > Save and click Save Configuration.
2 Click Save to display the File Download screen.
36
GS1910/XGS1910 Series User's Guide
User Guide - Page 66
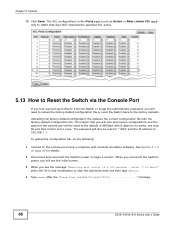
... stop bit and flow control set to none. The password will also be reset to "1234" and the IP address to 192.168.1.1.
To upload the configuration file, do the following:
1 Connect to the console port using a computer with terminal emulation software. See Section 3.1.4 on page 20 for details.
2 Disconnect and reconnect the Switch's power to begin a session...
User Guide - Page 67
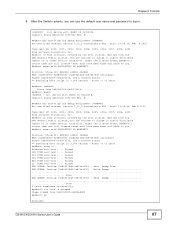
... user name and password to log in.
>+M25PXX : Init device with JEDEC ID 0xC22018. Jaguar-1 board detected (VSC7460 Rev. B).
RedBoot(tm) bootstrap and debug environment [ROMRAM] Non-certified release, version 1_12_2-customized-z-XGS ...3 tests completed successfully. RedBoot> fis load -d managed Image loaded from 0x80040000-0x806a4d20 RedBoot> go
Username:
GS1910/XGS1910 Series User's Guide
67
User Guide - Page 73
... the limits for a Class A digital switch, pursuant to Part 15 of the FCC Rules. These limits are designed to provide reasonable protection against harmful interference in a commercial environment. This device generates, uses, and can radiate radio frequency energy and, if not installed and used in accordance with the instruction manual, may cause harmful interference to...
User Guide - Page 74
..., and make sure all the connections are indoors. There is a remote risk of electric shock from lightning. • Do NOT obstruct the device ventilation slots, as insufficient airflow may harm your device. • The PoE (Power over Ethernet) devices that supply or receive power and their connected Ethernet cables must all be completely
indoors. • This product is for...