ASRock B150A-X1/Hyper driver and firmware
Drivers and firmware downloads for this ASRock item

Related ASRock B150A-X1/Hyper Manual Pages
Download the free PDF manual for ASRock B150A-X1/Hyper and other ASRock manuals at ManualOwl.com
User Manual - Page 4
... Headers and Connectors
19
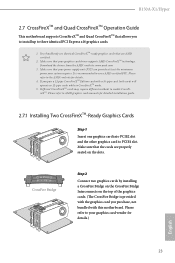
2.7 CrossFireXTM and Quad CrossFireXTM Operation Guide
23
2.7.1 Installing Two CrossFireXTM-Ready Graphics Cards
23
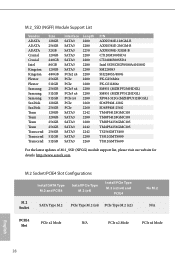
2.8 M.2_SSD (NGFF) Module Installation Guide
26
Chapter 3 Software and Utilities Operation
29
3.1 Installing Drivers
29
3.2 A-Tuning
30
3.3 ASRock Live Update & APP Shop
34
3.3.1 UI Overview
34
3.3.2 Apps
35
3.3.3 BIOS & Drivers
38
User Manual - Page 5
3.3.4 Setting
39
3.4 Enabling USB Ports for Windows® 7 Installation
40
Chapter 4 UEFI SETUP UTILITY
43
4.1 Introduction
43
4.2 EZ Mode
44
4.3 Advanced Mode
45
4.3.1 UEFI Menu Bar
45
4.3.2 Navigation Keys
46
4.4 Main Screen
47
4.5 OC Tweaker Screen
48
4.6 Advanced Screen
56
4.6.1 CPU Configuration
57
4.6.2 Chipset Configuration
59
4.6.3 Storage Configuration
61
...
User Manual - Page 6
... are using. You may find the latest VGA cards and CPU support list on ASRock's website as well. ASRock website http://www.asrock.com.
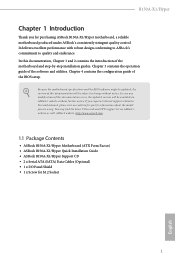
1.1 Package Contents
• ASRock B150A-X1/Hyper Motherboard (ATX Form Factor) • ASRock B150A-X1/Hyper Quick Installation Guide • ASRock B150A-X1/Hyper Support CD • 2 x Serial ATA (SATA) Data Cables (Optional) • 1 x I/O Panel Shield •...
User Manual - Page 10
B150A-X1/Hyper
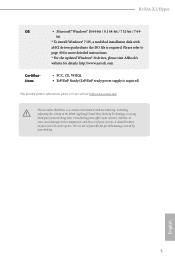
OS
Certifications
• Microsoft® Windows® 10 64-bit / 8.1 64-bit / 7 32-bit / 7 64bit
* To install Windows® 7 OS, a modified installation disk with xHCI drivers packed into the ISO file is required. Please refer to page 40 for more detailed instructions. * For the updated Windows® 10 driver, please visit ASRock's website for details: http://www.asrock.com
...
User Manual - Page 28
B150A-X1/Hyper
2.7 CrossFireXTM and Quad CrossFireXTM Operation Guide
This motherboard supports CrossFireXTM and Quad CrossFireXTM that allows you to install up to three identical PCI Express x16 graphics cards.
1. You should only use identical CrossFireXTM-ready graphics cards that are AMD certified.
2. Make sure that your graphics card driver supports AMD CrossFireXTM technology. Download the ...
User Manual - Page 30
B150A-X1/Hyper
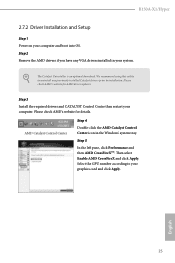
2.7.2 Driver Installation and Setup
Step 1 Power on your computer and boot into OS. Step 2 Remove the AMD drivers if you have any VGA drivers installed in your system.
The Catalyst Uninstaller is an optional download. We recommend using this utility to uninstall any previously installed Catalyst drivers prior to installation. Please check AMD's website for AMD driver updates.
...
User Manual - Page 33
...
For the latest updates of M.2_SSD (NFGG) module support list, please visit our website for details: http://www.asrock.com
M.2 Socket/PCIE4 Slot Configurations
Install SATA Type M.2 and PCIE4
Install PCIe Type M.2 (x4)
Install PCIe Type M.2 (x2/x4) and
PCIE4
M.2 Socket
SATA Type M.2 PCIe Type M.2 (x4) PCIe Type M.2 (x2)
No M.2 N/A
PCIE4
PCIe x2 Mode
N/A
PCIe x2 Mode
PCIe x4 Mode
Slot...
User Manual - Page 34

B150A-X1/Hyper
Chapter 3 Software and Utilities Operation
3.1 Installing Drivers
The Support CD that comes with the motherboard contains necessary drivers and useful utilities that enhance the motherboard's features.
Running The Support CD
To begin using the support CD, insert the CD into your CD-ROM drive. The CD automatically displays the Main Menu if "AUTORUN" is enabled in your computer. If ...
User Manual - Page 35

... can be downloaded from ASRock Live Update & APP Shop. After the installation, you will find the icon "A-Tuning" on your desktop. Double-click the "ATuning" icon, A-Tuning main menu will pop up.
3.2.2 Using A-Tuning
There are six sections in A-Tuning main menu: Operation Mode, OC Tweaker, System Info, FAN-Tastic Tuning, Tech Service and Settings.
Operation Mode...
User Manual - Page 39
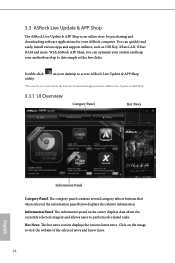
3.3 ASRock Live Update & APP Shop
The ASRock Live Update & APP Shop is an online store for purchasing and downloading software applications for your ASRock computer. You can quickly and easily install various apps and support utilities, such as USB Key, XFast LAN, XFast RAM and more. With ASRock APP Shop, you can optimize your system and keep your motherboard up to date simply with a few clicks...
User Manual - Page 40
B150A-X1/Hyper
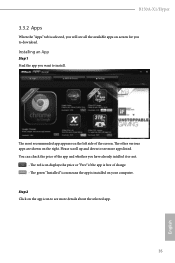
3.3.2 Apps
When the "Apps" tab is selected, you will see all the available apps on screen for you to download.
Installing an App
Step 1 Find the app you want to install.
The most recommended app ... or not.
- The red icon displays the price or "Free" if the app is free of charge. - The green "Installed" icon means the app is installed on your computer. Step 2 Click on the app icon...
User Manual - Page 41
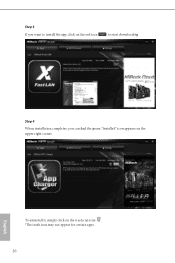
Step 3 If you want to install the app, click on the red icon
to start downloading.
Step 4
When installation completes, you can find the green "Installed" icon appears on the upper right corner.
English
To uninstall it, simply click on the trash can icon . *The trash icon may not appear for certain apps.
36
User Manual - Page 42
B150A-X1/Hyper
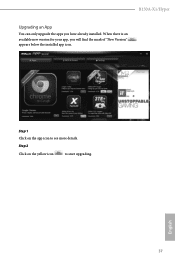
Upgrading an App
You can only upgrade the apps you have already installed. When there is an available new version for your app, you will find the mark of "New Version" appears below the installed app icon.
Step 1 Click on the app icon to see more details.
Step 2
Click on the yellow icon
to start upgrading.
English
37
User Manual - Page 43
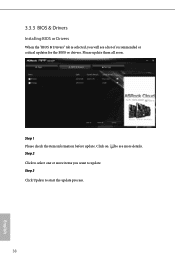
3.3.3 BIOS & Drivers
Installing BIOS or Drivers
When the "BIOS & Drivers" tab is selected, you will see a list of recommended or critical updates for the BIOS or drivers. Please update them all soon.
Step 1 Please check the item information before update. Click on Step 2
to see more details.
Click to select one or more items you want to update. Step 3
Click Update to start the update process...
User Manual - Page 45
...
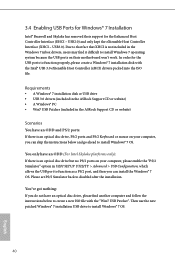
• A Windows® 7 installation disk or USB drive • USB 3.0 drivers (included in the ASRock Support CD or website) • A Windows® PC • Win7 USB Patcher (included in the ASRock Support CD or website)
Scenarios You have an ODD and PS/2 ports:
If there is an optical disc drive, PS/2 ports and PS/2 Keyboard or mouse on your computer, you can skip the instructions below and...
User Manual - Page 46
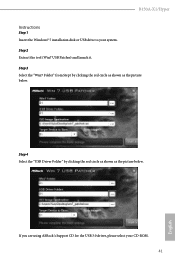
B150A-X1/Hyper Instructions
Step 1 Insert the Windows® 7 installation disk or USB drive to your system. Step 2 Extract the tool (Win7 USB Patcher) and launch it. Step 3 Select the "Win7 Folder" from Step1 by clicking the red circle as shown as the picture below.
Step 4 Select the "USB Driver Folder" by clicking the red circle as shown as the picture below.
If you are...
User Manual - Page 48
B150A-X1/Hyper
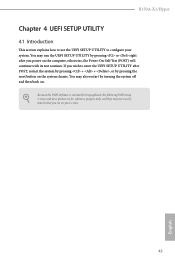
Chapter 4 UEFI SETUP UTILITY
4.1 Introduction
This section explains how to use the UEFI SETUP UTILITY to configure your system. You may run the UEFI SETUP UTILITY by pressing or right after you power on the computer, otherwise, the Power-On-Self-Test (POST) will continue with its test routines. If you wish to enter the UEFI SETUP UTILITY...
User Manual - Page 53
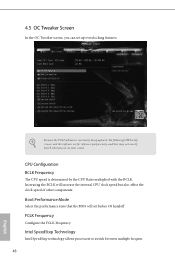
... Tweaker screen, you can set up overclocking features.
Because the UEFI software is constantly being updated, the following UEFI setup screens and descriptions are for reference purpose only, and they may not exactly match what you see on your screen.
CPU Configuration BCLK Frequency
The CPU speed is determined by the CPU Ratio multiplied with the BCLK...
User Manual - Page 70
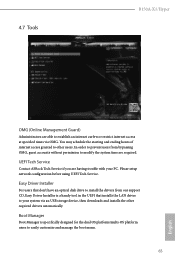
... Tech Service
Contact ASRock Tech Service if you are having trouble with your PC. Please setup network configuration before using UEFI Tech Service.
Easy Driver Installer
For users that don't have an optical disk drive to install the drivers from our support CD, Easy Driver Installer is a handy tool in the UEFI that installs the LAN driver to your system via an USB storage device, then downloads...
User Manual - Page 71
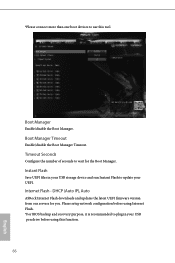
... UEFI files in your USB storage device and run Instant Flash to update your UEFI.
Internet Flash - DHCP (Auto IP), Auto
ASRock Internet Flash downloads and updates the latest UEFI firmware version from our servers for you. Please setup network configuration before using Internet Flash. *For BIOS backup and recovery purpose, it is recommended to plug in your USB pen drive before using this function...