ASRock CML-HDV/M.2 TPM R2.0 driver and firmware
Drivers and firmware downloads for this ASRock item
Related ASRock CML-HDV/M.2 TPM R2.0 Manual Pages
Download the free PDF manual for ASRock CML-HDV/M.2 TPM R2.0 and other ASRock manuals at ManualOwl.com
User Manual - Page 3
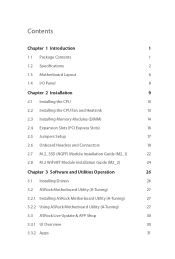
...Installing the CPU Fan and Heatsink
13
2.3 Installing Memory Modules (DIMM)
14
2.4 Expansion Slots (PCI Express Slots)
16
2.5 Jumpers Setup
17
2.6 Onboard Headers and Connectors
18
2.7 M.2_SSD (NGFF) Module Installation Guide (M2_1)
22
2.8 M.2 WiFi/BT Module Installation Guide (M2_2)
24
Chapter 3 Software and Utilities Operation
26
3.1 Installing Drivers
26
3.2 ASRock Motherboard...
User Manual - Page 4
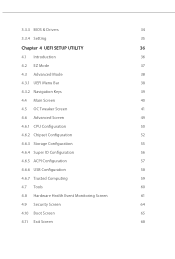
3.3.3 BIOS & Drivers
34
3.3.4 Setting
35
Chapter 4 UEFI SETUP UTILITY
36
4.1 Introduction
36
4.2 EZ Mode
37
4.3 Advanced Mode
38
4.3.1 UEFI Menu Bar
38
4.3.2 Navigation Keys
39
4.4 Main Screen
40
4.5 OC Tweaker Screen
41
4.6 Advanced Screen
49
4.6.1 CPU Configuration
50
4.6.2 Chipset Configuration
52
4.6.3 Storage Configuration
55
4.6.4 Super IO Configuration
56
4.6.5...
User Manual - Page 5
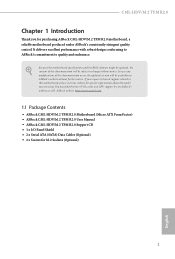
.... You may find the latest VGA cards and CPU support list on ASRock's website as well. ASRock website http://www.asrock.com.
1.1 Package Contents
• ASRock CML-HDV/M.2 TPM R2.0 Motherboard (Micro ATX Form Factor) • ASRock CML-HDV/M.2 TPM R2.0 User Manual • ASRock CML-HDV/M.2 TPM R2.0 Support CD • 1 x I/O Panel Shield • 2 x Serial ATA (SATA) Data Cables (Optional) •...
User Manual - Page 9
CML-HDV/M.2 TPM R2.0
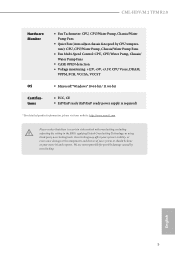
Hardware Monitor
OS Certifications
• Fan Tachometer: CPU, CPU/Water Pump, Chassis/Water Pump Fans
• Quiet Fan (Auto adjust chassis fan speed by CPU temperature): CPU, CPU/Water Pump, Chassis/Water Pump Fans
• Fan Multi-Speed Control: CPU, CPU/Water Pump, Chassis/ Water Pump Fans
• CASE OPEN detection • Voltage monitoring: +12V, +5V, +3.3V, CPU ...
User Manual - Page 13
CML-HDV/M.2 TPM R2.0
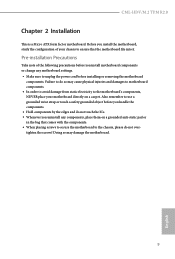
Chapter 2 Installation
This is a Micro ATX form factor motherboard. Before you install the motherboard, study the configuration of your chassis to ensure that the motherboard fits into it.
Pre-installation Precautions
Take note of the following precautions before you install motherboard components or change any motherboard settings. • Make sure to unplug the power cord ...
User Manual - Page 14
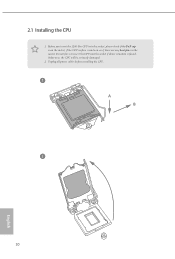
2.1 Installing the CPU
1. Before you insert the 1200-Pin CPU into the socket, please check if the PnP cap is on the socket, if the CPU surface is unclean, or if there are any bent pins in the socket. Do not force to insert the CPU into the socket if above situation is found. Otherwise, the CPU will be seriously damaged.
2. Unplug all power cables before installing the CPU.
1 A B
2
10
English
User Manual - Page 17
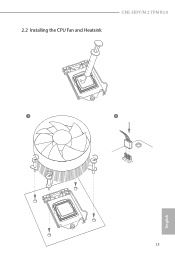
2.2 Installing the CPU Fan and Heatsink
CML-HDV/M.2 TPM R2.0
1
2
CPU_FAN
13
English
User Manual - Page 30
Chapter 3 Software and Utilities Operation
3.1 Installing Drivers
The Support CD that comes with the motherboard contains necessary drivers and useful utilities that enhance the motherboard's features.
Running The Support CD
To begin using the support CD, insert the CD into your CD-ROM drive. The CD automatically displays the Main Menu if "AUTORUN" is enabled in your computer. If the Main Menu ...
User Manual - Page 31
CML-HDV/M.2 TPM R2.0
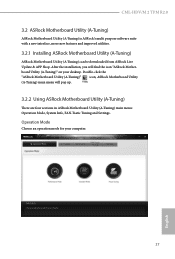
3.2 ASRock Motherboard Utility (A-Tuning)
ASRock Motherboard Utility (A-Tuning) is ASRock's multi purpose software suite with a new interface, more new features and improved utilities.
3.2.1 Installing ASRock Motherboard Utility (A-Tuning)
ASRock Motherboard Utility (A-Tuning) can be downloaded from ASRock Live Update & APP Shop. After the installation, you will find the icon ...
User Manual - Page 34
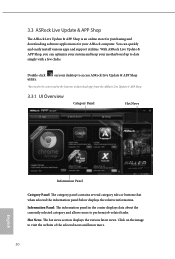
... an online store for purchasing and downloading software applications for your ASRock computer. You can quickly and easily install various apps and support utilities. With ASRock Live Update & APP Shop, you can optimize your system and keep your motherboard up to date simply with a few clicks.
Double-click utility.
on your desktop to access ASRock Live Update & APP Shop
*You need to...
User Manual - Page 35
CML-HDV/M.2 TPM R2.0
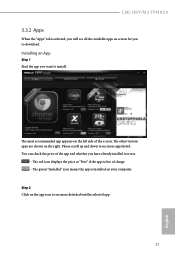
3.3.2 Apps
When the "Apps" tab is selected, you will see all the available apps on screen for you to download.
Installing an App
Step 1 Find the app you want to install.
The most recommended app ... or not.
- The red icon displays the price or "Free" if the app is free of charge. - The green "Installed" icon means the app is installed on your computer. Step 2 Click on the app ...
User Manual - Page 36
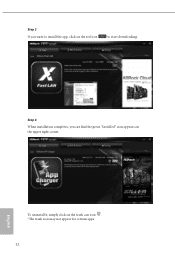
Step 3 If you want to install the app, click on the red icon
to start downloading.
Step 4
When installation completes, you can find the green "Installed" icon appears on the upper right corner.
English
To uninstall it, simply click on the trash can icon . *The trash icon may not appear for certain apps.
32
User Manual - Page 37
CML-HDV/M.2 TPM R2.0
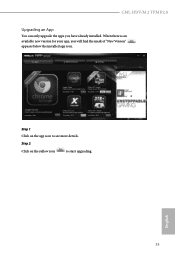
Upgrading an App
You can only upgrade the apps you have already installed. When there is an available new version for your app, you will find the mark of "New Version" appears below the installed app icon.
Step 1 Click on the app icon to see more details.
Step 2
Click on the yellow icon
to start upgrading.
English
33
User Manual - Page 38
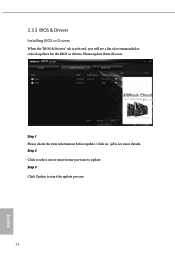
3.3.3 BIOS & Drivers
Installing BIOS or Drivers
When the "BIOS & Drivers" tab is selected, you will see a list of recommended or critical updates for the BIOS or drivers. Please update them all soon.
Step 1 Please check the item information before update. Click on Step 2
to see more details.
Click to select one or more items you want to update. Step 3
Click Update to start the update process...
User Manual - Page 39
CML-HDV/M.2 TPM R2.0
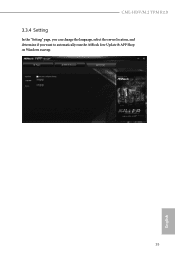
3.3.4 Setting
In the "Setting" page, you can change the language, select the server location, and determine if you want to automatically run the ASRock Live Update & APP Shop on Windows startup.
35
English
User Manual - Page 40
...the UEFI SETUP UTILITY by pressing or right after you power on the computer, otherwise, the Power-On-Self-Test (POST) will continue with its test routines. If you wish to enter the UEFI SETUP UTILITY after... turning the system off and then back on.
Because the UEFI software is constantly being updated, the following UEFI setup screens and descriptions are for reference purpose only, and they may ...
User Manual - Page 45
CML-HDV/M.2 TPM R2.0
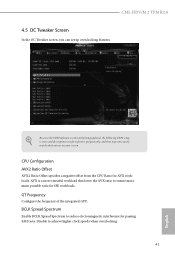
4.5 OC Tweaker Screen
In the OC Tweaker screen, you can set up overclocking features.
Because the UEFI software is constantly being updated, the following UEFI setup screens and descriptions are for reference purpose only, and they may not exactly match what you see on your screen.
CPU Configuration AVX2 Ratio Offset
AVX2 Ratio Offset specifies a negative...
User Manual - Page 62
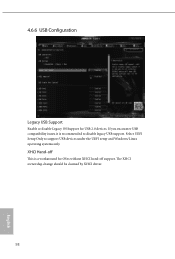
... Support
Enable or disable Legacy OS Support for USB 2.0 devices. If you encounter USB compatibility issues it is recommended to disable legacy USB support. Select UEFI Setup Only to support USB devices under the UEFI setup and Windows/Linux operating systems only.
XHCI Hand-off
This is a workaround for OSes without XHCI hand-off support. The XHCI ownership change should be claimed by XHCI driver...
User Manual - Page 64
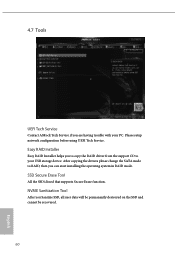
4.7 Tools
UEFI Tech Service
Contact ASRock Tech Service if you are having trouble with your PC. Please setup network configuration before using UEFI Tech Service.
Easy RAID Installer
Easy RAID Installer helps you to copy the RAID driver from the support CD to your USB storage device. After copying the drivers please change the SATA mode to RAID, then you can start installing the operating system ...
User Manual - Page 74

... file or other text or file.
(e) Intel has no obligation to provide any support, technical assistance or updates for the Software.
OWNERSHIP OF SOFTWARE AND COPYRIGHTS. Title to all copies of the Software remains with Intel or its licensors or suppliers. The Software is copyrighted and protected by the laws of the United States and other countries...