ASRock K7S41GX driver and firmware
Related ASRock K7S41GX Manual Pages
Download the free PDF manual for ASRock K7S41GX and other ASRock manuals at ManualOwl.com
User Manual - Page 3
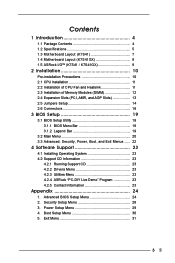
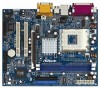
... (K7S41 7 1.4 Motherboard Layout (K7S41GX 8 1.5 ASRock I/OTM (K7S41 / K7S41GX 9
2 Installation 10
Pre-installation Precautions 10 2.1 CPU Installation 11 2.2 Installation of CPU Fan and Heatsink 11 2.3 Installation of Memory Modules (DIMM 12 2.4 Expansion Slots (PCI, AMR, and AGP Slots 13 2.5 Jumpers Setup 14 2.6 Connectors 16
3 BIOS Setup 19
3.1 BIOS Setup Utility 19 3.1.1 BIOS Menu...
User Manual - Page 4
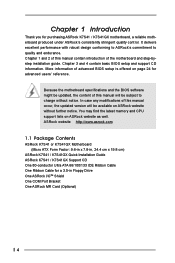
...memory and CPU support lists on ASRock website as well. ASRock website http://www.asrock.com
1.1 Package Contents
ASRock K7S41 or K7S41GX Motherboard (Micro ATX Form Factor: 9.6-in x 7.8-in, 24.4 cm x 19.8 cm)
ASRock K7S41 / K7S41GX Quick Installation Guide ASRock K7S41 / K7S41GX Support CD One 80-conductor Ultra ATA 66/100/133 IDE Ribbon Cable One Ribbon Cable for a 3.5-in Floppy Drive One ASRock...
User Manual - Page 6
... improve heat dissipation, remember to spray thermal grease between the CPU and the heatsink when you install the PC system.
2. Do NOT use a 3.3V AGP card on the AGP slot of this motherboard! It may cause permanent damage!
3. Power Management for USB 2.0 works fine under Microsoft® Windows® XP SP1/2000 SP4. It may not work...
User Manual - Page 10
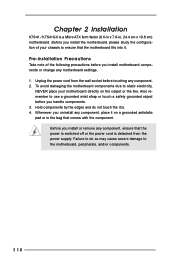
... Installation
K7S41 / K7S41GX is a Micro ATX form factor (9.6-in x 7.8-in, 24.4 cm x 19.8 cm) motherboard. Before you install the motherboard, please study the configuration of your chassis to ensure that the motherboard fits into it.
Pre-installation Precautions
Take note of the following precautions before you install motherboard components or change any motherboard settings. 1. Unplug the power...
User Manual - Page 11
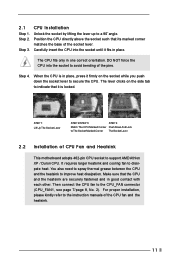
... 1: Lift Up The Socket Lever
Socket Marked Corner
CPU Marked Corner
STEP 2/STEP 3:
STEP 4:
Match The CPU Marked Corner Push Down And Lock
to The Socket Marked Corner The Socket Lever
2.2 Installation of CPU Fan and Heatsink
This motherboard adopts 462-pin CPU socket to support AMD Athlon XP / Duron CPU. It requires larger heatsink and cooling fan...
User Manual - Page 12
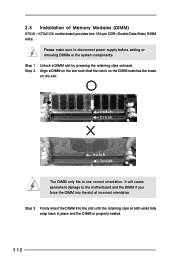
2.3 Installation of Memory Modules (DIMM)
K7S41 / K7S41GX motherboard provides two 184-pin DDR (Double Data Rate) DIMM slots.
Please make sure to disconnect power supply before adding or removing DIMMs or the system ...
The DIMM only fits in one correct orientation. It will cause permanent damage to the motherboard and the DIMM if you force the DIMM into the slot at incorrect orientation.
Step ...
User Manual - Page 13

... slot, and 1 AGP slot on K7S41 / K7S41GX motherboard. PCI slots: PCI slots are used to install expansion cards that have the 32-bit PCI
interface. AMR slot: The AMR slot is used to insert an ASRock MR card (optional) with
v.92 Modem functionality. AGP slot: The AGP slot is used to install a graphics card. The ASRock AGP slot has
a special design of clasp...
User Manual - Page 15
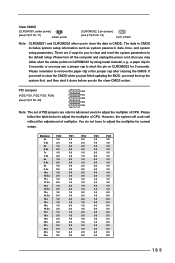
... the data in CMOS. The data in CMOS includes system setup information such as system password, date, time, and system setup parameters. There are 2 ways for you to clear and reset the system parameters to the default setup. Please turn off the computer and unplug the power cord, then you may either short the solder points...
User Manual - Page 19
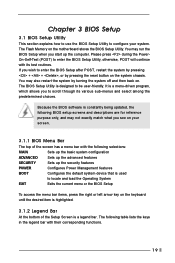
Chapter 3 BIOS Setup
3.1 BIOS Setup Utility
This section explains how to use the BIOS Setup Utility to configure your system. The Flash Memory on the motherboard stores the BIOS Setup Utility. You may run the BIOS Setup when you start up the computer. Please press during the PowerOn-Self-Test (POST) to enter the BIOS Setup Utility, otherwise, POST will continue with its test routines. If you...
User Manual - Page 20
...a highlighted field Loads all the setup items to default value Saves changes and exits Setup
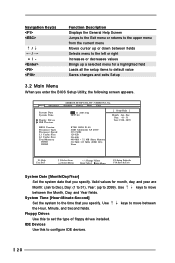
3.2 Main Menu
When you enter the BIOS Setup Utility, the following screen appears.
Main Advanced
System Date System Time
Floppy Drives IDE Devices
BIOS Version Processor Type Processor Speed L1 Cache Size L2 Cache Size Total Memory
DDR1 DDR2
AMIBIOS SETUP UTILITY - VERSION 3.31a Security Power Boot Exit...
User Manual - Page 21
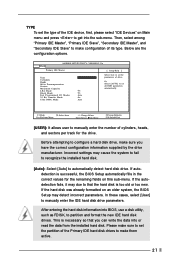
... already formatted on an older system, the BIOS Setup may detect incorrect parameters. In these cases, select [User] to manually enter the IDE hard disk drive parameters.
After entering the hard disk information into BIOS, use a disk utility, such as FDISK, to partition and format the new IDE hard disk drives. This is necessary so that you can write the...
User Manual - Page 22
... to determine the correct value. Maximum Capacity This field shows the drive's maximum capacity as calculated by the BIOS based on the drive information you entered. LBA Mode This allows user to select the LBA mode for a hard disk > 512 MB under DOS and Windows; for Netware and UNIX user, select [Off] to disable the...
User Manual - Page 23
... the Support CD to display the menus.
4.2.2 Drivers Menu
The Drivers Menu shows the available devices drivers if the system detects installed devices. Install the necessary drivers to activate the devices.
4.2.3 Utilities Menu
The Utilities Menu shows the applications software that the motherboard supports. Click on a specific item then follow the installation wizard to install it.
4.2.4 ASRock PC...
User Manual - Page 24

... jumper adjustment according to your AMD CPU before you use this "Manual" option as the FSB setting in BIOS setup to perform over clocking. This is not recommended unless you thoroughly know the feature. Wrong setup may cause problems during operation.
DRAM Frequency: If set to [Auto], the motherboard will detect the inserted memory module(s) and automatically assign appropriate...
User Manual - Page 25
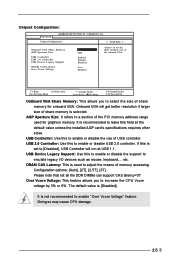
... PCI memory address range used for graphics memory. It is recommended to leave this field at the default value unless the installed AGP card's specifications requires other sizes.
USB Controller: Use this to enable or disable the use of USB controller. USB 2.0 Controller: Use this to enable or disable USB 2.0 controller. If this is
set to [Disabled], USB Controller will run at USB 1.1. USB Device...
User Manual - Page 26
...
+/-:Change Values Enter:Select Sub-Menu
F9:Setup Defaults F10:Save & Exit
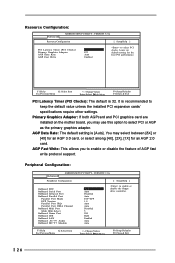
PCI Latency Timer (PCI Clocks): The default is 32. It is recommended to keep the default value unless the installed PCI expansion cards' specifications require other settings.
Primary Graphics Adapter: If both AGPcard and PCI graphics card are installed on the mother board, you may use this option to select...
User Manual - Page 29
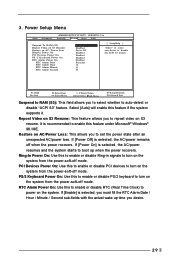
3. Power Setup Menu
Main Advanced
AMIBIOS SETUP UTILITY - VERSION 3.31a Security Power Boot Exit
Suspend To RAM (S3) Repost Video on S3 Resume Restore on AC / Power Loss Ring-In Power On PCI Devices Power On PS / 2 Keyboard Power On RTC Alarm Power On
RTC Alarm Date RTC Alarm Hour RTC Alarm Minute RTC Alarm Second
Disabled Disabled Power Off Disabled Disabled Disabled Disabled Everyday...
Quick Installation Guide - Page 5
...memory and CPU support lists on ASRock website as well. ASRock website http://www.asrock.com
1.1 Package Contents
ASRock K7S41 or K7S41GX Motherboard (Micro ATX Form Factor: 9.6-in x 7.8-in, 24.4 cm x 19.8 cm)
ASRock K7S41 / K7S41GX Quick Installation Guide ASRock K7S41 / K7S41GX Support CD One 80-conductor Ultra ATA 66/100/133 IDE Ribbon Cable One Ribbon Cable for a 3.5-in Floppy Drive One ASRock...
Quick Installation Guide - Page 7
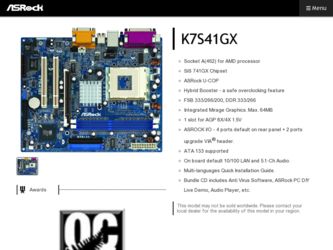
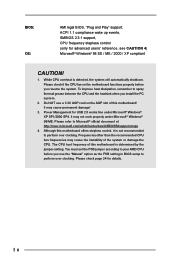
...1 PS/2 mouse port, 1 PS/2 keyboard port, 1 VGA port, 1 parallel port: ECP/EPP support, 1 RJ 45 port, 4 default USB 2.0 ports, 1 Game port, Audio Jack: Line Out / Line In / Microphone In AMI legal BIOS, "Plug and Play" support, ACPI 1.1 compliance wake up events, SMBIOS 2.3.1 support, CPU frequency stepless control (only for advanced users' reference, see CAUTION 4) Microsoft® Windows® 98...
Quick Installation Guide - Page 15
... the predetermined choices. For the detailed information about BIOS Setup, please refer to the User Manual (PDF file) contained in the Support CD.
4. Software Support CD information
This motherboard supports various Microsoft® Windows® operating systems: 98 SE/ ME / 2000 / XP. The Support CD that came with the motherboard contains necessary drivers and useful utilities that will enhance...