ASRock X99 WS-E/10G driver and firmware

Related ASRock X99 WS-E/10G Manual Pages
Download the free PDF manual for ASRock X99 WS-E/10G and other ASRock manuals at ManualOwl.com
User Manual - Page 4

Contents
Chapter 1 Introduction
7
1.1 Package Contents
7
1.2 Speciications
8
1.3 Motherboard Layout
13
1.4 I/O Panel
19
Chapter 2 Installation
23
2.1 Installing the CPU
24
2.2 Installing the CPU Fan and Heatsink
27
2.3 Installation of Memory Modules (DIMM)
28
2.4 Expansion Slots (PCI Express Slots)
30
2.5 Jumpers Setup
31
2.6 Onboard Headers and Connectors
32
2.7 Smart ...
User Manual - Page 5
...51
2.10.4 Driver Installation and Setup
52
2.11 M.2_SSD (NGFF) Module Installation Guide
53
2.12 SATA DOM (Disk on Module) Installation Guide
56
2.13 Dual LAN and Teaming Operation Guide
57
Chapter 3 Software and Utilities Operation
58
3.1 Installing Drivers
58
3.2 A-Tuning
59
3.3 ASRock APP Shop
65
3.3.1 UI Overview
65
3.3.2 Apps
66
3.3.3 BIOS & Drivers
69
3.3.4 Setting
70...
User Manual - Page 41
X99 WS-E/10G / X99 WS-E
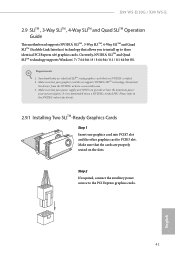
2.9 SLITM , 3-Way SLITM , 4-Way SLITM and Quad SLITM Operation Guide
his motherboard supports NVIDIA® SLITM , 3-Way SLITM, 4-Way SLITM and Quad SLITM (Scalable Link Interface) technology that allows you to install up to three identical PCI Express x16 graphics cards. Currently, NVIDIA® SLITM and Quad SLITM technology supports Windows® 7 / 7 64-bit / 8 / 8 64-...
User Manual - Page 47
X99 WS-E/10G / X99 WS-E
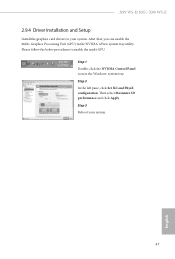
2.9.4 Driver Installation and Setup
Install the graphics card drivers to your system. Ater that, you can enable the Multi-Graphics Processing Unit (GPU) in the NVIDIA® nView system tray utility. Please follow the below procedures to enable the multi-GPU.
Step 1 Double-click the NVIDIA Control Panel icon in the Windows® system tray. Step 2 In the let...
User Manual - Page 48
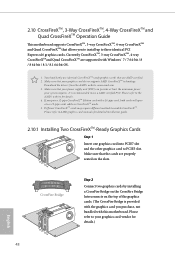
... CrossFireXTMand Quad CrossFireXTM are supported with Windows® 7 / 7 64-bit / 8 / 8 64-bit / 8.1 / 8.1 64-bit OS.
1. You should only use identical CrossFireXTM-ready graphics cards that are AMD certiied. 2. Make sure that your graphics card driver supports AMD CrossFireXTM technology.
Download the drivers from the AMD's website: www.amd.com 3. Make sure that your power supply unit (PSU) can...
User Manual - Page 52
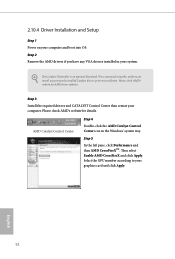
2.10.4 Driver Installation and Setup
Step 1 Power on your computer and boot into OS. Step 2 Remove the AMD drivers if you have any VGA drivers installed in your system.
he Catalyst Uninstaller is an optional download. We recommend using this utility to uninstall any previously installed Catalyst drivers prior to installation. Please check AMD's website for AMD driver updates.
Step 3
Install the ...
User Manual - Page 58
Chapter 3 Software and Utilities Operation
3.1 Installing Drivers
he Support CD that comes with the motherboard contains necessary drivers and useful utilities that enhance the motherboard's features.
Running The Support CD
To begin using the support CD, insert the CD into your CD-ROM drive. he CD automatically displays the Main Menu if "AUTORUN" is enabled in your computer. If the Main Menu does ...
User Manual - Page 59
X99 WS-E/10G / X99 WS-E
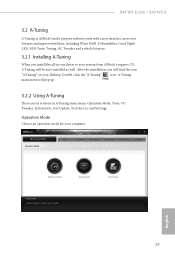
3.2 A-Tuning
A-Tuning is ASRock's multi purpose sotware suite with a new interface, more new features and improved utilities, including XFast RAM, Dehumidiier, Good Night LED, FAN-Tastic Tuning, OC Tweaker and a whole lot more.
3.2.1 Installing A-Tuning
When you install the all-in-one driver to your system from ASRock's support CD, A-Tuning will be auto-installed as well. ...
User Manual - Page 69
X99 WS-E/10G / X99 WS-E
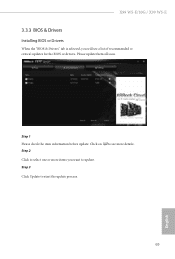
3.3.3 BIOS & Drivers
Installing BIOS or Drivers
When the "BIOS & Drivers" tab is selected, you will see a list of recommended or critical updates for the BIOS or drivers. Please update them all soon.
Step 1 Please check the item information before update. Click on Step 2
to see more details.
Click to select one or more items you want to update. Step 3
Click Update to ...
User Manual - Page 95
...
X99 WS-E/10G / X99 WS-E
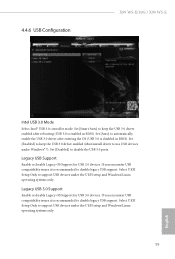
Intel USB 3.0 Mode
Select Intel® USB 3.0 controller mode. Set [Smart Auto] to keep the USB 3.0 driver enabled ater rebooting (USB 3.0 is enabled in BIOS). Set [Auto] to automatically enable the USB 3.0 driver ater entering the OS (USB 3.0 is disabled in BIOS). Set [Enabled] to keep the USB 3.0 driver enabled (Must install driver to use USB devices under Windows...
User Manual - Page 98
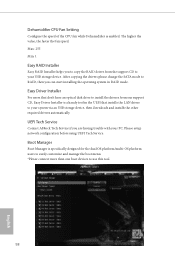
...don't have an optical disk drive to install the drivers from our support CD, Easy Driver Installer is a handy tool in the UEFI that installs the LAN driver to your system via an USB storage device, then downloads and installs the other required drivers automatically.
UEFI Tech Service
Contact ASRock Tech Service if you are having trouble with your PC. Please setup network coniguration before using...
RAID Installation Guide - Page 7
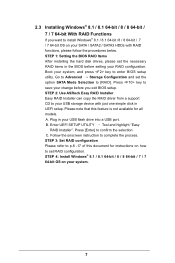
... and set the option SATA Mode Selection to [RAID]. Press key to save your change before you exit BIOS setup. STEP 2: Use ASRock Easy RAID Installer Easy RAID Installer can copy the RAID driver from a support CD to your USB storage device with just one simple click in UEFI setup. Please note that this feature is not available for all models. A. Plug in your USB lash drive into a USB port. B. Enter...
RAID Installation Guide - Page 18
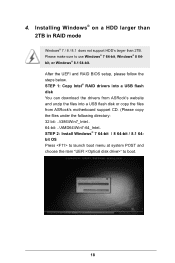
4. Installing Windows® on a HDD larger than 2TB in RAID mode
Windows® 7 / 8 / 8.1 does not support HDD's larger than 2TB. Please make sure to use Windows® 7 64-bit, Windows® 8 64bit, or Windows® 8.1 64-bit. After the UEFI and RAID BIOS setup, please follow the steps below. STEP 1: Copy Intel® RAID drivers into a USB lash disk You can download the drivers from ASRock's...
RAID Installation Guide - Page 19
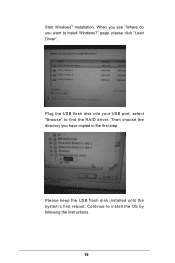
Start Windows® Installation. When you see "Where do you want to install Windows?" page, please click "Load Driver".
Plug the USB flash disk into your USB port; select "Browse" to find the RAID driver. Then choose the directory you have copied in the irst step.
Please keep the USB flash disk installed until the system's first reboot. Continue to install the OS by following the instructions.
19
RAID Installation Guide - Page 20
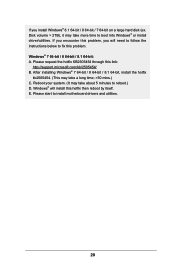
.... Disk volume > 2TB), it may take more time to boot into Windows® or install driver/utilities. If you encounter this problem, you will need to follow the instructions below to ix this problem. Windows® 7 64-bit / 8 64-bit / 8.1 64-bit: A. Please request the hotix KB2505454 through this link:
http://support.microsoft.com/kb/2505454/ B. After installing Windows...
Intel Rapid Storage Guide - Page 12
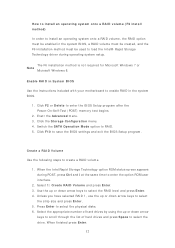
...load t he I nt el® Rapid St orage Technology driver during operat ing syst em set up.
The F6 inst allat ion m et hod is not required for Microsoft Windows 7 or Note
Microsoft Windows...er t he BI OS Set up program aft er t he Power- On- Self- Test ( POST) m em ory t est begins.
2. Enet r t he Adva nce d m enu. 3. Click t he St or a ge Con figu r a t ion m enu. 4. Swit ch t he SATA Ope r a t ion ...
Intel Rapid Storage Guide - Page 16
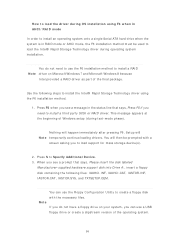
... all a t hird part y SCSI or RAI D driver. This m essage appears at the beginning of Windows setup ( during text- m ode phase) .
Not hing will happen im m ediat ely aft er pressing F6. Set up will N ot e t em porarily cont inue loading drivers. You will t hen be prom pt ed wit h a
screen asking you to load support for m ass storage device(s) .
2. Press S t o Spe...
Marvell SATA3 RAID Installation Guide - Page 2
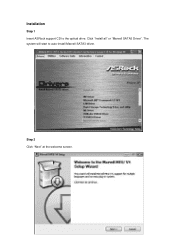
Installation
Step 1 Insert ASRock support CD to the optical drive. Click "Install all" or "Marvell SATA3 Driver". The system will start to auto-install Marvell SATA3 driver.
Step 2 Click "Next" at the welcome screen.
2
Marvell SATA3 RAID Installation Guide - Page 4
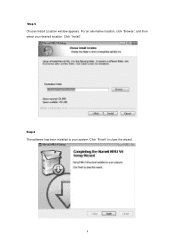
Step 5 Choose Install Location window appears. For an alternative location, click "Browse", and then select your desired location. Click "Install".
Step 6 The software has been installed to your system. Click "Finish" to close the wizard.
4
Marvell SATA3 RAID Installation Guide - Page 6
...
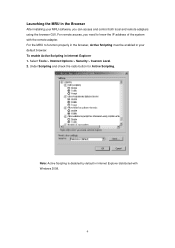
After installing your MRU software, you can access and control both local and remote adapters using the browser GUI. For remote access, you need to know the IP address of the system with the remote adapter. For the MRU to function properly in the browser, Active Scripting must be enabled in your default browser. To enable Active Scripting in Internet...