Acer P8800 driver and firmware
Related Acer P8800 Manual Pages
Download the free PDF manual for Acer P8800 and other Acer manuals at ManualOwl.com
User Manual - Page 3
... for cleaning.
Caution for plug as disconnecting device
Observe the following guidelines when connecting and disconnecting power to the external power supply unit:
• Install the power supply unit before connecting the power cord to the AC power outlet.
• Unplug the power cord before removing the power supply unit from the projector.
• If the system has multiple sources...
User Manual - Page 5
... damaged • the product exhibits a distinct change in performance, indicating a need
for service • the product does not operate normally after following the operating
instructions
Note: Adjust only those controls that are covered by the operating instructions, since improper adjustment of other controls may result in damage and will often require extensive work by a qualified...
User Manual - Page 6
... "Lamp Reset" function from the Onscreen display "Setup lamp settings menu " menu after replacing the lamp module. • Do not attempt to disassemble this projector. There are dangerous high voltages inside which may hurt you. The only user serviceable part is the lamp which has its own removable cover. Refer servicing only to suitable qualified professional...
User Manual - Page 9
......14 Remote control...15
SETUP AND INSTALLATION 17
Installing the projector...17 Connecting sources to the projector 18 Adjusting the projector image...19 Remote setup...20
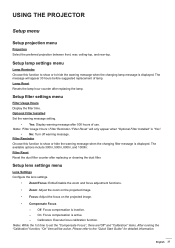
USING THE PROJECTOR 22
Powering on / off the projector 22 Selecting an input source...23 Menu navigation and features 24 OSD Menu tree...25 Display image settings menu...33 Display aspect ratio menu...35 Display edge...
User Manual - Page 10
... menu...39 Setup reset menu...40 Network LAN menu...40 Network control menu...41 Setup network control settings menu 42 Info menu...47
MAINTENANCE 48
Replacing the lamp...48
ADDITIONAL INFORMATION 50
Compatible resolutions...50 Image size and projection distance 52 Projector dimensions and ceiling mount installation 53 IR remote control codes...54 Troubleshooting...56 Warning indicators...
User Manual - Page 17
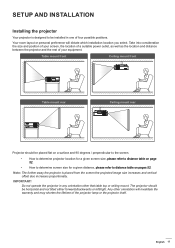
SETUP AND INSTALLATION
Installing the projector
Your projector is designed to be installed in one of four possible positions.
Your room layout or personal preference will dictate which installation location you select. Take into consideration the size and position of your screen, the location of a suitable power outlet, as well as the location and distance between the projector and the...
User Manual - Page 18
... INSTALLATION
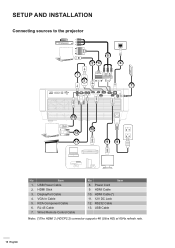
Connecting sources to the projector
5
34
6
1 2
RS-232 USB Power Out(5V-1.5A) Service
HDMI 1
12V Out A
12V Out B
HDMI 2 (HDCP2.2) DisplayPort
HDMI 3
VGA/YPbPr
RJ-45
HDMI Out
Wired Remote
7
MOLEX
13
10 12
11
9
8
MOLEX
No
Item
1. USB Power Cable
2. HDMI Stick
3. DisplayPort Cable
4. VGA In Cable
5. RCA Component Cable
6. RJ-45 Cable
7. Wired Remote Control...
User Manual - Page 19
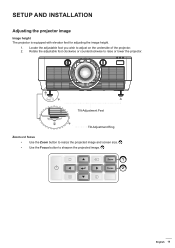
SETUP AND INSTALLATION
Adjusting the projector image
Image height The projector is equipped with elevator feet for adjusting the image height.
1. Locate the adjustable foot you wish to adjust on the underside of the projector. 2. Rotate the adjustable foot clockwise or counterclockwise to raise or lower the projector.
Tilt-Adjustment Feet
Tilt-Adjustment Ring
Zoom and focus...
User Manual - Page 20
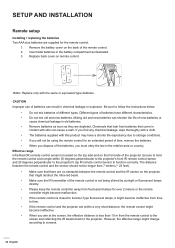
SETUP AND INSTALLATION
Remote setup
Installing / replacing the batteries Two AAA size batteries are supplied for the remote control.
1. Remove the battery cover on the back of the remote control. 2. Insert AAA batteries in the battery compartment as illustrated. 3. Replace back cover on remote control.
Notee: Replace only with the same or equivalent type batteries.
CAUTION Improper use of ...
User Manual - Page 21
...Correction
PIP/PBP
On
Off
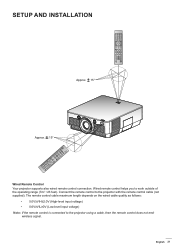
SETUP AND INSTALLATION
Approx. 15°
Approx. 15°
Wired Remote Control Your projector supports also wired remote control connection. Wired remote control helps you to work outside of the operating range (7m/ ~23 feet). Connect the remote control to the projector with the remote control cable (not supplied). The remote control cable maximum length depends on the...
User Manual - Page 28
USING THE PROJECTOR
Main Menu
Sub Menu
Sub Menu 2
Filter Usage Hours
Optional Filter Installed
Sub Menu 3
Fitler Settings
Filter Reminder
Sub Menu 4
Filter Reset Zoom/Focus Zoom Lens Settings Focus
Setup
Compensate Focus
Direct Power On
Auto Power Off (min)
Power Settings Sleep Timer (min)
Always On
Power Mode (Standby)
Security
Security
Security Timer Change Password
Month Day ...
User Manual - Page 37
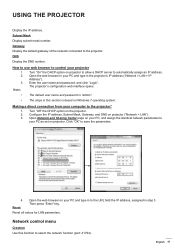
... hours before suggested replacement of lamp. Lamp Reset Resets the lamp hour counter after replacing the lamp.
Setup filter settings menu
Filter Usage Hours Display the filter time. Optional Filter Installed Set the warning message setting.
‡‡ Yes: Display warning message after 500 hours of use. Note: "Filter Usage Hours / Filter Reminder / Filter Reset" will only...
User Manual - Page 41
... section is based on Windows 7 operating system.
Making a direct connection from your computer to the projector*
1. Turn "Off" the DHCP option on the projector. 2. Configure the IP address, Subnet Mask, Gateway, and DNS on projector ("Network > LAN"). 3. Open Network and Sharing Center page on your PC, and assign the identical network parameters to
your PC as set on projector. Click "OK" to...
User Manual - Page 42
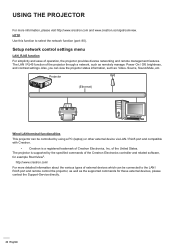
...function of the projector through a network, such as remotely manage: Power On / Off, brightness, and contrast settings. Also, you can view the projector status information, such as: Video- Source, Sound-Mute, etc.
Projector (Ethernet)
Wired LAN terminal functionalities This projector can be controlled by using a PC (laptop) or other external device via LAN / RJ45 port and compatible with Crestron...
User Manual - Page 43
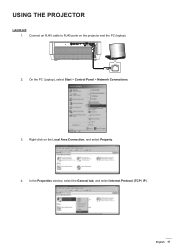
... an RJ45 cable to RJ45 ports on the projector and the PC (laptop).
RS-232 USB Power Out(5V-1.5A) Service
HDMI 1
12V Out A
12V Out B
HDMI 2 (HDCP2.2) DisplayPort
HDMI 3
VGA/YPbPr
RJ-45
HDMI Out
Wired Remote
2. On the PC (Laptop), select Start > Control Panel > Network Connections.
3. Right-click on the Local Area Connection, and select Property. 4. In the Properties window, select the...
User Manual - Page 44
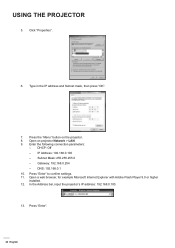
... projector Network > LAN. 9. Enter the following connection parameters:
±± DHCP: Off ±± IP Address: 192.168.0.100 ±± Subnet Mask: 255.255.255.0 ±± Gateway: 192.168.0.254 ±± DNS: 192.168.0.1 10. Press "Enter" to confirm settings. 11. Open a web browser, for example Microsoft Internet Explorer with Adobe Flash Player 9.0 or higher installed...
User Manual - Page 46
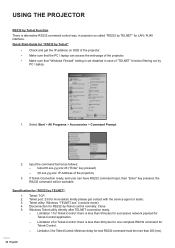
... command control way, in projector so called "RS232 by TELNET" for LAN / RJ45 interface. Quick Start-Guide for "RS232 by Telnet"
‡‡ Check and get the IP address on OSD of the projector. ‡‡ Make sure that the PC / laptop can access the web-page of the projector. ‡‡ Make sure that "Windows Firewall" setting is set disabled...
User Manual - Page 53
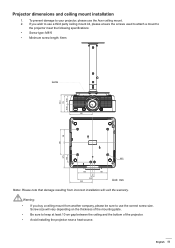
... ceiling mount installation
1. To prevent damage to your projector, please use the Acer ceiling mount. 2. If you wish to use a third party ceiling mount kit, please ensure the screws used to attach a mount to
the projector meet the following specifications: ‡ Screw type: M8*6 ‡ Minimum screw length: 6mm
Lens
250
191.9 178 85...
User Manual - Page 56
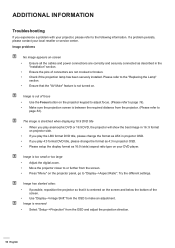
...; Please setup the display format as 16:9 (wide) aspect ratio type on your DVD player.
I mage is too small or too large ‡‡ Adjust the digital zoom. ‡‡ Move the projector closer to or further from the screen. ‡‡ Press "Menu" on the projector panel, go to "Display-->Aspect Ratio". Try the different settings.
I mage...
User Manual - Page 60
... 2160p: 80" to 200"inches for optical range 2.4 m (80") ~ 9m (300") for optical range
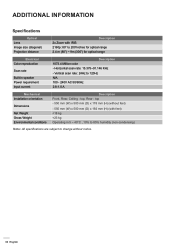
Electrical Color reproduction
Scan rate
Built-in speaker Power requirement Input current
Description 1073.4 Million color - Horizontal scan rate: 15.375~91.146 KHz
- Vertical scan rate: 24Hz to 120Hz N/A 100 - 240V AC 50/60Hz 2.8-1.0 A
Mechanical Installation orientation
Dimensions
Net Weight Gross Weight...