Acer Veriton S480G driver and firmware
Drivers and firmware downloads for this Acer Computers item


Related Acer Veriton S480G Manual Pages
Download the free PDF manual for Acer Veriton S480G and other Acer manuals at ManualOwl.com
Service Guide - Page 1
Veriton S480G/S488G/S480 Service Guide
Service guide files and updates are available on the AIPG/CSD web; for more information please refer to
http://csd.acer.com.tw
PRINTED IN TAIWAN
I
Service Guide - Page 2
Revision History
Please refer to the table below for the updates made on Veriton S480G/S488G/S480 Service Guide.
Date
Chapter
Updates
II
Service Guide - Page 3
... in a retrieval system, or translated into any language or computer language, in any form or by any means, electronic, mechanical, magnetic, optical, chemical, manual or otherwise, without the prior written permission of Acer Incorporated.
Disclaimer
The information in this guide is subject to change without notice. Acer Incorporated makes no representations or warranties, either expressed or...
Service Guide - Page 4
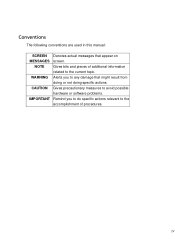
... this manual:
SCREEN MESSAGES
NOTE
WARNING
CAUTION
IMPORTANT
Denotes actual messages that appear on screen. Gives bits and pieces of additional information related to the current topic. Alerts you to any damage that might result from doing or not doing specific actions. Gives precautionary measures to avoid possible hardware or software problems...
Service Guide - Page 7
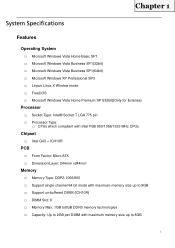
...; Socket Type: Intel® Socket T LGA 775 pin … Processor Type:
… CPUs which compliant with Intel FSB 800/1066/1333 MHz CPUs
Chipset
… Intel G43 + ICH10R
PCB
… Form Factor: Micro ATX … Dimension/Layer: 244mm x244mm
Memory
… Memory Type: DDR3 1066/800 … Support single channel 64 bit mode with maximum...
Service Guide - Page 8
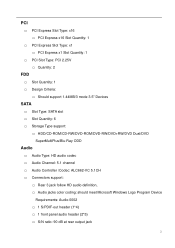
... Storage Type support:
… HDD/CD-ROM/CD-RW/DVD-ROM/DVD-RW/DVD+RW/DVD Dual/DVD SuperMultiPlus/Blu-Ray ODD
Audio
… Audio Type: HD audio codec … Audio Channel: 5.1 channel … Audio Controller /Codec: ALC662-VC 5.1CH … Connectors support:
… Rear 3 jack follow HD audio definition, … Audio jacks color coding: should meet Microsoft Windows Logo Program Device
Requirements...
Service Guide - Page 17
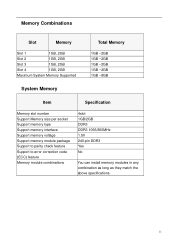
... 1GB ~8GB
System Memory
Item
Specification
Memory slot number Support Memory size per socket Support memory type Support memory interface Support memory voltage Support memory module package Support to parity check feature Support to error correction code (ECC) feature Memory module combinations
4slot 1GB/2GB DDR3 DDR3 1066/800MHz 1.5V 240-pin DDR3 Yes No
You can install memory modules in any...
Service Guide - Page 22
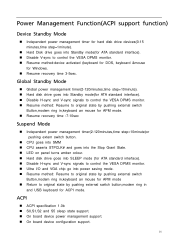
... Function(ACPI support function)
Device Standby Mode
„ Independent power management timer for hard disk drive devices(0-15 minutes,time step=1minute).
„ Hard Disk drive goes into Standby mode(for ATA standard interface). „ Disable V-sync to control the VESA DPMS monitor. „ Resume method:device activated (keyboard for DOS, keyboard &mouse
for Windows. „ Resume recovery time...
Service Guide - Page 36
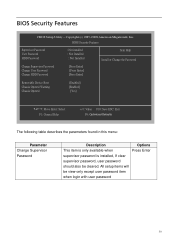
... Security Features
CMOS Setup Utility - Copyright (c) 1985-2008,American Megatrends, Inc. BIOS Security Features
Supervisor Password User Password HDD Password
Change Supervisor Password Change User Password Change HDD Password
: Not installed : Not Installed : Not Installed
[Press Enter] [Press Enter] [Press Enter]
Item Help Install or Change the Password
Removable Device Boot Chassis Opened...
Service Guide - Page 37

..., Inc.
Product Information
PC Health Status
Standard CMOS Features
Frequency/Voltage Control
Advance BIOS Features CMOS Load Default Settings? BIOS Security Features
Advanced Chipset Features BIOS
LLooaabbDDeefafauultltSeStetitntignsgs
Integrated Peripherals Power Management Setup
[OK]
[CancalS] ave & Exit Setup Exit Without Saving
KLIJ: Move Enter: Select F1: General Help
+/-/: Value...
Service Guide - Page 73
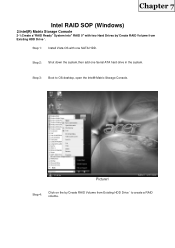
Chapter 7
Intel RAID SOP (Windows)
2.Intel(R) Matrix Storage Console
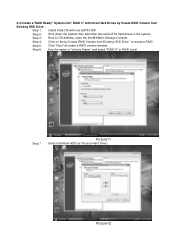
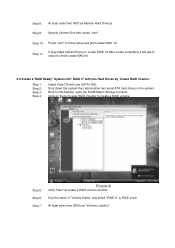
2-1:Create a"RAID Ready" System into" RAID 0" with two Hard Drives by'Create RAID Volume from Existing HDD Drive '.
Step 1: Install Vista OS with one SATA HDD.
Step 2: Shut down the system,then add one Serial ATA hard drive in the system.
Step 3: Boot to OS desktop, open the Intel® Matrix Storage Console.
Picture1
Picture1...
Service Guide - Page 74
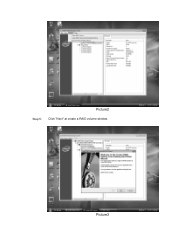
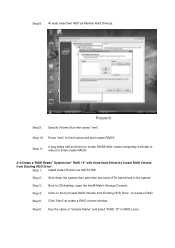
Picture2
Step 5: Click "Next" at create a RAID volume window.
Picture3
Service Guide - Page 78
... HDD Drive '.
Step 1: Install Vista OS with one SATA HDD.
Step 2: Shut down the system,then add another Serial ATA hard drive in the system.
Step 3: Boot to OS desktop, open the Intel® Matrix Storage Console.
Step 4:
Click on the by'Create RAID Volume from Existing HDD Drive ' to create a RAID volume.
Step 5: Step 6:
Click "Next" at create a RAID volume window. Key...
Service Guide - Page 79
... Existing HDD Drive '.
Step 1: Install Vista OS with one SATA HDD. Step 2: Shut down the system,then add other two serial ATA hard drives in the system. Step 3: Boot to OS desktop, open the Intel® Matrix Storage Console. Step 4: Click on the by'Create RAID Volume from Existing HDD Drive ' to create a RAID Step 5: Click "Next" at create a RAID volume window. Step...
Service Guide - Page 80
... Existing HDD Drive '.
Step 1: Install Vista OS with one SATA HDD.
Step 2: Shut down the system,then add other two serial ATA hard drives in the system.
Step 3: Boot to OS desktop, open the Intel® Matrix Storage Console.
Step 4: Step 5:
Click on the by'Create RAID Volume from Existing HDD Drive ' to create a RAID Click "Next" at create a RAID volume window.
Step...
Service Guide - Page 82
... 1: Step 2: Step 3: Step 4:
Install Vista OS with one SATA HDD. Shut down the system,then add another two serial ATA hard drives in the system. Boot to OS desktop, open the Intel® Matrix Storage Console. Click on the by'Create RAID Volume' to create a RAID volume.
Step 5: Step 6: Step 7:
Picture16
Click "Next" at create a RAID volume window.
Key the name...
Service Guide - Page 84
... Hard Drives by 'Create RAID Volume '.
Step 1: Install Vista OS with one SATA HDD.
Step 2: Shut down the system,then add another three serial ATA hard drives in the system.
Step 3: Boot to OS desktop, open the Intel® Matrix Storage Console.
Step 4: Click on the by'Create RAID Volume' to create a RAID volume.
Step 5: Click "Next" at create a RAID volume window.
Step...
Service Guide - Page 87
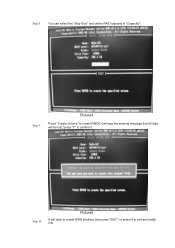
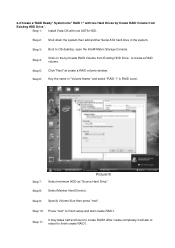
Step 8:
You can select the "Strip Size" and define RAID capacity in "Capactity".
Step 9:
Picture4
Press "Create Volume" to create RAID0,it will pop the warning message that all data will be lost,"press "Y" to confirm it.
Step 10:
Picture5
It will back to create RAID interface,then press "ESC" or select 4 to exit and install OS.
Service Guide - Page 88
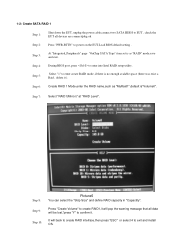
... SATA RAID 1
Step 1:
Shut down the EUT, unplug the power cable,connect two SATA HDDS to EUT , check the EUT all devices are connect/plug ok
Step 2: Press "PWR-BTTN" to power on the EUT,Load BIOS default setting .
Step 3:
At "Integrated_Peripherals" page "OnChip SATA Type" item set is as "RAID" mode,save and exit.
Step 4: During BIOS post, press to enter into Intel RAID setup...
Service Guide - Page 89
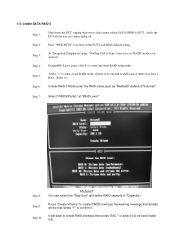
... SATA RAID 5
Step 1:
Shut down the EUT, unplug the power cable,connect three SATA HDDS to EUT , check the EUT all devices are connect/plug ok
Step 2: Press "PWR-BTTN" to power on the EUT,Load BIOS default setting .
Step 3:
At "Integrated_Peripherals" page "OnChip SATA Type" item set is as "RAID" mode,save and exit.
Step 4: During BIOS post, press to enter into Intel RAID setup...