Asus P5CR-VM driver and firmware

Related Asus P5CR-VM Manual Pages
Download the free PDF manual for Asus P5CR-VM and other Asus manuals at ManualOwl.com
User Guide - Page 4
... the first time 3-1 3.2 Powering off the computer 3-2
Using the OS shut down function 3-2
Chapter 4: BIOS setup
4.1 Managing and updating your BIOS 4-1 4.1.1 Creating a bootable floppy disk 4-1 4.1.2 AFUDOS utility 4-2 4.1.3 ASUS EZ Flash utility 4-5 4.1.4 ASUS CrashFree BIOS 2 utility 4-6 4.1.5 ASUS Update utility 4-8
4.2 BIOS setup program 4-11 4.2.1 BIOS menu screen 4-12 4.2.2 Menu...
User Guide - Page 8
... contains the information you need when installing and configuring the motherboard.
How this guide is organized
This manual contains the following parts: • Chapter 1: Product introduction
This chapter describes the features of the motherboard and the new technology it supports. • Chapter 2: Hardware information This chapter lists the hardware setup procedures that you have to perform...
User Guide - Page 11
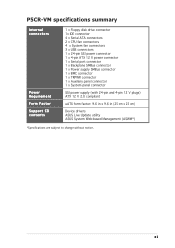
P5CR-VM specifications summary
Internal connectors
Power Requirement Form Factor Support CD contents
1 x Floppy disk drive connector 1x IDE connector 4 x Serial ATA connectors 2 x CPU fan connectors 4 x System fan connectors 3 x USB connectors 1 x 24-pin SSI power connector 1 x 4-pin ATX 12 V power connector 1 x Serial port connector 1 x Backplane SMBus connector 1 x Power supply SMBus connector...
User Guide - Page 27

...
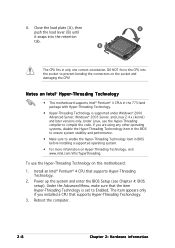
thumb and forefinger to a
B
100º angle (A), then push
the PnP cap from the load
plate window to remove (B).
Load plate
5. Position the CPU over
the socket, making
sure that the gold
triangle is on the
bottom-left corner of
the socket. The socket alignment key A l i g n m e n t k e y
should fit into the
CPU notch.
Gold triangle mark
ASUS P5CR-VM
A 2-7
User Guide - Page 28
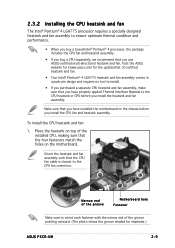
... an Intel® Pentium® 4 CPU that supports Hyper-Threading Technology.
2. Power up the system and enter the BIOS Setup (see Chapter 4: BIOS setup). Under the Advanced Menu, make sure that the item Hyper-Threading Technology is set to Enabled. The item appears only if you installed a CPU that supports Hyper-Threading Techonology.
3. Reboot the computer.
2-8
Chapter 2: Hardware information
User Guide - Page 29
... the holes on the motherboard.
Orient the heatsink and fan assembly such that the CPU fan cable is closest to the CPU fan connector.
Narrow end of the groove
Motherboard hole Fastener
Make sure to orient each fastener with the narrow end of the groove pointing outward. (The photo shows the groove shaded for emphasis.)
ASUS P5CR-VM
2-9
User Guide - Page 35

... BIOS setup.
2. Assign an IRQ to the card. Refer to the tables on the next page. 3. Install the software drivers for the expansion card.
When using PCI cards on shared slots, ensure that the drivers support "Share IRQ" or that the cards do not need IRQ assignments. Otherwise, conflicts will arise between the two PCI groups, making the system unstable and the card inoperable.
ASUS P5CR-VM...
User Guide - Page 46
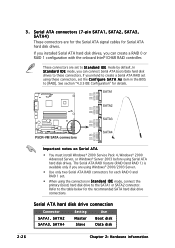
... RAID controller.
These connectors are set to S t a n d a r d I D E mode by default. In S t a n d a r d I D E mode, you can connect Serial ATA boot/data hard disk drives to these connectors. If you intend to create a Serial ATA RAID set using these connectors, set the C o n f i g u r e S A T A A s item in the BIOS to [RAID]. See section "4.3.5 IDE Configuration" for details.
P5CR-VM
P5CR-VM SATA...
User Guide - Page 61
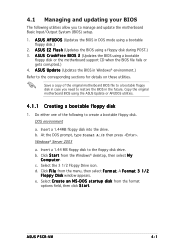
... disk to the floppy disk drive. b. Click S t a r t from the Windows® desktop, then select M y
C o m p u t e r. c. Select the 3 1/2 Floppy Drive icon. d. Click F i l e from the menu, then select F o r m a t. A F o r m a t 3 1 / 2
F l o p p y D i s k window appears. e. Select C r e a t e a n M S - D O S s t a r t u p d i s k from the format
options field, then click S t a r t.
ASUS P5CR-VM...
User Guide - Page 62
... the Windows® 2000 CD to the optical drive. c. Click S t a r t, then select R u n. d. In the O p e n field, type D:\bootdisk\makeboot a:
assuming that D is your optical drive letter. e. Press , then follow screen instructions to continue.
2. Copy the original or the latest motherboard BIOS file to the bootable floppy disk.
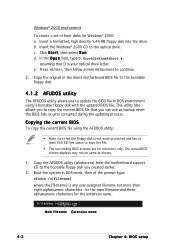
4.1.2 AFUDOS utility
The AFUDOS utility allows you to update the BIOS...
User Guide - Page 63
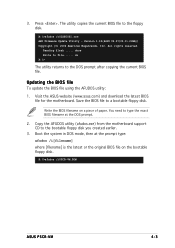
...The utility copies the current BIOS file to the floppy disk.
A:\>afudos /oOLDBIOS1.rom AMI Firmware Update Utility - Version 1.19(ASUS V2.07(03.11.24BB)) Copyright (C) 2002 American Megatrends, Inc. All rights reserved.
Reading flash ..... done Write to file...... ok A:\>
The utility returns to the DOS prompt after copying the current BIOS file.
Updating the BIOS file
To update the BIOS file using...
User Guide - Page 64
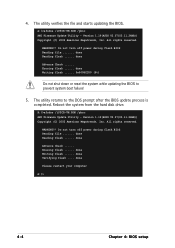
...to the DOS prompt after the BIOS update process is completed. Reboot the system from the hard disk drive.
A:\>afudos /iP5CR-VM.ROM /pbnc AMI Firmware Update Utility - Version 1.19(ASUS V2.07(03.11.24BB)) Copyright (C) 2002 American Megatrends, Inc. All rights reserved.
WARNING!! Do not turn off power during flash BIOS Reading file ....... done Reading flash ...... done
Advance Check ...... Erasing...
User Guide - Page 65
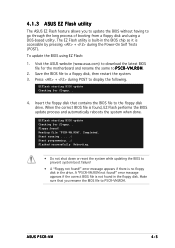
...; Do not shut down or reset the system while updating the BIOS to prevent system boot failure!
• A "Floppy not found!" error message appears if there is no floppy disk in the drive. A "P5CR-VM.ROM not found!" error message appears if the correct BIOS file is not found in the floppy disk. Make sure that you rename the BIOS file to P5CR-VM.ROM.
ASUS P5CR-VM
4-5
User Guide - Page 67
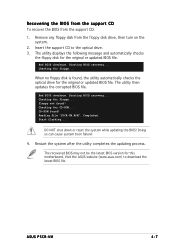
...! Reading file "P5CR-VM.ROM". Completed. Start flashing...
DO NOT shut down or reset the system while updating the BIOS! Doing so can cause system boot failure!
4. Restart the system after the utility completes the updating process.
The recovered BIOS may not be the latest BIOS version for this motherboard. Visit the ASUS website (www.asus.com) to download the latest BIOS file.
ASUS P5CR-VM
4-7
User Guide - Page 68
...with the motherboard package.
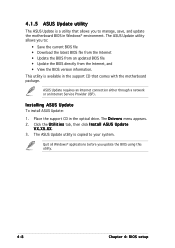
ASUS Update requires an Internet connection either through a network or an Internet Service Provider (ISP).
Installing ASUS Update
To install ASUS Update:
1. Place the support CD in the optical drive. The D r i v e r s menu appears. 2. Click the U t i l i t i e s tab, then click I n s t a l l A S U S U p d a t e
V X . X X . X X. 3. The ASUS Update utility is copied to...
User Guide - Page 69
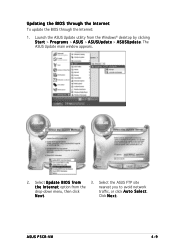
... Windows® desktop by clicking S t a r t > P r o g r a m s > A S U S > A S U S U p d a t e > A S U S U p d a t e. The ASUS Update main window appears.
2. Select U p d a t e B I O S f r o m
3. Select the ASUS FTP site
t h e I n t e r n e t option from the
nearest you to avoid network
drop-down menu, then click
traffic, or click A u t o S e l e c t.
N e x t.
Click N e x t.
ASUS P5CR-VM...
User Guide - Page 70
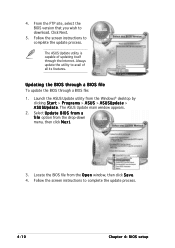
... the BIOS version that you wish to download. Click Next.
5. Follow the screen instructions to complete the update process.
The ASUS Update utility is capable of updating itself through the Internet. Always update the utility to avail of all its features.
Updating the BIOS through a BIOS file
To update the BIOS through a BIOS file: 1. Launch the ASUS Update utility from the Windows® desktop by...
User Guide - Page 71
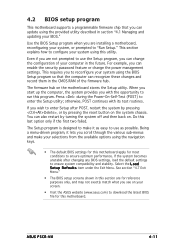
... can enable the security password feature or change the power management settings. This requires you to reconfigure your system using the BIOS Setup program so that the computer can recognize these changes and record them in the CMOS RAM of the firmware hub.
The firmware hub on the motherboard stores the Setup utility. When you start up the computer, the system provides you...
User Guide - Page 76
... devices installed in the system. Select an item then press if you want to configure the item.
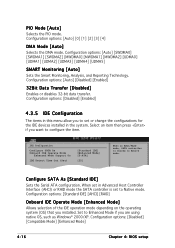
IDE Configuration
Configure SATA As Onboard IDE Operate Mode
Enhanced Mode Support On
IDE Detect Time Out (Sec)
[Standard IDE] [Enhanced Mode] [S-ATA]
[35]
When in AHCI/RAID mode, SATA controller is forced to Native mode.
Configure SATA As [Standard IDE]
Sets the Serial ATA...
User Guide - Page 83
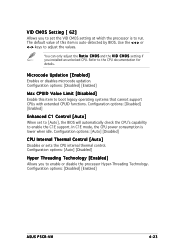
... C1E mode, the CPU power consumption is lower when idle. Configuration options: [Auto] [Disabled]
CPU Internal Thermal Control [Auto]
Disables or sets the CPU internal thermal control. Configuration options: [Auto] [Disabled]
Hyper Threading Technology [Enabled]
Allows you to enable or disable the processor Hyper-Threading Technology. Configuration options: [Disabled] [Enabled]
ASUS P5CR-VM
4-23