Asus P5GC-VM Pro driver and firmware

Related Asus P5GC-VM Pro Manual Pages
Download the free PDF manual for Asus P5GC-VM Pro and other Asus manuals at ManualOwl.com
User Manual - Page 31
... BIOS BIOS
BIOS 程式
BIOS 程式。
1.2MB
BIOS
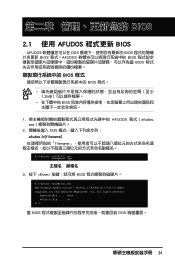
1 AFUDOS 程式(afudos. exe
2 DOS afudos /o[filename filename
A:\>afudos /oOLDBIOS1.rom
3. 按下 afudos /oOLDBIOS1.rom AMI Firmware Update Utility - Version 1.19(ASUS V2.07(03.11.24BB)) Copyright (C) 2002 American Megatrends, Inc. All rights reserved.
Reading flash...
User Manual - Page 32
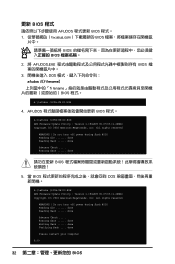
...afudos /iP5B-VM DO.ROM AMI Firmware Update Utility - Version 1.19(ASUS V2.07(03.11.24BB)) Copyright (C) 2002 American Megatrends, Inc. All rights reserved.
WARNING!! Do not turn off power during flash BIOS Reading file ....... done Reading flash ...... done
Advance Check ...... Erasing flash ...... done Writing flash ...... done Verifying flash .... done
Please restart your computer
A:\>
32 BIOS
User Manual - Page 4
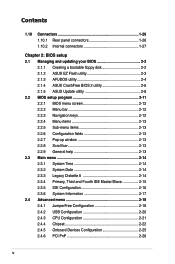
...Creating a bootable floppy disk 2-2 2.1.2 ASUS EZ Flash utility 2-3 2.1.3 AFUDOS utility 2-4 2.1.4 ASUS CrashFree BIOS 2 utility 2-6 2.1.5 ASUS Update utility 2-8 2.2 BIOS setup program 2-11 2.2.1 BIOS menu screen 2-12 2.2.2 Menu bar 2-12 2.2.3 Navigation keys 2-12 2.2.4 Menu items 2-13 2.2.5 Sub-menu items 2-13 2.2.6 Configuration fields 2-13 2.2.7 Pop-up window 2-13 2.2.8 Scroll bar...
User Manual - Page 5
... Priority 2-32 2.6.2 Hard Disk Drives 2-32 2.6.3 Boot Settings Configuration 2-33 2.6.4 Security 2-34
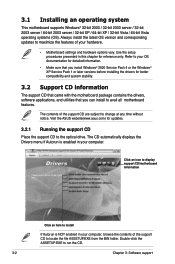
2.7 Exit menu 2-36 Chapter 3: Software support 3.1 Installing an operating system 3-2 3.2 Support CD information 3-2
3.2.1 Running the support CD 3-2 3.2.2 Drivers menu 3-3 3.2.3 Utilities menu 3-4 3.2.4 ASUS Contact information 3-5 Appendix: CPU features A.1 Enhanced Intel SpeedStep...
User Manual - Page 8
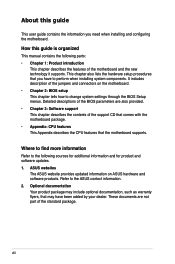
... procedures that you have to perform when installing system components. It includes description of the jumpers and connectors on the motherboard. • Chapter 2: BIOS setup This chapter tells how to change system settings through the BIOS Setup menus. Detailed descriptions of the BIOS parameters are also provided. • Chapter 3: Software support This chapter describes the contents of the...
User Manual - Page 11
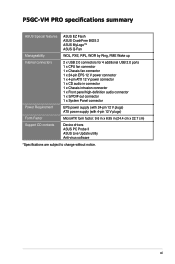
P5GC-VM PRO specifications summary
ASUS Special features
ASUS EZ Flash ASUS CrashFree BIOS 2 ASUS MyLogo™ ASUS Q-Fan
Manageability
WOL, PXE, RPL, WOR by Ring, PME Wake up
Internal connectors
2 x USB 2.0 connectors for 4 additional USB 2.0 ports 1 x CPU fan connector 1 x Chassis fan connector 1 x 24-pin EPS 12 V power connector 1 x 4-pin ATX 12 V power connector 1 x ...
User Manual - Page 22
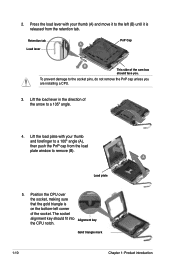
... the PnP cap unless you are installing a CPU.
3. Lift the load lever in the direction of the arrow to a 135º angle.
4. Lift the load plate with your thumb and forefinger to a 100º angle (A), then push the PnP cap from the load plate window to remove (B).
B A
Load plate
5. Position the CPU over the socket, making sure that...
User Manual - Page 33
... system cover.
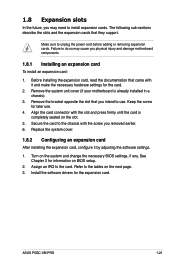
1.8.2 Configuring an expansion card
After installing the expansion card, configure it by adjusting the software settings.
1. Turn on the system and change the necessary BIOS settings, if any. See Chapter 2 for information on BIOS setup.
2. Assign an IRQ to the card. Refer to the tables on the next page. 3. Install the software drivers for the expansion card.
ASUS P5GC-VM PRO
1-21
User Manual - Page 35
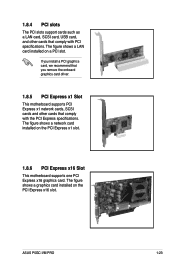
... PCI Express x1 Slot
This motherboard supports PCI Express x1 network cards, SCSI cards and other cards that comply with the PCI Express specifications. The figure shows a network card installed on the PCI Express x1 slot.
1.8.6 PCI Express x16 Slot
This motherboard supports one PCI Express x16 graphics card. The figure shows a graphics card installed on the PCI Express x16 slot.
ASUS P5GC-VM PRO...
User Manual - Page 48
.../Output System (BIOS) setup.
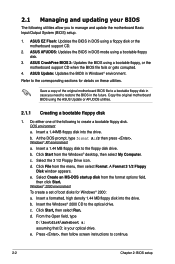
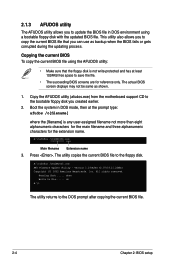
1. ASUS EZ Flash: Updates the BIOS in DOS using a floppy disk or the motherboard support CD.
2. ASUS AFUDOS: Updates the BIOS in DOS mode using a bootable floppy disk.
3. ASUS CrashFree BIOS 2: Updates the BIOS using a bootable floppy, or the motherboard support CD when the BIOS file fails or gets corrupted.
4. ASUS Update: Updates the BIOS in Windows® environment...
User Manual - Page 49
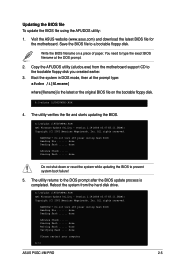
... shut down or reset the system while updating the BIOS to prevent system boot failure!
• A "Floppy not found!" error message appears if there is no floppy disk in the drive. A "P5GCVMPRO.ROM not found!" error message appears if the correct BIOS file is not found in the floppy disk. Make sure that you rename the BIOS file to P5GCVMPRO.ROM.
ASUS P5GC-VM PRO
2-
User Manual - Page 50
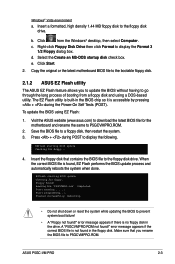
... alphanumeric characters for the extension name.
A:\>afudos /oOLDBIOS1.rom
Main filename Extension name
3. Press . The utility copies the current BIOS file to the floppy disk.
A:\>afudos /oOLDBIOS1.rom AMI Firmware Update Utility - Version 1.19(ASUS V2.07(03.11.24BB)) Copyright (C) 2002 American Megatrends, Inc. All rights reserved.
Reading flash ..... done Write to file...... ok A:\>
The utility...
User Manual - Page 51
...iP5GCVMPRO.ROM AMI Firmware Update Utility - Version 1.19(ASUS V2.07(03.11.24BB)) Copyright (C) 2002 American Megatrends, Inc. All rights reserved.
WARNING!! Do not turn off power during flash BIOS Reading file ....... done Reading flash ...... done
Advance Check ...... Erasing flash ...... done Writing flash ...... done Verifying flash .... done
Please restart your computer
A:\>
ASUS P5GC-VM PRO...
User Manual - Page 54
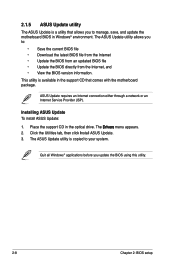
...available in the support CD that comes with the motherboard package.
ASUS Update requires an Internet connection either through a network or an Internet Service Provider (ISP).
Installing ASUS Update To install ASUS Update:
1. Place the support CD in the optical drive. The Drivers menu appears. 2. Click the Utilities tab, then click Install ASUS Update. 3. The ASUS Update utility is copied to your...
User Manual - Page 56
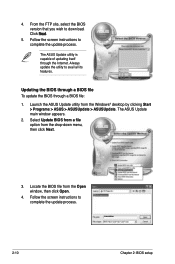
... the BIOS version that you wish to download. Click Next.
5. Follow the screen instructions to complete the update process.
The ASUS Update utility is capable of updating itself through the Internet. Always update the utility to avail all its features.
Updating the BIOS through a BIOS file To update the BIOS through a BIOS file:
1. Launch the ASUS Update utility from the Windows® desktop by...
User Manual - Page 57
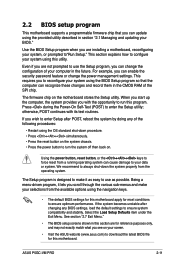
.... For example, you can enable the security password feature or change the power management settings. This requires you to reconfigure your system using the BIOS Setup program so that the computer can recognize these changes and record them in the CMOS RAM of the SPI chip.
The firmware chip on the motherboard stores the Setup utility. When you start up the...
User Manual - Page 86
... the drivers, software applications, and utilities that you can install to avail all motherboard features.
The contents of the support CD are subject to change at any time without notice. Visit the ASUS website(www.asus.com) for updates.
3.2.1 Running the support CD
Place the support CD to the optical drive. The CD automatically displays the Drivers menu if Autorun is enabled in your computer...
User Manual - Page 87
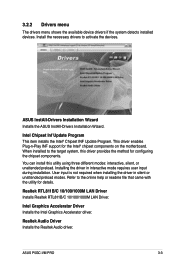
...when installing the driver in silent or unattended preload modes. Refer to the online help or readme file that came with the utility for details.
Realtek RTL811B/C 10/100/1000M LAN Driver Installs Realtek RTL811B/C 10/100/1000M LAN Driver.
Intel Graphics Accelerator Driver Installs the Intel Graphics Accelerator driver.
Realtek Audio Driver Installs the Realtek Audio driver.
ASUS P5GC-VM PRO
3-
User Manual - Page 88

..., and system voltages, and alerts you of any detected problems. This utility helps you keep your computer in healthy operating condition.
ASUS Update The ASUS Update utility allows you to update the motherboard BIOS in a Windows® environment. This utility requires an Internet connection either through a network or an Internet Service Provider (ISP).
3-
Chapter 3: Software support
User Manual - Page 92
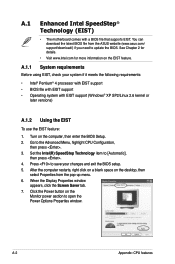
... CPU Configuration,
then press . 3. Set the Intel(R) SpeedStep Technology item to [Automatic],
then press . 4. Press to save your changes and exit the BIOS setup. 5. After the computer restarts, right click on a blank space on the desktop, then
select Properties from the pop-up menu. 6. When the Display Properties window
appears, click the Screen Saver tab. 7. Click the Power button...