Asus PCH DR - Motherboard - Extended ATX driver and firmware
Drivers and firmware downloads for this Asus item

Related Asus PCH DR Manual Pages
Download the free PDF manual for Asus PCH DR and other Asus manuals at ManualOwl.com
User Guide - Page 2
... the express written permission of ASUSTeK COMPUTER INC. ("ASUS"). Product warranty or service will not be extended if: (1) the product is repaired, modified or altered, unless such repair, modification of alteration is authorized in writing by ASUS; or (2) the serial number of the product is defaced or missing. ASUS PROVIDES THIS MANUAL "AS IS" WITHOUT WARRANTY OF ANY...
User Guide - Page 3
... vi About this guide vii PCH-DR specifications summary ix
Chapter 1: Product introduction
1.1 Welcome 1-1 1.2 Package contents 1-1 1.3 Special features 1-2
Chapter 2: Hardware information
2.1 Before you proceed 2-1 2.2 Motherboard installation 2-2
2.2.1 Placement direction 2-2 2.2.2 Screw holes 2-2 2.2.3 Motherboard layout 2-3 2.2.4 Layout Contents 2-4 2.3 Central Processing Unit (CPU...
User Guide - Page 4
...4.4 Advanced menu 4-15 4.4.1 CPU Configuration 4-15 4.4.2 Memory Configuration 4-16 4.4.3 Chipset 4-18 4.4.4 Onboard Device 4-20 4.4.5 PCIPnP 4-25 4.4.6 USB Configuration 4-27
4.5 Power menu 4-28 4.5.1 APM Configuration 4-28 4.5.2 Hardware Monitor 4-31
4.6 Boot menu 4-33 4.6.1 Boot Device Priority 4-33 4.6.2 Hard Disk Boot Priority 4-34 4.6.3 Removable Device Priority 4-34 4.6.4 Boot...
User Guide - Page 5
...limits for a Class B digital device, pursuant to Part 15 of the FCC Rules. These limits are designed to provide reasonable protection against harmful interference in a residential installation. This equipment generates, ... the dealer or an experienced radio/TV technician for help.
The use of shielded cables for connection of the monitor to the graphics card is required to assure compliance with ...
User Guide - Page 6
... to fix it by yourself. Contact a qualified service technician or your retailer.
Operation safety
• Before installing the motherboard and adding devices on it, carefully read all the manuals that came with the package.
• Before using the product, make sure all cables are correctly connected and the power cables are not damaged. If you detect any damage...
User Guide - Page 7
... the motherboard.
How this guide is organized
This manual contains the following parts: • Chapter 1: Product introduction
This chapter describes the features of the PCH-DR motherboard. It includes brief descriptions of the special attributes of the motherboard and the new technology it supports. • Chapter 2: Hardware installation This chapter lists the hardware setup procedures...
User Guide - Page 8

... used in this guide
To make sure that you perform certain tasks properly, take note of the following symbols used throughout this manual.
WARNING: Information to...additional information and for product and software updates. 1. ASUS Websites
The ASUS websites worldwide provide updated information on ASUS hardware and software products. Refer to the ASUS contact information. 2. Optional Documentation...
User Guide - Page 9
... Gigabit LAN controller (32-bit)
1 x PS/2 keyboard port 1 x PS/2 mouse port 2 x USB 2.0 ports 1 x Serial port 1 x Video port 2 x RJ-45 ports (LAN1, LAN2)
Floppy disk drive connector Serial ATA connectors IDE connectors SMBus connector RAID ATA/133/100/66/33 connector Serial ATA RAID connectors Parallel port connector SSI power connectors Mini-PCI connector Serial port 2 connector Power supply...
User Guide - Page 10
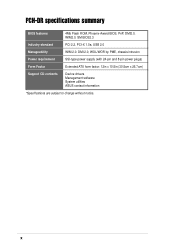
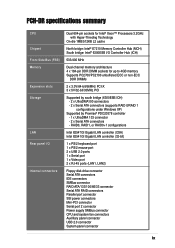
PCH-DR specifications summary
BIOS features
4Mb Flash ROM, Phoenix-Award BIOS, PnP, DMI2.0, WfM2.0, SM BIOS2.3
Industry standard
PCI 2.2, PCI-X 1.0a, USB 2.0
Manageability
WfM 2.0. DMI 2.0, WOL/WOR by PME, chassis intrusion
Power requirement
SSI-type power supply (with 24-pin and 8-pin power plugs)
Form Factor
Extended ATX form factor: 12in x 10.5in (30.5cm x 26.7cm)
Support CD contents...
User Guide - Page 13
...your computing needs. Before you start installing the motherboard, and hardware devices on it, check the items in your package with the list below.
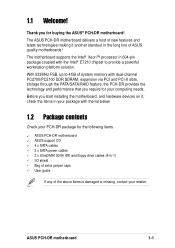
1.2 Package contents
Check your PCH-DR package for the following items.
ASUS PCH-DR motherboard ASUS support CD 4 x SATA cables 2 x SATA power cables 3 x UltraDMA100/66 IDE and floppy drive cables (4-in-1) I/O shield Bag of extra jumper caps User guide...
User Guide - Page 17
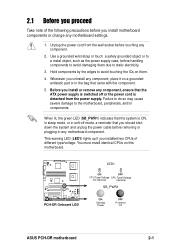
Chapter 2
This chapter describes the hardware setup procedures that you have to perform when installing system components. It includes details on the switches, jumpers, and connectors on the motherboard.
Hardware information
User Guide - Page 18
Chapter summary
2.1 Before you proceed 2-1 2.2 Motherboard installation 2-2 2.3 Central Processing Unit (CPU 2-6 2.4 System memory 2-13 2.5 Expansion slots 2-16 2.6 Jumpers 2-19 2.7 Connectors 2-24
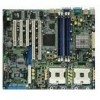
ASUS PCH-DR motherboard
User Guide - Page 19
... unplug the power cable before removing or plugging in any motherboard component.
This warning LED (LED1) lights up if you installed two CPUs of different type/voltage. You must install identical CPUs on this motherboard.
LED1
ON
OFF
CPU Type/Voltage CPU Type/Voltage
not identical
identical
SB_PWR1
PCH-DR
PCH-DR Onboard LED
ON
Standby Power
OFF
Powered Off
ASUS PCH-DR motherboard
2-1
User Guide - Page 34
... cover.
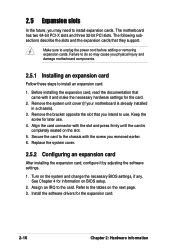
2.5.2 Configuring an expansion card
After installing the expansion card, configure it by adjusting the software settings.
1. Turn on the system and change the necessary BIOS settings, if any. See Chapter 4 for information on BIOS setup.
2. Assign an IRQ to the card. Refer to the tables on the next page. 3. Install the software drivers for the expansion card.
2-16
Chapter 2: Hardware...
User Guide - Page 40
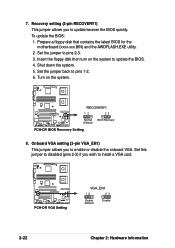
... update the BIOS. 4. Shut down the system. 5. Set the jumper back to pins 1-2. 6. Turn on the system.
RECOVERY1
12
23
Normal (Default)
PCH-DR
PCH-DR BIOS Recovery Setting
BIOS Recovery
8. Onboard VGA setting (3-pin VGA_EN1)
This jumper allows you to enable or disable the onboard VGA. Set this jumper to disabled (pins 2-3) if you wish to install a VGA card.
PCH-DR
PCH-DR VGA Setting
VGA_EN1...
User Guide - Page 43
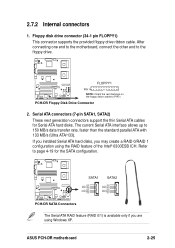
... 1.
PCH-DR
PCH-DR Floppy Disk Drive Connector
2. Serial ATA connectors (7-pin SATA1, SATA2) These next generation connectors support the thin Serial ATA cables for Serial ATA hard disks. The current Serial ATA interface allows up to 150 MB/s data transfer rate, faster than the standard parallel ATA with 133 MB/s (Ultra ATA/133). If you installed Serial ATA hard disks, you may create a RAID 0/RAID...
User Guide - Page 59
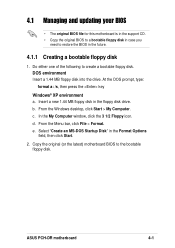
...MB floppy disk in the floppy disk drive. b. From the Windows desktop, click Start > My Computer. c. In the My Computer window, click the 3 1/2 Floppy icon. d. From the Menu bar, click File > Format. e. Select "Create an MS-DOS Startup Disk" in the Format Options
field, then click Start.
2. Copy the original (or the latest) motherboard BIOS to the bootable floppy disk.
ASUS PCH-DR motherboard
4-1
User Guide - Page 60

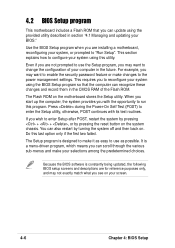
... Updating the BIOS
The Basic Input/Output System (BIOS) can be updated using the AwardBIOS Flash Utility. Follow these instructions to update the BIOS using this utility.
1. Download the latest BIOS file from the ASUS web site. Rename the file to *.BIN and save it to a floppy disk.
Save only the updated BIOS file in the floppy disk to avoid loading the wrong BIOS file.
2. Copy the AwardBIOS Flash...
User Guide - Page 64
... to enable the security password feature or make changes to the power management settings. This requires you to reconfigure your system using the BIOS Setup program so that the computer can recognize these changes and record them in the CMOS RAM of the Flash ROM.
The Flash ROM on the motherboard stores the Setup utility. When you start up the computer, the system provides you...
User Guide - Page 81
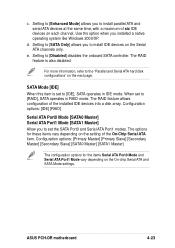
...] allows you to install parallel ATA and serial ATA devices at the same time, with a maximum of six IDE devices on each channel. Use ths option when you installed a native operating system like Windows 2000/XP.
d. Setting to [SATA Only] allows you to install IDE devices on the Serial ATA channels only.
e. Setting to [Disabled] disables the onboard SATA controller. The RAID feature is also disabled...