Dell PowerEdge 2550 driver and firmware

Related Dell PowerEdge 2550 Manual Pages
Download the free PDF manual for Dell PowerEdge 2550 and other Dell manuals at ManualOwl.com
Installing a Fifth SCSI
Hard-Disk Drive - Page 3
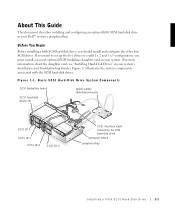
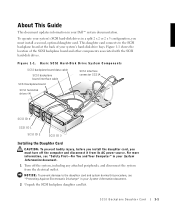
...daughter card, see "Installing Hard-Disk Drives" in your system's Installation and Troubleshooting Guide.) Figure 1-1 illustrates the system components associated with the SCSI hard-disk drives.
Figure 1-1. Basic SCSI Hard-Disk Drive System Components
.
SCSI backplane board
power supply distribution board
SCSI hard-disk drives (4)
SCSI ID 0 SCSI ID 1
SCSI ID 2
SCSI ID 3
SCSI interface cable...
Installing a Fifth SCSI
Hard-Disk Drive - Page 4
... SCSI backplane daughter card and a second SCSI host adapter. In this mode, the host adapter attached to connector SCSIB on the backplane controls slots SCSI ID 0 and SCSI ID 1, while the host adapter connected to connector SCSIA controls slots SCSI ID 2, SCSI ID 3, and the fifth drive slot, SCSI ID 4.
Installing a Fifth SCSI Hard-Disk Drive
Dell supplies SCSI hard-disk drives in special drive...
Installing a Fifth SCSI
Hard-Disk Drive - Page 5
...board interface cable connector
interposer board power cable connector
control panel cable connector
diskette drive/CD-ROM drive interface connector
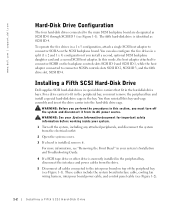
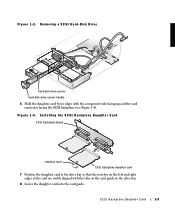
6 Loosen the thumbscrew at the back corner of the peripheral bay (see Figure 1-3). Figure 1-3. Installing the Hard-Disk Drive Cage in the Peripheral Bay
thumbscrew
hard-disk drive cage rails (2)
peripheral bay
Installing a Fifth SCSI Hard-Disk...
Installing a Fifth SCSI
Hard-Disk Drive - Page 6
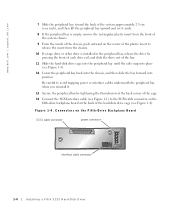
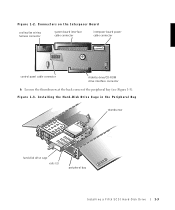
... the thumbscrew at the back corner of the cage. 14 Connect the SCSI interface cable (see Figure 1-1) to the SCSI cable connector on the
fifth-drive backplane board at the back of the hard-disk drive cage (see Figure 1-4).
Figure 1-4. Connectors on the Fifth-Drive Backplane Board
SCSI cable connector
power connector
interface cable connector
1-4
Installing a Fifth SCSI Hard-Disk Drive
Installing a Fifth SCSI
Hard-Disk Drive - Page 7
... the control panel cable, power cable, cooling fan wiring harness, and interposer board interface cable to the interposer board (see Figure 1-2).
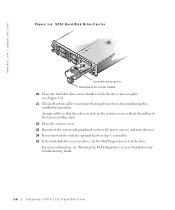
19 Install the fifth hard-disk drive by aligning the edge of the hard-disk drive carrier with the opening in the front of the hard-disk drive cage, and insert the carrier into the drive cage (see Figure 1-6).
Installing a Fifth SCSI Hard-Disk Drive
1-5
Installing a Fifth SCSI
Hard-Disk Drive - Page 8
www.dell.com | support.dell.com
Figure 1-6. SCSI Hard-Disk Drive Carrier
hard-disk drive carrier hard-disk drive carrier handle
20 Close the hard-disk drive carrier handle to lock the drive carrier in place (see Figure 1-6).
21 Check all system cable connections that might have been loosened during this installation procedure. Arrange cables so that they do not catch on the system covers or ...
SCSI Backplane
Daughter Card - Page 3
... Hard-Disk Drive System Components
SCSI backplane board data cable
SCSI backplane board interface cable
SCSI backplane board
SCSI hard-disk drives (4)
SCSI interface connector SCSIA
SCSI ID 0
SCSI ID 1
SCSI ID 2
SCSI ID 3
Installing the Daughter Card
CAUTION: To prevent bodily injury, before you install the daughter card, you must turn off the computer and disconnect it from its AC power...
SCSI Backplane
Daughter Card - Page 4

www.dell.com | support.dell.com
3 Open the system covers. See "Checking Inside the System" in your system's Installation and Troubleshooting Guide for more information.
4 If any hard-disk drives are installed in the right-hand drive bay, remove the hard-disk drive lock (see Figure 1-2).
Figure 1-2. Removing a Hard-Disk Drive Lock
hard-disk drive lock 5 Remove any hard-disk drives from the right-...
SCSI Backplane
Daughter Card - Page 5
...Removing a SCSI Hard-Disk Drive
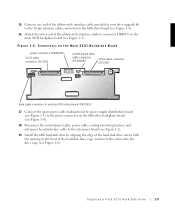
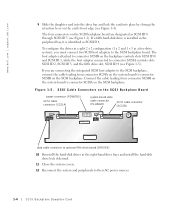
hard-disk drive carrier hard-disk drive carrier handle 6 Hold the daughter card by its edges with the component side facing up and the card connector facing the SCSI backplane (see Figure 1-4). Figure 1-4. Installing the SCSI Backplane Daughter Card
SCSI backplane board
retention lever
SCSI backplane daughter card
7 Position the daughter card in the drive bay so...
SCSI Backplane
Daughter Card - Page 6
...cable connector (SCSIA)
system-board data cable connector (PLANAR)
SCSI cable connector (SCSIB)
data cable connector to optional fifth drive board (DRIVE5)
10 Reinstall the hard-disk drives in the right-hand drive bays and install the hard-disk drive lock if desired.
11 Close the system covers. 12 Reconnect the system and peripherals to their AC power sources.
1-4
SCSI Backplane Daughter Card
Activating the Dell
PERC 3/Di - Page 3

... hard-disk drives before changing the mode of operation of the integrated SCSI controller from SCSI to RAID.
CAUTION: See "Protecting Against Electrostatic Discharge" in the safety instructions in your System Information document.
1 Open the system doors.
See "Opening the System Doors" in your system Installation and Troubleshooting Guide.
2 Open the ejectors on the RAID controller memory module...
Activating the Dell
PERC 3/Di - Page 5
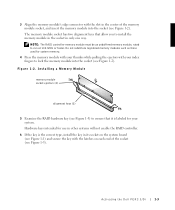
... 1-2).
Figure 1-2. Installing a Memory Module
memory module socket ejectors (2)
alignment keys (2)
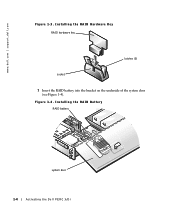
5 Examine the RAID hardware key (see Figure 1-3) to ensure that it is labeled for your system. Hardware keys intended for use in other systems will not enable the RAID controller.
6 If the key is the correct type, install the key in its socket on the system board (see...
Activating the Dell
PERC 3/Di - Page 6
www.dell.com | support.dell.com
Figure 1-3. Installing the RAID Hardware Key RAID hardware key
latches (2)
socket
7 Insert the RAID battery into the bracket on the underside of the system door (see Figure 1-4).
Figure 1-4. Installing the RAID Battery RAID battery
system door
1-4
Activating the Dell PERC 3/Di
Activating the Dell
PERC 3/Di - Page 7
... Devices section of the screen. • If the system displays the SCSI option, it did not detect the integrated RAID controller. Ensure that the RAID hardware key and RAID memory module are the correct type and repeat all hardware installation steps found earlier in this document. NOTICE: To avoid possible data loss, back up all data on the hard-disk drives...
Activating the Dell
PERC 3/Di - Page 8

... the RAID option to RAID Enabled. Channel A displays RAID, and Channel B displays SCSI. (When the RAID option is set to SCSI, Channel A and Channel B display SCSI.)
5 Press to save settings, and then reboot the system. 6 Configure the RAID subsystem and install the RAID driver and management software.
For more information, see the PERC 3/Di controller documentation.
1-6
Activating the Dell PERC...
Rack Installation Guide - Page 3
...any server, storage system, or appliance, as well as to various peripherals or supporting hardware.
WARNING: Installing Dell system components in a Dell rack without the front and side stabilizers installed could cause the... to be installed in a Dell rack by trained service technicians. If you install the kit in any other rack, be sure that the rack meets the specifications of a Dell rack.
•...
Rack Installation Guide - Page 19
...driver • Masking tape or felt-tip marker pen to mark the mounting holes
Two-Post RapidRails Rack Installation Tasks Installing a two-post RapidRails rack kit includes the following tasks:
1 Marking the rack 2 Installing the slide assemblies in the rack
a Center mount installation b Flush mount installation 3 Installing the system in the rack 4 Installing the cable... Installation Guide
1-13
Rack Installation Guide - Page 20
...dell.com | support.dell... inches (see Figure 1-3).
Installing the Slide Assemblies in the Rack You can install the slide assemblies in a...Installation To prepare the RapidRails slide assemblies for center-mount installation in the 2-post rack, perform the following steps:
1 Using a 3/8-inch nut driver...step 3 to install the left slide assembly in the rack. 5 Using a 3/8-inch nut driver, tighten the ...
Rack Installation Guide - Page 22

www.dell.com | support.dell.com
3 Place the bracket from the right slide assembly on the threaded studs on the left slide...mounting flange.
6 Perform steps 3 through 6 to install the right slide assembly in the rack. 7 The guide pin on the mounting flange should enter a mounting hole in the rack
(see Figure 1-13). 8 Use a 3/8-inch nut driver to fully tighten the locking nuts on the mounting ...
Rack Installation Guide - Page 30
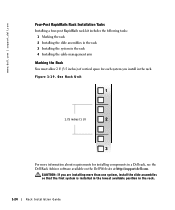
... rack 4 Installing the cable management arm Marking the Rack You must allow 2 U (3.5 inches) of vertical space for each system you install in the rack. Figure 1-19. One Rack Unit
1.75 inches (1 U)
For more information about requirements for installing components in a Dell rack, see the Dell Rack Advisor software available on the Dell Web site at http://support.dell.com.
CAUTION...