Dell Vostro 20 3015 driver and firmware
Related Dell Vostro 20 3015 Manual Pages
Download the free PDF manual for Dell Vostro 20 3015 and other Dell manuals at ManualOwl.com
Owners Manual - Page 3
...the online or telephone service and support team. Damage due to servicing that is not authorized by Dell is not covered by your warranty. Read and follow the safety instructions that came with ... computer. CAUTION: Handle components and cards with care. Do not touch the components or contacts on a card. Hold a card by its edges or by its metal mounting bracket. Hold a component such as a processor ...
Owners Manual - Page 5
... system, press and hold the power button for about 6 seconds to turn them off.
After Working Inside Your Computer
After you complete any replacement procedure, ensure you connect any external devices, cards, and cables before turning on your computer.
1. Replace the cover. CAUTION: To connect a network cable, first plug the cable into the network device and then plug it into the...
Owners Manual - Page 10
... information on how to remove or install the components from your computer.
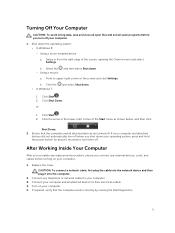
Removing the Stand
1. Follow the procedures in Before Working Inside Your Computer. 2. Place the computer on a flat surface, display side facing downwards. 3. Pry and remove the panel from the computer.
4. Remove the screws that secure the stand to the computer and remove it from the...
Owners Manual - Page 11
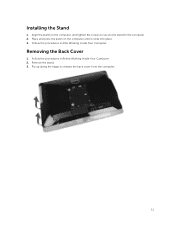
Installing the Stand
1. Align the stand on the computer, and tighten the screws to secure the stand to the computer. 2. Place and press the panel on the computer until it clicks into place. 3. Follow the procedures in After Working Inside Your Computer.
Removing the Back Cover
1. Follow the procedures in Before Working Inside Your Computer. 2. Remove the...
Owners Manual - Page 12
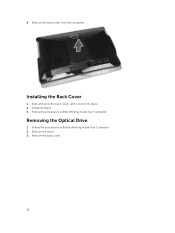
4. Remove the back cover from the computer.
Installing the Back Cover
1. Align and press the back cover, until it clicks into place. 2. Install the stand. 3. Follow the procedures in After Working Inside Your Computer.
Removing the Optical Drive
1. Follow the procedures in Before Working Inside Your Computer. 2. Remove the stand. 3. Remove the back cover.
12
Owners Manual - Page 13
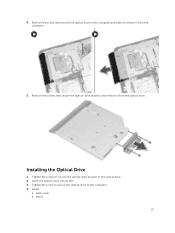
... optical drive to the computer and slide to remove it from the computer.
5. Remove the screws that secure the optical-drive bracket, and remove it from the optical drive.
Installing the Optical Drive
1. Tighten the screws to secure the optical-drive bracket to the optical drive. 2. Insert the optical-drive into its slot. 3. Tighten the screw to secure the optical-drive to the computer. 4. Install...
Owners Manual - Page 15

...release the hard drive. Remove the hard drive from the hard-drive bracket.
Installing the Hard Drive
1. Insert the hard drive into the hard-drive bracket. 2. Connect the hard-drive cable to the hard drive and align the hard drive to its slot on the computer. 3. Install:
a. back cover b. stand 4. Follow the procedures in After Working Inside Your Computer.
Removing the Convertor Board
1. Follow the...
Owners Manual - Page 16
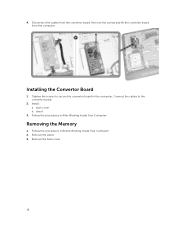
4. Disconnect the cables from the convertor board. Remove the screws and lift the convertor board from the computer.
Installing the Convertor Board
1. Tighten the screws to secure the convertor board to the computer. Connect the cables to the convertor board.
2. Install: a. back cover b. stand
3. Follow the procedures in After Working Inside Your Computer.
Removing the Memory
1. Follow the ...
Owners Manual - Page 17
... it from the computer.
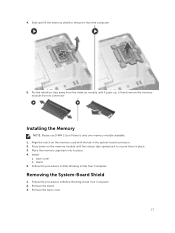
5. Pry the retention clips away from the memory module until it pops-up. Lift and remove the memory module from its connector.
Installing the Memory
NOTE: Please use DIMM 2 slot if there is only one memory module available. 1. Align the notch on the memory-card with the tab in the system-board connector. 2. Press down...
Owners Manual - Page 18
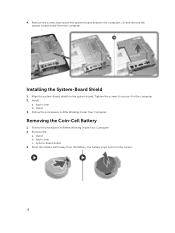
... screws that secure the system-board shield to the computer. Lift and remove the system-board shield from the computer.
Installing the System-Board Shield
1. Align the system-board shield on the system board. Tighten the screws to secure it to the computer. 2. Install:
a. back cover b. stand 3. Follow the procedures in After Working Inside Your Computer.
Removing the Coin-Cell Battery...
Owners Manual - Page 19
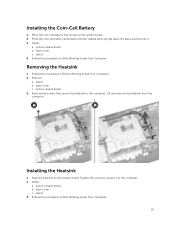
... in Before Working Inside Your Computer. 2. Remove:
a. stand b. back cover c. system-board shield 3. Remove the screws that secure the heatsink to the computer. Lift and remove the heatsink from the computer.
Installing the Heatsink
1. Align the heatsink on the system board. Tighten the screws to secure it to the computer. 2. Install:
a. system-board shield b. back cover c. stand 3. Follow...
Owners Manual - Page 21
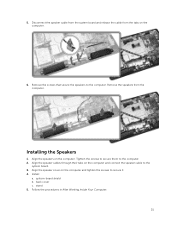
... speakers from the computer.
Installing the Speakers
1. Align the speakers on the computer. Tighten the screws to secure them to the computer. 2. Align the speaker cables through their tabs on the computer and connect the speaker cable to the
system board. 3. Align the speaker cover on the computer and tighten the screws to secure it. 4. Install:
a. system-board shield b. back cover...
Owners Manual - Page 22
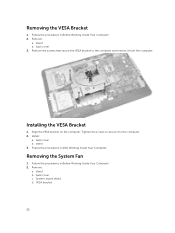
... computer and remove it from the computer.
Installing the VESA Bracket
1. Align the VESA bracket on the computer. Tighten the screws to secure it to the computer. 2. Install:
a. back cover b. stand 3. Follow the procedures in After Working Inside Your Computer.
Removing the System Fan
1. Follow the procedures in Before Working Inside Your Computer. 2. Remove:
a. stand b. back cover c. System-board...
Owners Manual - Page 23
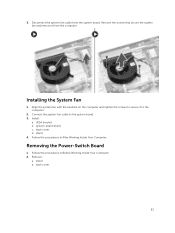
... the system fan with the heatsink on the computer and tighten the screws to secure it to the computer.
2. Connect the system-fan cable to the system board. 3. Install:
a. VESA bracket b. system-board shield c. back cover d. stand 4. Follow the procedures in After Working Inside Your Computer.
Removing the Power-Switch Board
1. Follow the procedures in Before Working Inside Your...
Owners Manual - Page 24
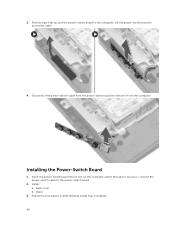
... secures the power-switch board to the computer. Lift the power-switch board to access the cable.
4. Disconnect the power-switch cable from the power-switch board to remove it from the computer.
Installing the Power-Switch Board
1. Insert the power-switch board into its slot on the computer and fix the tape to secure it. Connect the power-switch cable to the power-switch board.
2. Install: a. back...
Owners Manual - Page 26

... to the computer. 3. Connect the following cables to the system board:
a. camera cable b. LVDS cable c. system fan cable d. optical-drive cable e. hard-drive cable f. hard-drive/optical-drive power cable g. convertor-board cable h. touch cable (if available) i. power-switch cable j. speaker cable 4. Install: a. WLAN card b. heatsink c. system-board shield d. VESA bracket e. memory f. back cover...
Owners Manual - Page 28
...
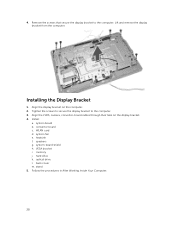
1. Align the display bracket on the computer. 2. Tighten the screws to secure the display bracket to the computer. 3. Align the LVDS, camera, convertor-board cables through their tabs on the display bracket. 4. Install:
a. system board b. convertor board c. WLAN card d. system fan e. heatsink f. speakers g. system-board shield h. VESA bracket i. memory j. hard drive k. optical drive l. back cover...
Owners Manual - Page 30
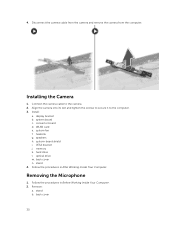
... remove the camera from the computer.
Installing the Camera
1. Connect the camera cable to the camera. 2. Align the camera into its slot and tighten the screws to secure it to the computer. 3. Install:
a. display bracket b. system board c. convertor board d. WLAN card e. system fan f. heatsink g. speakers h. system-board shield i. VESA bracket j. memory k. hard drive l. optical drive m. back cover...
Owners Manual - Page 36
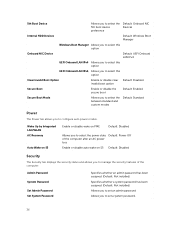
... the power state Default: Power Off of the computer after an AC power loss
Enable or disable auto wake on S5 Default: Disabled
Security
The Security tab displays the security status and allows you to manage the security features of the computer.
Admin Password
System Password
Set Admin Password Set System Password
Specifies whether an admin password has been assigned. (Default: Not installed...
Owners Manual - Page 37
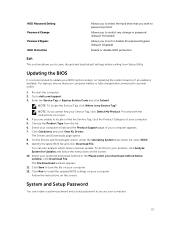
... discard and load default settings before exiting from Setup Utility.
Updating the BIOS
It is recommended to update your BIOS (system setup), on replacing the system board or if an update is available. For laptops, ensure that your computer battery is fully charged and connected to a power outlet
1. Re-start the computer. 2. Go to dell.com/support. 3. Enter the Service Tag or Express Service Code...