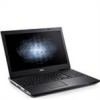
Dell Vostro 3750 driver and firmware
Related Dell Vostro 3750 Manual Pages
Download the free PDF manual for Dell Vostro 3750 and other Dell manuals at ManualOwl.com
User Manual - Page 1
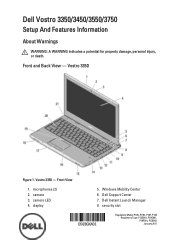
Dell Vostro 3350/3450/3550/3750
Setup And Features Information
About Warnings
WARNING: A WARNING indicates a potential for property damage, personal injury, or death.
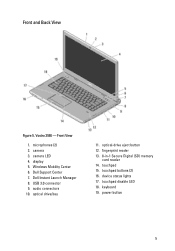
Front and Back View - Vostro 3350
Figure 1. Vostro 3350 - Front View
1. microphones (2) 2. camera 3. camera LED 4. display
5. Windows Mobility Center 6. Dell Support Center 7. Dell Instant Launch Manager 8. security slot
Regulatory...
User Manual - Page 3
... 3. Vostro 3450 - Front view
1. microphones (2) 2. camera 3. camera LED 4. display 5. Windows Mobility Center 6. Dell Support Center 7. Dell Instant Launch Manager 8. USB 3.0 connector 9. audio connectors
10. optical drive/bay 11. optical drive eject button 12. fingerprint reader 13. touchpad 14. touchpad buttons (2) 15. device status lights 16. touchpad disable LED 17. keyboard 18. power button...
User Manual - Page 5
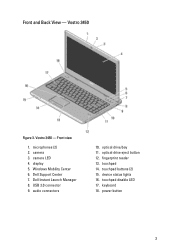
Front and Back View
Figure 5. Vostro 3550 - Front View
1. microphones (2) 2. camera 3. camera LED 4. display 5. Windows Mobility Center 6. Dell Support Center 7. Dell Instant Launch Manager 8. USB 3.0 connector 9. audio connectors 10. optical drive/bay
11. optical-drive eject button 12. fingerprint reader 13. 8-in-1 Secure Digital (SD) memory
card reader 14. touchpad 15. touchpad buttons (2) 16....
User Manual - Page 7
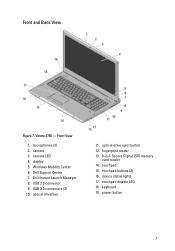
Front and Back View
Figure 7. Vostro 3750 - Front View
1. microphones (2) 2. camera 3. camera LED 4. display 5. Windows Mobility Center 6. Dell Support Center 7. Dell Instant Launch Manager 8. USB 2.0 connector 9. USB 3.0 connectors (2) 10. optical drive/bay
11. optical-drive eject button 12. fingerprint reader 13. 8-in-1 Secure Digital (SD) memory
card reader 14. touchpad 15. touchpad buttons ...
User Manual - Page 10
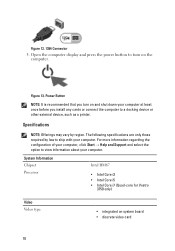
Figure 12. 1394 Connector
5. Open the computer display and press the power button to turn on the computer.
Figure 13. Power Button
NOTE: It is recommended that you turn on and shut down your computer at least once before you install any cards or connect the computer to a docking device or other external device, such as a printer.
Specifications
NOTE: Offerings may vary by...
User Manual - Page 16
...™ are trademarks of Advanced Micro Devices, Inc. Microsoft®, Windows®, MS-DOS®, Windows Vista®, the Windows Vista start button, and Office Outlook®...players. The Bluetooth® word mark is a registered trademark and owned by the Bluetooth® SIG, Inc. and any use of such mark by Dell Inc. is under license. Wi-Fi® is a registered trademark of Wireless Ethernet...
Owners Manual - Page 2
...™ are trademarks of Advanced Micro Devices, Inc. Microsoft®, Windows®, MS-DOS®, Windows Vista®, the Windows Vista start button, and Office Outlook®...players. The Bluetooth® word mark is a registered trademark and owned by the Bluetooth® SIG, Inc. and any use of such mark by Dell Inc. is under license. Wi-Fi® is a registered trademark of Wireless Ethernet...
Owners Manual - Page 3
... Your Computer 11
2 Battery...13
Removing The Battery...13 Installing The Battery...14
3 Secure Digital (SD) Card 15
Removing The Secure Digital (SD) Card 15 Installing The Secure Digital (SD) Card 16
4 ExpressCard 17
Removing The ExpressCard 17 Installing The ExpressCard 18
5 Keyboard...19
Removing The Keyboard 19 Installing The Keyboard 26
6 Memory Door 27
Removing The Memory Door...
Owners Manual - Page 4
...The Memory Module 30
8 Hard Drive 31
Removing The Hard Drive 31 Installing The Hard Drive 33
9 Optical Drive 35
Removing The Optical Drive 35 Installing The Optical Drive 37
10 Palm Rest 39
Removing The Palmrest 39 Installing The Palmrest...44
11 Hinge Cover 47
Removing The Hinge Cover 47 Installing The Hinge Cover 48
12 Wireless Local Area Network (WLAN) Card 51
Removing the Wireless...
Owners Manual - Page 5

... The Display Brackets And Hinges 73
18 Camera...75
Removing The Camera Module 75 Installing The Camera Module 77
19 Camera Cable 79
Removing The Camera Cable 79 Installing The Camera Cable 80
20 System Fan 83
Removing The System Fan 83 Installing The System Fan 84
21 ExpressCard Cable 87
Removing The ExpressCard Cable 87 Installing The ExpressCard Cable 88
22 ExpressCard Board 89...
Owners Manual - Page 6
... The PCH Heatsink 103 Installing The PCH Heatsink 104
27 Processor 107
Removing The Processor 107 Installing The Processor 108
28 Coin-Cell Battery 111
Removing The Coin-Cell Battery 111 Installing The Coin-Cell Battery 112
29 DC-In Port 115
Removing The DC-in Port 115 Installing The DC-in Port 116
30 Input/Output Board 119
Removing The...
Owners Manual - Page 9
... online or telephone service and support team. Damage due to servicing that is not authorized by Dell is not covered by your warranty. Read and follow the safety instructions that came with ... computer. CAUTION: Handle components and cards with care. Do not touch the components or contacts on a card. Hold a card by its edges or by its metal mounting bracket. Hold a component such as a processor by...
Owners Manual - Page 11
11. Remove any installed ExpressCards or Smart Cards from the appropriate slots.
Recommended Tools
The procedures in this document may require the following tools: • Small flat-blade screwdriver • #0 Phillips screwdriver • #1 Phillips screwdriver • Small plastic scribe • Flash BIOS update program CD
Turning Off Your Computer
CAUTION: To avoid losing data, save and ...
Owners Manual - Page 14

Installing The Battery
1. Slide the battery into its slot until it clicks into place. 2. Follow the procedures in After Working Inside Your Computer.
14
Owners Manual - Page 16
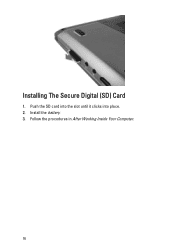
Installing The Secure Digital (SD) Card
1. Push the SD card into the slot until it clicks into place. 2. Install the battery. 3. Follow the procedures in After Working Inside Your Computer.
16
Owners Manual - Page 18
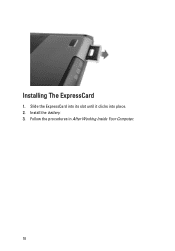
Installing The ExpressCard
1. Slide the ExpressCard into its slot until it clicks into place. 2. Install the battery. 3. Follow the procedures in After Working Inside Your Computer.
18
Owners Manual - Page 26
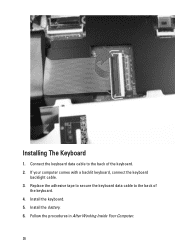
Installing The Keyboard
1. Connect the keyboard data cable to the back of the keyboard. 2. If your computer comes with a backlit keyboard, connect the keyboard
backlight cable. 3. Replace the adhesive tape to secure the keyboard data cable to the back of
the keyboard. 4. Install the keyboard. 5. Install the battery. 6. Follow the procedures in After Working Inside Your Computer.
26
Owners Manual - Page 28
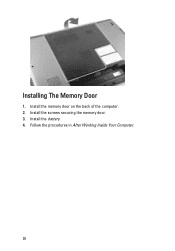
Installing The Memory Door
1. Install the memory door on the back of the computer. 2. Install the screws securing the memory door. 3. Install the battery. 4. Follow the procedures in After Working Inside Your Computer.
28
Owners Manual - Page 129
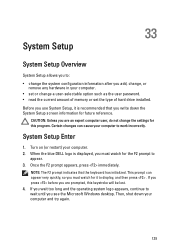
... add, change, or
remove any hardware in your computer. • set or change a user-selectable option such as the user password. • read the current amount of memory or set the type of hard drive installed. Before you use System Setup, it is recommended that you write down the System Setup screen information for future reference.
CAUTION: Unless you...
Owners Manual - Page 130
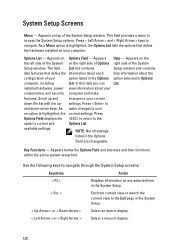
... right side of the System
Setup window. The field List and contains
Setup window and contains
lists features that define the information about each
help information about the
configuration of your
option listed in the Options option selected in Options
computer, including
List. In this field you can List.
installed hardware, power view information about your
conservation...