Dell Vostro V131 driver and firmware
Related Dell Vostro V131 Manual Pages
Download the free PDF manual for Dell Vostro V131 and other Dell manuals at ManualOwl.com
User Manual - Page 1

Dell Vostro V131
Setup And Features Information
About Warnings
WARNING: A WARNING indicates a potential for property damage, personal injury, or death.
Front And Back
Figure 1. Front View
1. microphone 2. camera 3. camera status light 4. display
5. Windows Mobility Center 6. Dell Support Center 7. Dell Instant Launch Manager 8. network connector
Regulatory Model : P18S Regulatory Type : P18S001
...
User Manual - Page 4

... 4. Network Connector
3. Connect USB devices, such as a mouse or keyboard (optional).
Figure 5. USB Connector
4. Open the computer display and press the power button to turn on the computer.
Figure 6. Power Button NOTE: It is recommended that you turn on and shut down your computer at least once before you install any cards or connect the computer to a docking device or other external device, such...
User Manual - Page 8

...8482;, Vostro™, and Wi-Fi Catcher™ are trademarks of Dell Inc. ... Devices, Inc. Microsoft®, Windows®, MS-DOS®, Windows Vista®, the Windows Vista...players. The Bluetooth® word mark is a registered trademark and owned by the Bluetooth® SIG, Inc. and any use of such mark by Dell Inc. is under license. Wi-Fi® is a registered trademark of Wireless Ethernet...
Owners Manual - Page 2

...™ are trademarks of Advanced Micro Devices, Inc. Microsoft®, Windows®, MS-DOS®, Windows Vista®, the Windows Vista start button, and Office Outlook®...players. The Bluetooth® word mark is a registered trademark and owned by the Bluetooth® SIG, Inc. and any use of such mark by Dell Inc. is under license. Wi-Fi® is a registered trademark of Wireless Ethernet...
Owners Manual - Page 3

...Digital (SD) Card 11
3 Removing The Battery 13
Installing The Battery...14
4 Removing The Subscriber Identity Module (SIM) Card 15
Installing The Subscriber Identity Module (SIM) Card 16
5 Removing The Keyboard 17
Installing The Keyboard 18
6 Removing The Base Cover 19
Installing The Base Cover 20
7 Removing The Memory 21
Installing The Memory...22
8 Removing The Hard Drive 23
Installing...
Owners Manual - Page 4

... Area Network (WLAN) Card 30
11 Removing The Wireless Wide Area Network (WWAN) Card.........31
Installing The Wireless Wide Area Network (WWAN 32
12 Removing The Display Assembly 33
Installing The Display Assembly 35
13 Removing The Display Bezel 37
Installing Display Bezel 38
14 Removing The Display Panel 39
Installing the Display Panel 41
15 Removing The Camera 43
Installing The Camera...
Owners Manual - Page 5

.../Output (I/O) Board 65
Installing The Input/Output (I/O) Board 66
24 Removing the DC-In Port 67
Installing The DC-In Port 69
25 Removing The LVDS Cable 71
Installing The Low-Voltage Differential Signalling (LVDS) Cable 72
26 System Setup 73
System Setup Overview 73 Entering System Setup...73 System Setup Screens...73 System Setup Menu Options 75
27 Diagnostics 79
Device Status Lights...
Owners Manual - Page 7

...the online or telephone service and support team. Damage due to servicing that is not authorized by Dell is not covered by your warranty. Read and follow the safety instructions that came with ... computer.
CAUTION: Handle components and cards with care. Do not touch the components or contacts on a card. Hold a card by its edges or by its metal mounting bracket. Hold a component such as a processor ...
Owners Manual - Page 8

... cable from your computer and then unplug the cable from the network device. 4. Disconnect all network cables from the computer. 5. Disconnect your computer and all attached devices from their electrical outlets. 6. Close the display and turn the computer upside-down on a flat work surface.
NOTE: To avoid damaging the system board, you must remove the main battery before you service the computer...
Owners Manual - Page 9

... cables before turning on your computer.
CAUTION: To avoid damage to the computer, use only the battery designed for this particular Dell computer. Do not use batteries designed for other Dell computers. 1. Connect any external devices, such as a port replicator, battery slice, or media base, and replace any cards, such as an ExpressCard. 2. Connect any telephone or network cables to your computer...
Owners Manual - Page 11

... the procedures in Before Working On Your Computer. 2. Press in on the SD card to release it from the computer.
3. Grasp the SD card and pull out to release from the computer.
Installing The Secure Digital (SD) Card 1. Slide the SD card into its slot and press until it clicks into place. 2. Follow the procedures in After working inside...
Owners Manual - Page 14

Installing The Battery 1. Insert the battery into its compartment. 2. Slide the battery into its slot until it clicks into place. 3. Install the Secure Digital (SD) Card. 4. Follow the procedures in After Working Inside Your Computer.
14
Owners Manual - Page 16

Installing The Subscriber Identity Module (SIM) Card 1. Insert the SIM card into the slot. 2. Install the battery. 3. Follow the procedures in After Working Inside Your Computer.
16
Owners Manual - Page 17

Removing The Keyboard
5
1. Follow the procedures in Before Working On Your Computer. 2. Remove the battery. 3. Pry the keyboard using a flat-head screw driver to remove the keyboard
retainers that secure keyboard to the computer.
4. Flip the keyboard over and lay it on the palm rest.
5. Lift the clip to release the keyboard cable and disconnect it from the system board. 17
Owners Manual - Page 18

6. Lift the keyboard up and away from the computer.
Installing The Keyboard 1. Connect the keyboard cable to the system board. 2. Insert the keyboard in its compartment. 3. Press down until the keyboard clicks into place in the computer. 4. Install the battery. 5. Follow the procedures in After Working Inside Your Computer.
18
Owners Manual - Page 20

Installing The Base Cover 1. Align the edge of the base cover on the computer and slide it on the
computer. 2. Tighten the screw to secure the base cover to the computer. 3. Install the battery 4. Follow the procedures in After Working Inside Your Computer.
20
Owners Manual - Page 22

Installing The Memory 1. Insert the memory module into the memory socket. 2. Press the clips to secure the memory module to the system board. 3. Install the base cover. 4. Install the battery. 5. Follow the procedures in After Working Inside Your Computer.
22
Owners Manual - Page 24
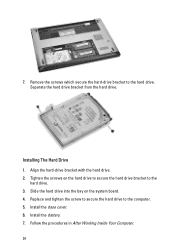
... drive bracket from the hard drive.
Installing The Hard Drive 1. Align the hard-drive bracket with the hard drive. 2. Tighten the screws on the hard drive to secure the hard drive bracket to the
hard drive. 3. Slide the hard drive into the bay on the system board. 4. Replace and tighten the screw to secure the hard drive to the computer. 5. Install the base cover. 6. Install...
Owners Manual - Page 73

... add, change, or remove any hardware in your computer.
• set or change a user-selectable option such as the user password. • read the current amount of memory or set the type of hard drive installed.
Before you use System Setup, it is recommended that you write down the System Setup screen information for future reference.
CAUTION: Unless you...
Owners Manual - Page 74

... right side of the System
Setup window. The field List and contains
Setup window and contains
lists features that define the information about each
help information about the
configuration of your
option listed in the Options option selected in Options
computer, including
List. In this field you can List.
installed hardware, power view information about your
conservation...