Edimax IR-113E driver and firmware

Related Edimax IR-113E Manual Pages
Download the free PDF manual for Edimax IR-113E and other Edimax manuals at ManualOwl.com
Datasheet - Page 1
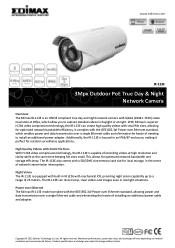
.../SDHC slot memory card slot for local storage, in the event of network transmission interruption. Night Vision The IR-113E is equipped with built-in IR LEDs with mechanical ICR, providing night vision capability up to a range of 25 meters. The IR-113E can record crisp, clear videos and images even in low light situations. Power over Ethernet The Edimax IR-113E model complies with...
Datasheet - Page 3

...Camera
Specifications
Lens
Sensor Night Vision Min. Illumination Memory
Focal Length F No. Iris Lens Mount Angle of View
Flash RAM
H.264
Video Codec
MPEG-4
M-JPEG
H.264
Video Quality
MPEG-4
M-JPEG
Audio Codec
Local Storage
Sensor (Alarm) in
Alarm out
Interface
Network Audio In / Out
LED Indicators
RS-485
Reset
Power over Ethernet
Motion Detection
Alarm Buffer
ONVIF
Digital...
Quick Install Guide - Page 2

... user manual on the CD‐ROM. The software and specifications are subject to change without notice. Please visit our website www.edimax.com for updates. All brand and product names mentioned in this manual are trademarks and/or registered trademarks of their respective holders.
Notice According to GNU General Public License Version 2
This product includes software that...
Quick Install Guide - Page 3
...:
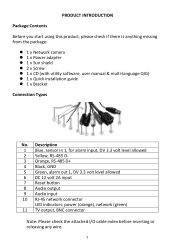
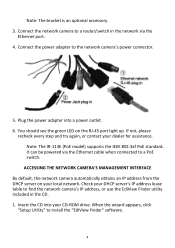
z 1 x Network camera z 1 x Power adapter z 1 x Sun shield z 2 x Screw z 1 x CD (with utility software, user manual & multi‐language QIG) z 1 x Quick installation guide z 1 x Bracket...Reset button 8 Audio output 9 Audio input 10 RJ‐45 network connector
LED indicators: power (orange), network (green) 11 TV output, BNC connector
Note: Please check the attached I/O cable index before ...
Quick Install Guide - Page 4
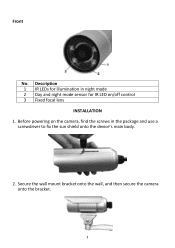
Front
No. Description 1 IR LEDs for illumination in night mode 2 Day and night mode sensor for IR LED on/off control 3 Fixed focal lens
INSTALLATION 1. Before powering on the camera, find the screws in the package and use a
screwdriver to fix the sun shield onto the device's main body.
2. Secure the wall mount bracket onto the wall, and then secure the camera onto the bracket.
3
Quick Install Guide - Page 5
...;45 port light up. If not, please
recheck every step and try again, or contact your dealer for assistance. Note: The IR‐113E (PoE model) supports the IEEE 802.3af PoE standard. It can be powered via the Ethernet cable when connected to a PoE switch.
ACCESSING THE NETWORK CAMERA'S MANAGEMENT INTERFACE By default, the network camera automatically obtains an IP address...
Quick Install Guide - Page 12
...ordinary way, to print or display an announcement including an appropriate...storage or distribution medium does not bring the other work under the scope of this License.
3. You may copy...copy of the corresponding source code, to be distributed under the terms of Sections 1 and 2 above on a medium customarily used for software...the scripts used to control compilation and installation of the executable. ...
Manual - Page 6
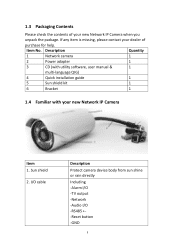
...Quantity
1
Network camera
1
2
Power adapter
1
3
CD (with utility software, user manual &
1
multi-language QIG)
4
Quick installation guide
1
5
Sun shield kit
1
6
Bracket
1
1.4 Familiar with your new Network IP Camera
Item 1. Sun shield
2. I/O cable
Description Protect camera device body from sun shine or rain directly Including -Alarm I/O -TV output -Network -Audio I/O -RS485...
Manual - Page 12

... your local network. Check your DHCP server's IP address lease table to find the network camera's IP address, or use the EdiView Finder utility included in the CD.
Note: We recommend that you use Microsoft Windows to install your network camera - Mac is not supported.
1. Insert the CD into your CD-ROM drive. When the wizard appears, click "Setup Utility" to install the "EdiView Finder" software.
9
Manual - Page 13
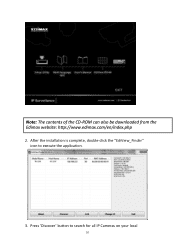
Note: The contents of the CD-ROM can also be downloaded from the Edimax website: http://www.edimax.com/en/index.php
2. After the installation is complete, double-click the "EdiView_Finder" icon to execute the application.
3. Press 'Discover' button to search for all IP Cameras on your local
10
Manual - Page 16
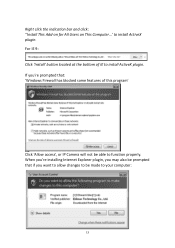
... Users on This Computer...' to install ActiveX plugin. For IE 9: Click 'Install' button located at the bottom of IE to install ActiveX plugin. If you're prompted that: 'Windows Firewall has blocked some features of this program'
Click 'Allow access', or IP Camera will not be able to function properly. When you're installing Internet Explorer plugin, you...
Manual - Page 17
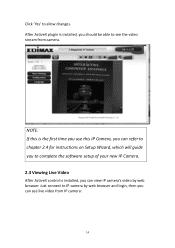
... the first time you use this IP Camera, you can refer to chapter 2.4 for instructions on Setup Wizard, which will guide you to complete the software setup of your new IP Camera. 2.3 Viewing Live Video
After ActiveX control is installed, you can view IP camera's video by web browser. Just connect to IP camera by web browser and login, then you...
Manual - Page 51
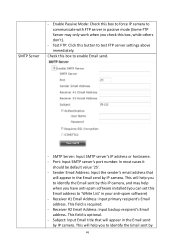
.... - Port: Input SMTP server's port number. In most cases it
should be default value '25'. - Sender Email Address: Input the sender's email address that
will appear in the Email send by IP camera. This will help you to identify the Email sent by this IP camera, and may help when you have anti-spam software installed (you can set...
Manual - Page 59
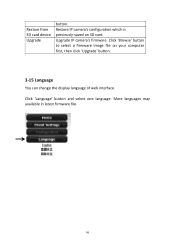
Restore from SD card device Upgrade
button. Restore IP camera's configuration which is previously-saved on SD card. Upgrade IP camera's firmware. Click 'Browse' button to select a firmware image file on your computer first, then click 'Upgrade' button.
3-15 Language
You can change the display language of web interface.
Click 'Language' button and select one language. More languages may available...
Manual - Page 60
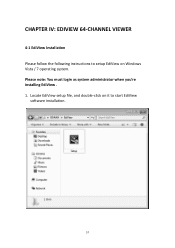
CHAPTER IV: EDIVIEW 64-CHANNEL VIEWER
4-1 EdiView Installation Please follow the following instructions to setup EdiView on Windows Vista / 7 operating system. Please note: You must login as system administrator when you're installing EdiView . 1. Locate EdiView setup file, and double-click on it to start EdiView
software installation.
57
Manual - Page 63
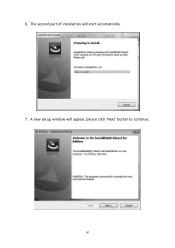
6. The second part of installation will start automatically. 7. A new setup window will appear, please click 'Next' button to continue.
60
Manual - Page 86
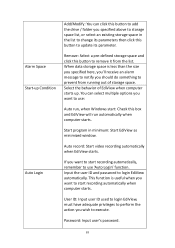
...: Check this box and EdiView will run automatically when computer starts.
Start program in minimum: Start EdiView as minimized window.
Auto record: Start video recording automatically when EdiView starts.
If you want to start recording automatically, remember to use 'Auto Login' function. Input the user ID and password to login EdiView automatically. This function is useful...
Manual - Page 92
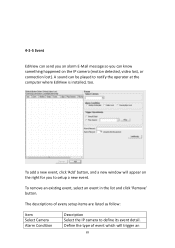
... know something happened on the IP camera (motion detected, video lost, or connection lost). A sound can be played to notify the operator at the computer where EdiView is installed, too.
To add a new event, click 'Add' button, and a new window will appear on the right for you to setup a new event.
To remove an existing...
Manual - Page 108
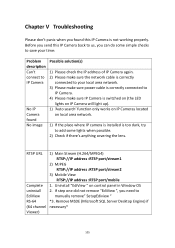
...-64 (64 channel Viewer)
1) Main Stream (H.264/MPEG4) RTSP://IP address :RTSP port/stream1
2) MJPEG RTSP://IP address :RTSP port/stream2
3) Mobile View RTSP://IP address :RTSP port/mobile
1. Uninstall "EdiView " on control panel in Window OS 2. If step one did not remove "EdiView ", you need to
manually remove" SetupEdiview " *3. Remove MSDE (Microsoft SQL Server Desktop Engine) if necessary*
105
Manual - Page 116
... a complete machine-readable copy of the corresponding source code, to be distributed under the terms of Sections 1 and 2 above on a medium customarily used for software interchange; or,
c) Accompany... contains, plus any associated interface definition files, plus the scripts used to control compilation and installation of the executable. However, as a special exception, the source code distributed...