Foxconn A74GA driver and firmware
Related Foxconn A74GA Manual Pages
Download the free PDF manual for Foxconn A74GA and other Foxconn manuals at ManualOwl.com
English Manual. - Page 5
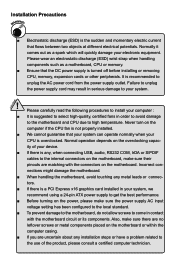
... the
computer if the CPU fan is not properly installed.
■ We cannot guarantee that your system can operate normally when your
CPU is overclocked. Normal operation depends on the overclocking capac-
ity of your device.
■ If there is any, when connecting USB, audio, RS232 COM, IrDA or S/PDIF
cables to the internal connectors on the motherboard, make...
English Manual. - Page 6
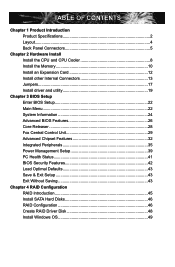
...Releaser 28 Fox Central Control Unit 29 Advanced Chipset Features 32 Integrated Peripherals 35 Power Management Setup 39 PC Health Status 41 BIOS Security Features 42 Load Optimal Defaults 43 Save & Exit Setup 43 Exit Without Saving 43
Chapter 4 RAID Configuration RAID Introduction 45 Install SATA Hard Disks 46 RAID Configuration 46 Create RAID Driver Disk 48 Install Windows OS 49
English Manual. - Page 10
1
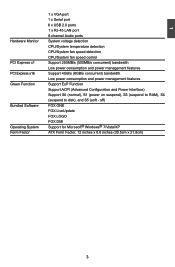
1 x VGA port
1 x Serial port
6 x USB 2.0 ports
1 x RJ-45 LAN port
6-channel Audio ports
Hardware Monitor System voltage detection
CPU/System temperature detection
CPU/System fan speed detection
CPU/System fan speed control
PCI Express x1 Support 250MB/s (500MB/s concurrent) bandwidth
Low power consumption and power management features
PCI Express x16
Support 4GB/s (...
English Manual. - Page 14
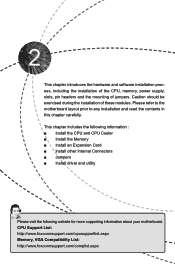
... information : ■ Install the CPU and CPU Cooler ■ Install the Memory ■ Install an Expansion Card ■ Install other Internal Connectors ■ Jumpers ■ Install driver and utility
Please visit the following website for more supporting information about your motherboard. CPU Support List: http://www.foxconnsupport.com/cpusupportlist.aspx Memory, VGA Compatibility List...
English Manual. - Page 15
...
recommended that the system bus frequency be set beyond hardware specifications
since it does not meet the standard requirements for the peripherals. If you want to
set the frequency beyond the standard specifications, please do so according to your
hardware specifications including the CPU, graphics card, memory, hard drive, etc.
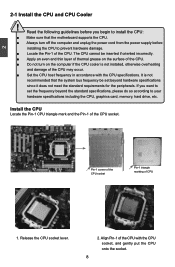
Install the CPU
Locate the Pin-1 CPU triangle mark and...
English Manual. - Page 16
...CPU socket lever back to its locked position.
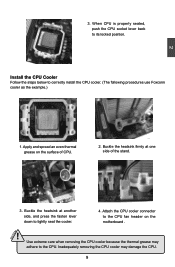
Install the CPU Cooler
Follow the steps below to correctly install the CPU cooler. (The following procedures use Foxconn cooler as the example.)
1. Apply and spread an even thermal grease on the surface of CPU... Attach the CPU cooler connector to the CPU fan header on the motherboard .
! Use extreme care when removing the CPU cooler because the thermal grease...
English Manual. - Page 17
... you begin to install the memory : ■ Make sure that the motherboard supports the memory. It is recommended that memory
of the same capacity, brand, speed, and chips be used. ■ Always turn off the computer and unplug the power cord from the power outlet before
installing the memory to prevent hardware damage. ■ Memory modules have a foolproof design. A memory module can be...
English Manual. - Page 18
CAUTION
2
144-Pin
96-Pin
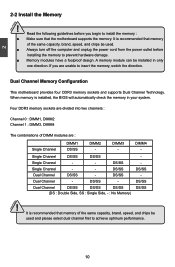
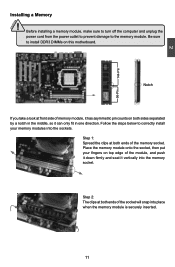
Installing a Memory
! Before installing a memory module, make sure to turn off the computer and unplug the power cord from the power outlet to prevent damage to the memory module. Be sure to install DDR3 DIMMs on this motherboard.
Notch
If you take a look at front side of memory module, it has asymmetric pin counts on both sides...
English Manual. - Page 19
... an Expansion Card
!
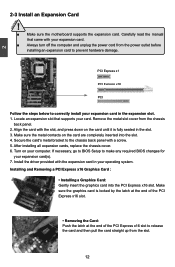
■ Make sure the motherboard supports the expansion card. Carefully read the manual that came with your expansion card.
■ Always turn off the computer and unplug the power cord from the power outlet before installing an expansion card to prevent hardware damage.
PCI Express x1
PCI Express x16
PCI
Follow the steps below to correctly install your expansion card in the...
English Manual. - Page 20
... order not to damage any device, make sure all the devices have been installed properly before applying the power supply.
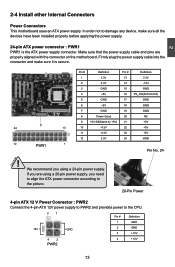
24-pin ATX power connector : PWR1 PWR1 is the ATX power supply connector. Make sure that the power supply cable and pins are properly aligned with the connector on the motherboard. Firmly plug the power supply cable into the connector and...
English Manual. - Page 26

2
2-6 Install driver and utility
This motherboard comes with one DVD, after installing the Oprating System, you can simply put it into your DVD-ROM drive, and the main menu will be displayed on your PC screen to guide you how to install.
1. Driver Use these options to install all the drivers for your system. You must click "AMD Chipset Driver" to install it first. After that...
English Manual. - Page 27
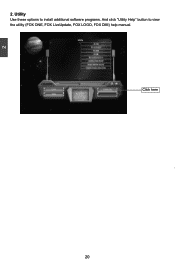
2
2. Utility Use these options to install additional software programs. And click "Utility Help" button to view the utility (FOX ONE, FOX LiveUpdate, FOX LOGO, FOX DMI) help manual.
Click here
20
English Manual. - Page 29
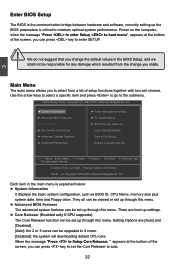
...
It displays the basic system configuration, such as BIOS ID, CPU Name, memory size plus system date, time and Floppy drive. They all can be viewed or set up through this menu. ► Advanced BIOS Features The advanced system features can be set up through this menu. There are boot up settings. ► Core Releaser (Enabled only if CPU supports) The...
English Manual. - Page 32
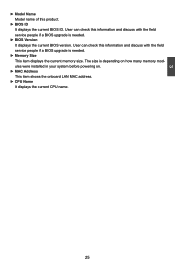
...; BIOS Version It displays the current BIOS version. User can check this information and discuss with the field service people if a BIOS upgrade is needed.
► Memory Size This item displays the current memory size. The size is depending on how many memory modules were installed in your system before powering on.
► MAC Address This item shows the onboard LAN MAC address.
► CPU Name...
English Manual. - Page 43
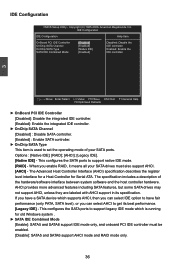
...set the operating mode of your SATA ports. Options : [Native IDE]; [RAID]; [AHCI]; [Legacy IDE]. [Native IDE] - This configures the SATA ports to support native IDE mode. [RAID] - When you enable RAID, it means all your SATA drives must also support AHCI. [AHCI] - The Advanced Host Controller Interface (AHCI) specification describes the register level interface for a Host Controller for Serial ATA...
English Manual. - Page 50
... of system components. But if the optimal performance
parameters to be set cannot be supported by your hardware devices (for example, too many
expansion cards were installed), the system might fail to work.
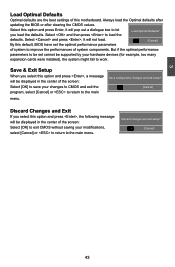
Save & Exit Setup
When you select this option and press , a message will be displayed in the center of the screen: Select [OK] to save...
English Manual. - Page 51
... XP
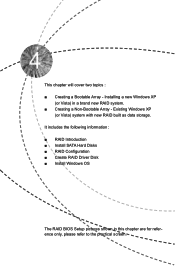
(or Vista) in a brand new RAID system. ■ Creating a Non-Bootable Array - Existing Windows XP
(or Vista) system with new RAID built as data storage. It includes the following information : ■ RAID Introduction ■ Install SATA Hard Disks ■ RAID Configuration ■ Create RAID Driver Disk ■ Install Windows OS
The RAID BIOS Setup pictures shown in this chapter are for...
English Manual. - Page 53
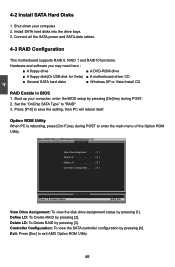
...computer. 2. Install SATA hard disks into the drive bays. 3. Connect all the SATA power and SATA data cables.
4-3 RAID Configuration
This motherboard supports RAID 0, RAID 1 and RAID10 functions.
Hardware and software you may need here :
■ A floppy drive
■ A DVD-ROM drive
■ A floppy disk(Or USB disk for Vista) ■ A motherboard driver CD
■ Several SATA hard disks...
English Manual. - Page 55
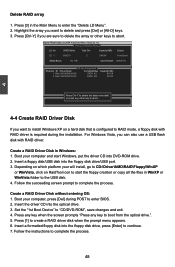
...with RAID driver is required during the installation. For Windows Vista, you can also use a USB flash disk with RAID driver.
Create a RAID Driver Disk in Windows: 1. Boot your computer and start Windows, put the driver CD into DVD-ROM drive. 2. Insert a floppy disk/USB disk into the floppy disk drive/USB port. 3. Depending on which platform your will install, go to CD:\Driver\AMD\RAID\Floppy\WinXP...
English Manual. - Page 56
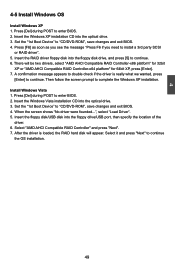
... to enter BIOS. 2. Insert the Windows Vista installation CD into the optical drive. 3. Set the "1st Boot Device" to "CD/DVD-ROM", save changes and exit BIOS. 4. When the screen shows "No driver were founded...", select "Load Driver". 5. Insert the floppy disk/USB disk into the floppy drive/USB port, then specify the location of the
driver. 6. Select "AMD AHCI Compatible RAID Controller" and press...