Foxconn P43AP driver and firmware
Related Foxconn P43AP Manual Pages
Download the free PDF manual for Foxconn P43AP and other Foxconn manuals at ManualOwl.com
English Manual. - Page 5
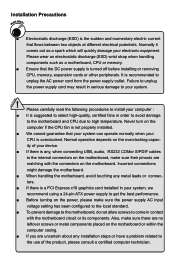
... the motherboard and CPU due to high temperature. Never turn on the
computer if the CPU fan is not properly installed.
■ We cannot guarantee that your system can operate normally when your
CPU is overclocked. Normal operation depends on the overclocking capac-
ity of your device.
■ If there is any, when connecting USB, audio, RS232 COMor S/PDIF cables...
English Manual. - Page 6
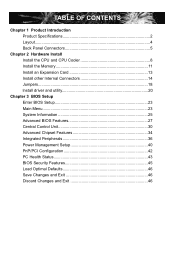
...Install Install the CPU and CPU Cooler 8 Install the Memory 11 Install an Expansion Card 13 Install other Internal Connectors 14 Jumpers 18 Install driver and utility 20
Chapter 3 BIOS Setup Enter BIOS Setup 23 Main Menu 23 System Information 25 Advanced BIOS Features 27 Central Control Unit 30 Advanced Chipset Features 34 Integrated Peripherals 36 Power Management Setup 40 PnP/PCI...
English Manual. - Page 10
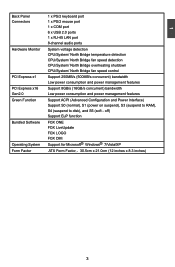
... Function
Bundled Software
Operating System Form Factor
1 x PS/2 keyboard port 1 x PS/2 mouse port 1 x COM port 6 x USB 2.0 ports 1 x RJ-45 LAN port 8-channel audio ports
System voltage detection CPU/System/ North Bridge temperature detection CPU/System/ North Bridge fan speed detection CPU/System/ North Bridge overheating shutdown CPU/System/ North Bridge fan speed control
Support 250MB/s (500MB...
English Manual. - Page 13
...
-
-
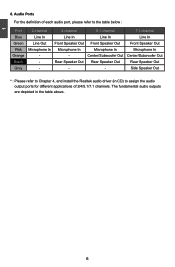
Center/Subwoofer Out Center/Subwoofer Out
Black
-
Rear Speaker Out Rear Speaker Out
Rear Speaker Out
Grey
-
-
-
Side Speaker Out
* : Please refer to Chapter 4, and install the Realtek audio driver (in CD) to assign the audio output ports for different applications of 2/4/5.1/7.1 channels. The fundamental audio outputs are depicted in the table above.
English Manual. - Page 14
... carefully. This chapter includes the following information : ■ Install the CPU and CPU Cooler ■ Install the Memory ■ Install an Expansion Card ■ Install other Internal Connectors ■ Jumpers ■ Install driver and utility
Please visit this website for more supporting information about CPU, Memory and VGA for your motherboard : http://www.foxconnchannel.com/product...
English Manual. - Page 15
... card, memory, hard drive, etc.
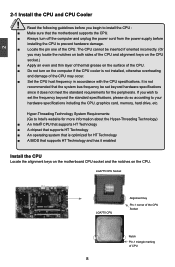
Hyper-Threading Technology System Requirements: (Go to Intel's website for more information about the Hyper-Threading Technology) ■ An Intel® CPU that supports HT Technology ■ A chipset that supports HT Technology ■ An operating system that is optimized for HT Technology ■ A BIOS that supports HT Technology and has it enabled
Install...
English Manual. - Page 16
CAUTION
2
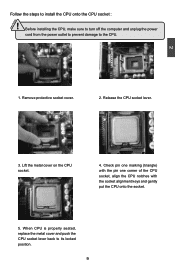
Follow the steps to install the CPU onto the CPU socket :
! Before installing the CPU, make sure to turn off the computer and unplug the power
cord from the power outlet to prevent damage to the CPU.
1. Remove protective socket cover.
2. Release the CPU socket lever.
3. Lift the metal cover on the CPU socket.
4. Check pin one marking (triangle) with the...
English Manual. - Page 17
...
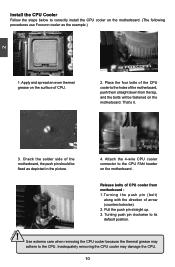
Follow the steps below to correctly install the CPU cooler on the motherboard. (The following
procedures use Foxconn cooler as the example.)
2
CAUTION
1. Apply and spread an even thermal grease on the surface of CPU.
2. Place the four bolts of the CPU cooler to the holes of the motherboard, push them straight down from the top, and...
English Manual. - Page 18
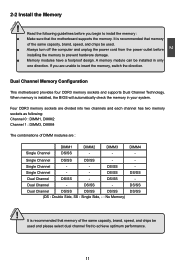
... you begin to install the memory : ■ Make sure that the motherboard supports the memory. It is recommended that memory
of the same capacity, brand, speed, and chips be used. ■ Always turn off the computer and unplug the power cord from the power outlet before
installing the memory to prevent hardware damage. ■ Memory modules have a foolproof design. A memory module can be...
English Manual. - Page 19
2 CAUTION
144-Pin
96-Pin
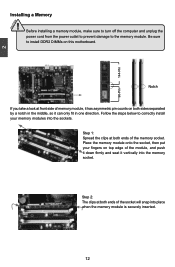
Installing a Memory
! Before installing a memory module, make sure to turn off the computer and unplug the power cord from the power outlet to prevent damage to the memory module. Be sure to install DDR2 DIMMs on this motherboard.
Notch
If you take a look at front side of memory module, it has asymmetric pin counts on both sides...
English Manual. - Page 20
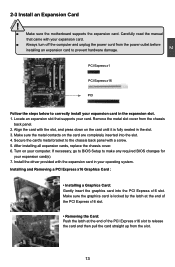
... an Expansion Card
!
■ Make sure the motherboard supports the expansion card. Carefully read the manual that came with your expansion card.
■ Always turn off the computer and unplug the power cord from the power outlet before installing an expansion card to prevent hardware damage.
PCI Express x1
PCI Express x16
PCI
Follow the steps below to correctly install your expansion card in the...
English Manual. - Page 21
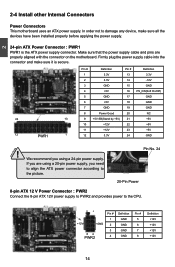
... order not to damage any device, make sure all the devices have been installed properly before applying the power supply.
24-pin ATX Power Connector : PWR1 PWR1 is the ATX power supply connector. Make sure that the power supply cable and pins are properly aligned with the connector on the motherboard. Firmly plug the power supply cable into the connector and...
English Manual. - Page 24
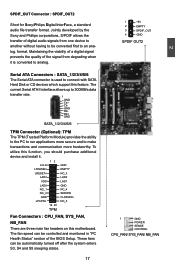
... transfer of digital audio signals from one device to another without having to be converted first to an analog. format. Maintaining the viability of a digital signal prevents the quality of the signal from degrading when it is converted to analog.
Serial ATA Connectors : SATA_1/2/3/4/5/6
The Serial ATA connector is used to connect with SATA
Hard Disk or CD devices which support this...
English Manual. - Page 27
2
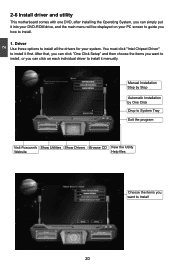
2-6 Install driver and utility
This motherboard comes with one DVD, after installing the Operating System, you can simply put it into your DVD-ROM drive, and the main menu will be displayed on your PC screen to guide you how to install.
1. Driver Use these options to install all the drivers for your system. You must click "Intel Chipset Driver" to install it first. After that...
English Manual. - Page 28
2
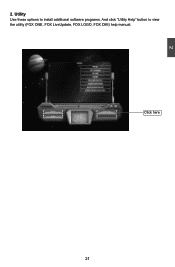
2. Utility Use these options to install additional software programs. And click "Utility Help" button to view the utility (FOX ONE, FOX LiveUpdate, FOX LOGO, FOX DMI) help manual.
Click here
21 21
English Manual. - Page 29
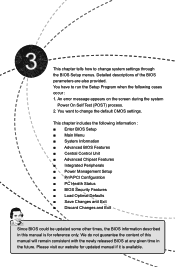
...9632; Central Control Unit ■ Advanced Chipset Features ■ Integrated Peripherals ■ Power Management Setup ■ PnP/PCI Configuration ■ PC Health Status ■ BIOS Security Features ■ Load Optimal Defaults ■ Save Changes and Exit ■ Discard Changes and Exit
Since BIOS could be updated some other times, the BIOS information described in this manual is for...
English Manual. - Page 33
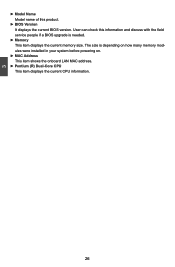
... the current BIOS version. User can check this information and discuss with the field service people if a BIOS upgrade is needed.
► Memory This item displays the current memory size. The size is depending on how many memory modules were installed in your system before powering on.
► MAC Address This item shows the onboard LAN MAC address.
► Pentium (R) Dual-Core CPU This item...
English Manual. - Page 44
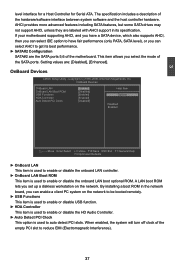
... optional ROM. A LAN boot ROM lets you set up a diskless workstation on the network. By installing a boot ROM in the network board, you can enable a client PC system on the network to be booted remotely.
► USB Functions This item is used to enable or disable USB function.
► HDA Controller This item is used to enable or disable the HD Audio Controller.
► Auto Detect PCI...
English Manual. - Page 46
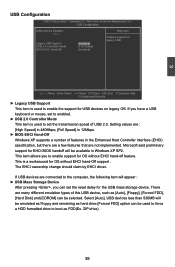
... item is used to enable the support for USB devices on legacy OS. If you have a USB keyboard or mouse, set to enabled.
► USB 2.0 Controller Mode This item is used to set the transmission speed of USB 2.0. Setting values are : [High Speed] in 480Mbps; [Full Speed] in 12Mbps.
► BIOS EHCI Hand-Off Windows XP supports a number of features in the Enhanced...
English Manual. - Page 53
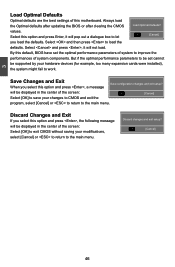
... if the optimal performance parameters to be set cannot
be supported by your hardware devices (for example, too many expansion cards were installed),
the system might fail to work.
Save Changes and Exit
When you select this option and press , a message
Save configuration changes and exit setup?
will be displayed in the center of the screen:
[OK...