Gigabyte GA-970-Gaming SLI driver and firmware
Drivers and firmware downloads for this Gigabyte item

Related Gigabyte GA-970-Gaming SLI Manual Pages
Download the free PDF manual for Gigabyte GA-970-Gaming SLI and other Gigabyte manuals at ManualOwl.com
Manual - Page 2

Motherboard GA-970-Gaming SLI
Motherboard GA-970-Gaming SLI
Feb. 15, 2016
Feb. 15, 2016
Copyright © 2016 GIGA-BYTE TECHNOLOGY CO., LTD. All rights reserved. The trademarks mentioned in this manual are legally registered to their respective owners.
Disclaimer Information in this manual is protected by copyright laws and is the property of GIGABYTE. Changes to the specifications and ...
Manual - Page 3
Table of Contents
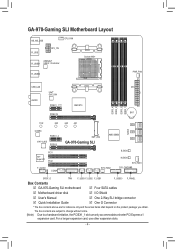
GA-970-Gaming SLI Motherboard Layout 4
Chapter 1 Hardware Installation 5 1-1 Installation Precautions 5 1-2 Product Specifications 6 1-3 Installing the CPU 9 1-4 Installing the Memory 9 1-5 Installing an Expansion Card 10 1-6 Back Panel Connectors 10 1-7 Internal Connectors 12
Chapter 2 BIOS Setup 19 2-1 Startup Screen 20 2-2 M.I.T...20 2-3 System Information 24 2-4 ...
Manual - Page 4
...
SYS_FAN2
B_BIOS
M_BIOS SYS_FAN1
CLR_CMOS
02
13
SPDIF_O
TPM F_USB3 F_USB2 F_USB1
F_USB30 F_PANEL
Box Contents
55 GA-970-Gaming SLI motherboard 55 Four SATA cables
55 Motherboard driver disk
55 I/O Shield
55 User's Manual
55 One 2-Way SLI bridge connector
55 Quick Installation Guide
55 One G Connector
* The box contents above are for reference only and the actual items shall depend...
Manual - Page 5
...ESD) wrist strap when handling electronic
components such as a motherboard, CPU or memory. If you do not have an ESD wrist strap, keep...installation steps or have a problem related to the use of the product, please consult a certified computer technician. •• If you use an adapter, extension power cable, or power strip, ensure to consult with its installation and/or grounding instructions...
Manual - Page 6
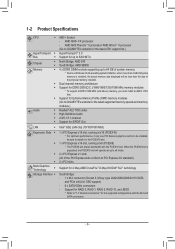
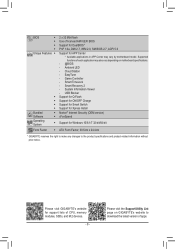
...Athlon™ II processor
(Go to GIGABYTE's website for the latest CPU support list.)
HyperTransport ŠŠ HyperTransport™ 3.0
Bus
ŠŠ Support for up to 5200 MT/s
Chipset
ŠŠ North Bridge: AMD 970 ŠŠ South Bridge: AMD SB950
Memory
ŠŠ 4 x DDR3 DIMM sockets supporting up to 64 GB of system memory
* Due to a Windows 32-bit operating system...
Manual - Page 7
... 3 connector ŠŠ 6 x SATA 6Gb/s connectors ŠŠ 1 x CPU fan header ŠŠ 2 x system fan headers ŠŠ 1 x power fan header ŠŠ 1 x front panel header ŠŠ 1 x front panel audio header ŠŠ 1 x S/PDIF Out header ŠŠ 1 x USB 3.0/2.0 header ŠŠ 3 x USB 2.0/1.1 headers ŠŠ 1 x serial port header ŠŠ 1 x Clear...
Manual - Page 8
... may also vary depending on motherboard specifications.
- @BIOS - Ambient LED - Cloud Station - EasyTune - Game Controller - Smart TimeLock - Smart Recovery 2 - System Information Viewer - USB Blocker Support for Q-Flash Support for ON/OFF Charge Support for Smart Switch Support for Xpress Install
Norton® Internet Security (OEM version) cFosSpeed
Support for Windows 10/8.1/7 32-bit/64-bit...
Manual - Page 9
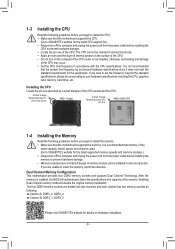
... begin to install the memory: •• Make sure that the motherboard supports the memory. It is recommended that memory of the
same capacity, brand, speed, and chips be used. (Go to GIGABYTE's website for the latest supported memory speeds and memory modules.) •• Always turn off the computer and unplug the power cord from the power outlet before installing the memory to prevent...
Manual - Page 10
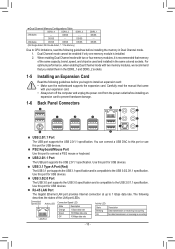
...8226;• Make sure the motherboard supports the expansion card. Carefully read the manual that came
with your expansion card. •• Always turn off the computer and unplug the power cord from the power outlet before installing an
expansion card to prevent hardware damage.
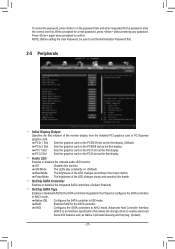
1-6 Back Panel Connectors
USB 2.0/1.1 Port
The USB port supports the USB 2.0/1.1 specification. You can connect...
Manual - Page 11
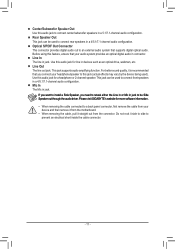
... to install a Side Speaker, you need to retask either the Line in or Mic in jack to be Side Speaker out through the audio driver. Please visit GIGABYTE's website for more software information. •• When removing the cable connected to a back panel connector, first remove the cable from your
device and then remove it from the motherboard. •...
Manual - Page 15
.... Please note that an M.2 PCIe SSD cannot be used to create a RAID set with SATA drive(s). Refer to Chapter 3, "Configuring a RAID Set," for instructions on configuring a RAID array.
110F
80F
60F
42F
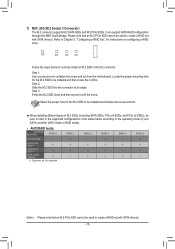
Follow the steps below to correctly install an M.2 SSD in the M.2 connector.
Step 1: Use a screw driver to unfasten the screw and nut from the motherboard. Locate the proper mounting hole...
Manual - Page 19
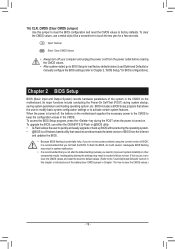
... the power is turned on. To upgrade the BIOS, use either the GIGABYTE Q-Flash or @BIOS utility. •• Q-Flash allows the user to quickly and easily upgrade or back up BIOS without entering the operating system. •• @BIOS is a Windows-based utility that searches and downloads the latest version of BIOS from the Internet
and updates the BIOS. •• Because BIOS flashing...
Manual - Page 21
... Allows you to alter the North Bridge controller frequency for the installed CPU. The adjustable range is dependent on the CPU being installed.
&& HT Link Frequency Allows you to manually set the frequency for the HT Link between the CPU and chipset. The adjustable range is dependent on the CPU being installed. (Default: Auto)
&& CPU Clock Ratio Allows you to alter the...
Manual - Page 25

... partitioning such as Windows 7 64-bit, select the optical drive that contains the Windows 7 64-bit installation disk and is prefixed with "UEFI:" string.
&& Hard Drive/CD/DVD ROM Drive/Floppy Drive/Network Device BBS Priorities Specifies the boot order for a specific device type, such as hard drives, optical drives, floppy disk drives, and devices that support Boot from LAN function, etc. Press...
Manual - Page 26
... ROM for the PCI device controller other than the LAN, storage device, and graphics controllers. Legacy OpROM Enables legacy option ROM only.
UEFI OpROM
Enables UEFI option ROM only. (Default)
This item is configurable only when CSM Support is set to Always.
&& Network Stack Disables or enables booting from the network to install a GPT format OS, such as installing the OS from the Windows...
Manual - Page 27
...from the installed PCI graphics card or PCI Express graphics card.
PCIe 1 Slot Sets the graphics card on the PCIEX16 slot as the first display. (Default)
PCIe 2 Slot PCI 1 Slot PCI 2 Slot
Sets the graphics card on the PCIEX8 slot as the first display. Sets the graphics card on the PCI1 slot as the first display. Sets the graphics card on the PCI2 slot as the first display.
&& Audio LED...
Manual - Page 29
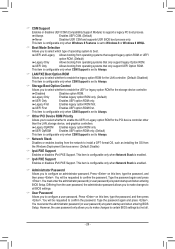
`` Trusted Computing && Security Device Support
Enables or disables Trusted Platform Module (TPM). Set this item to Enable when a TPM device is installed. (Default: Disable)
`` Super IO Configuration && Serial Port A
Enables or disables the onboard serial port. (Default: Enabled)
`` NVMe Configuration Displays information on your M.2 NVME PCIe SSD if installed.
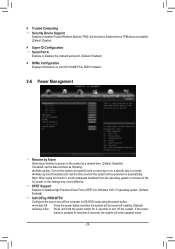
2-6 Power Management
&& Resume by ...
Manual - Page 32

... 2) •• Windows setup disk. •• Motherboard driver disk. •• A USB thumb drive.
Configuring the Onboard SATA Controller
A. Installing SATA hard drive(s) in your computer Connect the SATA signal cables to SATA hard drives and the SATA ports on the motherboard. Then connect the power connectors from your power supply to the hard drives. Or install your M.2 SSD in...
Manual - Page 34
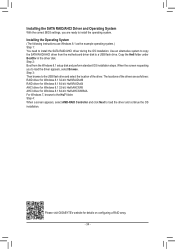
...
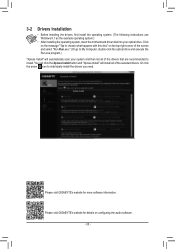
With the correct BIOS settings, you are ready to install the operating system. Installing the Operating System (The following instructions use Windows 8.1 as the example operating system.) Step 1: You need to install the SATA RAID/AHCI driver during the OS installation. Use an alternative system to copy the SATA RAID/AHCI driver from the motherboard driver disk to a USB flash drive. Copy the Hw8...
Manual - Page 35
... following instructions use Windows 8.1 as the example operating system.)
• After installing the operating system, insert the motherboard driver disk into your optical drive. Click on the message "Tap to choose what happens with this disc" on the top-right corner of the screen and select "Run Run.exe." (Or go to My Computer, double-click the optical drive and execute...