Gigabyte GA-B75M-D2P driver and firmware
Drivers and firmware downloads for this Gigabyte item

Related Gigabyte GA-B75M-D2P Manual Pages
Download the free PDF manual for Gigabyte GA-B75M-D2P and other Gigabyte manuals at ManualOwl.com
Manual - Page 2
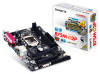
Motherboard GA-B75M-D2P
Motherboard GA-B75M-D2P
Dec. 25, 2013
Dec. 25, 2013
Copyright © 2013 GIGA-BYTE TECHNOLOGY CO., LTD. All rights reserved. The trademarks mentioned in this manual are legally registered to their respective owners. Disclaimer Information in this manual is protected by copyright laws and is the property of GIGABYTE. Changes to the specifications and features in this...
Manual - Page 3
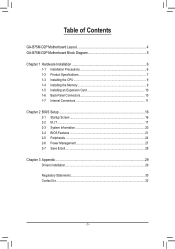
Table of Contents
GA-B75M-D2P Motherboard Layout 4 GA-B75M-D2P Motherboard Block Diagram 5
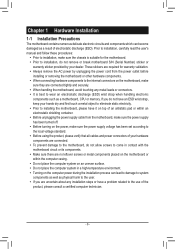
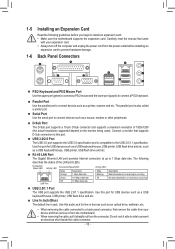
Chapter 1 Hardware Installation 6 1-1 Installation Precautions 6 1-2 Product Specifications 7 1-3 Installing the CPU 9 1-4 Installing the Memory 9 1-5 Installing an Expansion Card 10 1-6 Back Panel Connectors 10 1-7 Internal Connectors 11
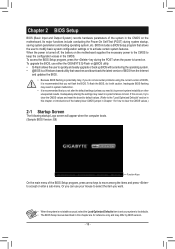
Chapter 2 BIOS Setup 16 2-1 Startup Screen 16 2-2 M.I.T......
Manual - Page 4
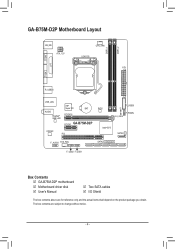
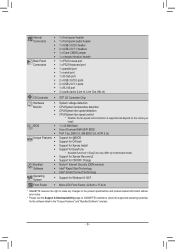
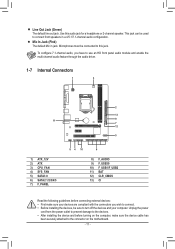
... ATX_12V
CPU_FAN LGA1155
LPT
ATX
VGA
R_USB30
USB_LAN
AUDIO Realtek® GbE LAN
iTE®
Super I/O
BAT
PCIEX16
PCIEX1 GA-B75M-D2P
CODEC PCI
BIOS
F_USB30 CI
F_PANEL CLR_CMOS
Intel® B75
SATA3 0
F_AUDIO SYS_FAN
SATA2 5 4 3 2 1
F_USB2 F_USB1
Box Contents 55 GA-B75M-D2P motherboard 55 Motherboard driver disk 55 User's Manual
55 Two SATA cables 55 I/O Shield
The box contents...
Manual - Page 6
... a motherboard, CPU or memory. If you do not have an ESD wrist strap, keep your hands dry and first touch a metal object to eliminate static electricity. •• Prior to installing the motherboard, please have it on top of an antistatic pad or within an electrostatic shielding container. •• Before unplugging the power supply cable from...
Manual - Page 7
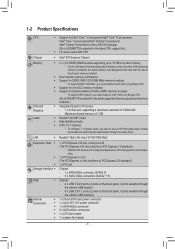
...) memory modules
* To support XMP memory, you must install an Intel® 22nm (Ivy Bridge) CPU. (Go to GIGABYTE's website for the latest supported memory speeds and memory modules.)
ŠŠ Integrated Graphics Processor: - 1 x D-Sub port, supporting a maximum resolution of 1920x1200 - Maximum shared memory of 1 GB
ŠŠ Realtek® ALC887 codec ŠŠ High Definition Audio...
Manual - Page 8
...Flash Support for Xpress Install Support for EasyTune
* Available functions in EasyTune may differ by motherboard model. Support for Xpress Recovery2 Support for ON/OFF Charge Norton® Internet Security (OEM version) Intel® Rapid Start Technology Intel® Smart Connect Technology
Support for Windows 8.1/8/7
Form Factor ŠŠ Micro ATX Form Factor; 22.6cm x 17.4cm
* GIGABYTE...
Manual - Page 9
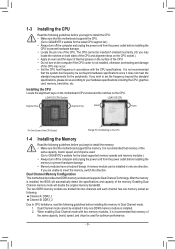
... begin to install the memory: •• Make sure that the motherboard supports the memory. It is recommended that memory of the
same capacity, brand, speed, and chips be used. (Go to GIGABYTE's website for the latest supported memory speeds and memory modules.) •• Always turn off the computer and unplug the power cord from the power outlet before installing the memory to prevent...
Manual - Page 10
...D-Sub connection to this port.
USB 3.0/2.0 Port The USB 3.0 port supports the USB 3.0 specification and is compatible to the USB 2.0/1.1 specification. Use this port for USB devices such as a USB keyboard/mouse, USB printer, USB flash drive and etc. such as a USB keyboard/mouse, USB printer, USB flash drive and etc.
RJ-45 LAN Port
The Gigabit Ethernet LAN port provides Internet connection at up...
Manual - Page 11
... connectors you wish to connect. •• Before installing the devices, be sure to turn off the devices and your computer. Unplug the power
cord from the power outlet to prevent damage to the devices. •• After installing the device and before turning on the computer, make sure the device cable has
been securely attached to the connector on the motherboard.
- 11 -
Manual - Page 12
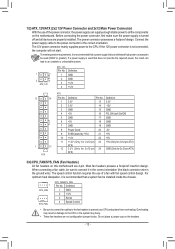
... on the motherboard. Before connecting the power connector, first make sure the power supply is turned off and all devices are properly installed. The power connector possesses a foolproof design. Connect the power supply cable to the power connector in the correct orientation. The 12V power connector mainly supplies power to the CPU. If the 12V power connector is not connected, the computer will...
Manual - Page 14
... No. Definition
9
1
1 Power (5V)
6
USB1 2D3Y+
S
10
2
2 Power (5V)
7 GND
S
3 USB DX-
8 GND
4 USB DY-
9 No Pin
5 USB DX+
10 NC
•• Do not plug the IEEE 1394 bracket (2x5-pin) cable into the USB header. •• Prior to installing the USB bracket, be sure to turn off your computer and unplug the power cord from the power
outlet to...
Manual - Page 15
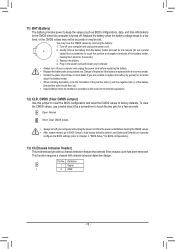
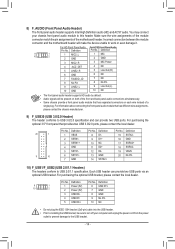
... about the battery model. •• When installing the battery, note the orientation of the positive ...computer and unplug the power cord from the power outlet before clearing the CMOS values. •• After system restart, go to BIOS Setup to load factory defaults (select Load Optimized Defaults) or manually
configure the BIOS settings (refer to Chapter 2, "BIOS Setup," for BIOS...
Manual - Page 16
... the power is turned on. To upgrade the BIOS, use either the GIGABYTE Q-Flash or @BIOS utility. •• Q-Flash allows the user to quickly and easily upgrade or back up BIOS without entering the operating system. •• @BIOS is a Windows-based utility that searches and downloads the latest version of BIOS from the Internet
and updates the BIOS. •• Because BIOS flashing...
Manual - Page 17
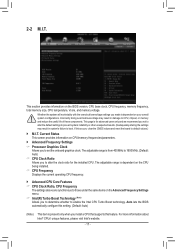
...provides information on the BIOS version, CPU base clock, CPU frequency, memory frequency, total memory size, CPU temperature, Vcore, and memory voltage.
Whether the system will work stably with the overclock/overvoltage settings you made is dependent on your overall system configurations. Incorrectly doing overclock/overvoltage may result in damage to CPU, chipset, or memory and reduce the useful...
Manual - Page 18
... multi-threading technology when using an Intel® CPU that supports this function. This feature only works for operating systems that support multi-processor mode. Auto lets the BIOS automatically configure this setting. (Default: Auto)
&& CPU Enhanced Halt (C1E) (Note 1) Enables or disables Intel® CPU Enhanced Halt (C1E) function, a CPU power-saving function in system halt state. When...
Manual - Page 21
... ATA Port Information This section provides information on the device connected to each SATA port controlled by Intel Chipset.
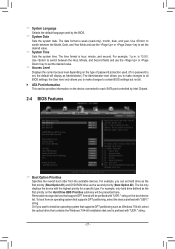
2-4 BIOS Features
&& Boot Option Priorities Specifies the overall boot order from the available devices. For example, you can set hard drive as the first priority (Boot Option #1) and DVD ROM drive as the second priority (Boot Option #2). The list only displays the device...
Manual - Page 22
&& Hard Drive/CD/DVD ROM Drive/Floppy Drive/Network Device BBS Priorities Specifies the boot order for a specific device type, such as hard drives, optical drives, floppy disk drives, and devices that support Boot from LAN function, etc. Press on this item to enter the submenu that presents the devices of the same type that are connected. This item is present only if at least one device for...
Manual - Page 23
... ROM for the PCI device controller other than the LAN, storage device, and graphics controllers. Legacy OpROM Enables legacy option ROM only. UEFI OpROM Enables UEFI option ROM only. (Default) This item is configurable only when CSM Support is set to Always.
&& Network stack Disables or enables booting from the network to install a GPT format OS, such as installing the OS from the Windows...
Manual - Page 25
...: For Windows 7 USB 3.0 Streams support, devices may require UASP class driver updates from UASP driver vendors to be fully compatible with Intel USB 3.0 Streams Support. (Default: Enabled)
&& USB2.0 Controller Enables or disables the integrated USB 2.0/1.1 controller. (Default: Enabled)
&& Audio Controller Enables or disables the onboard audio function. (Default: Enabled) If you wish to install...
Manual - Page 29
...in HDD/USB/FDD to input the profile previously created from your storage device or load the profile automatically created by the BIOS, such as reverting the BIOS settings to the last settings that worked properly (last known good record).
Chapter 3 Appendix
Drivers Installation
•• Before installing the drivers, first install the operating system. (The following instructions use Windows...