Gigabyte GS-R22PXL driver and firmware


Related Gigabyte GS-R22PXL Manual Pages
Download the free PDF manual for Gigabyte GS-R22PXL and other Gigabyte manuals at ManualOwl.com
Manual - Page 4
... Installing the CPU 15 2-3 Installing the Heat Sink 16 2-4 Installing the Memory 17
2-4-1 Three Channel Memory Configuration 17 2-4-2 Installing a Memory 19 2-5 Installing the PCI Expansion Card 20 2-6 Installing the Hard Disk Drive 21 2-6-1 GS-R22PXL Hard Disk Drive Installation 21 2-6-1 GS-R22PFL Hard Disk Drive Installation 22 2-7 Replacing the FAN Assemblly 23 2-8 Replacing the Power...
Manual - Page 6

Box Contents
GS-R22PXL/GS-R22PFL Driver CD
• The box contents above are for reference only and the actual items shall depend on the product package you obtain. The box contents are subject to change without notice.
• The motherboard image is for reference only.
- 6 -
Manual - Page 7
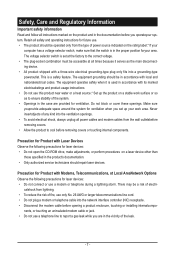
...; To avoid electrical shock, always unplug all power cables and modem cables from the wall outletsbefore removing covers. • Allow the product to cool before removing covers or touching internal components.
Precaution for Product with Laser Devices Observe the following precautions for laser devices: • Do not open the CD-ROM drive, make adjustments, or perform procedures on...
Manual - Page 8

... limits for a Class A digital device,pursuant to Part 15 of the FCC Rules. These limits are designed to provide reasonable protection againstharmful interference when the equipment is operated in a commercial environment. This equipmentgenerates, uses, and can radiate radio frequency energy and, if not installed and used in accordance withthe instruction manual, may cause harmful interference...
Manual - Page 9

...not be disposed of with other waste. Instead, the device should be taken to the waste collection centers for activation...please contact your local government office, your household waste disposal service or where you purchased the product for details of environmentally ...your product's user's manual and we will be glad to help you with your effort.
Battery Warning: Incorrectly installing a battery or ...
Manual - Page 10

... read the service guide and follow these procedures:
• Prior to installation, do not remove or break motherboard S/N (Serial Number) sticker or warranty sticker provided by your dealer. These stickers are required for warranty validation.
• Always remove the AC power by unplugging the power cord from the power outlet before installing or removing the motherboard or other hardware...
Manual - Page 11
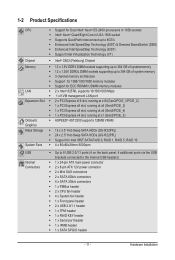
... SATA HDDs (GS-R22PXL) ŠŠ 24 x 2.5" Hot-Swap SATA HDDs (GS-R22PFL) ŠŠ Support for Intel IRST SATA RAID 0, RAID 1, RAID 5, RAID 10 ŠŠ 4 x 80x80x38mm 9000rpm
USB
Internal Connectors
ŠŠ Up to 8 USB 2.0/1.1 ports (4 on the back panel, 4 additional ports via the USB brackets connected to the internal USB headers)
ŠŠ 1 x 24-pin ATX main power connector...
Manual - Page 12

Rear Panel I/O
Front Panel LED/Buttons
I/O Controller Hardware Monitor BIOS Environment Ambient Temperature
ŠŠ 4 x USB 2.0/1.1 ports ŠŠ 2 x RJ-45 port ŠŠ 1 x 10/100 server management LAN ŠŠ 1 x COM port ŠŠ 1 x VGA port ŠŠ 1 x ID Switch button ŠŠ 1 x Power button/LED ŠŠ 1 x System status LED ŠŠ 1 x ID Switch ...
Manual - Page 13
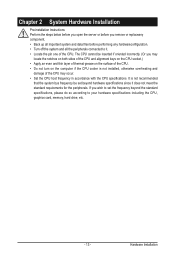
... the CPU specifications. It is not recommended
that the system bus frequency be set beyond hardware specifications since it does not meet the standard requirements for the peripherals. If you wish to set the frequency beyond the standard specifications, please do so according to your hardware specifications including the CPU, graphics card, memory, hard drive, etc.
- 13 -
Hardware Installation
Manual - Page 14

2-1 Removing Chassis Cover
Before you remove or install the system cover • Make sure the system is not turned on or connected to AC power.
Follow these instructions to remove the system cover:
1. Loosen and remove the screws securing the back cover. 2. Loosen and remove the screws securing the front cover. 3. Remove the ...
Manual - Page 15

... motherboard supports the CPU. • Always turn off the computer and unplug the power cord from the power outlet before installing
the CPU to prevent hardware damage. • Unplug all cables from the power outlets. • Disconnect all telecommunication cables from their ports. • Place the system unit on a flat and stable surface. • Open the system according to the instructions...
Manual - Page 16

... Sink
Follow these instructions to install the heat sinks:
1. Apply thermal compound evenly on the top of the CPU. 2. Remove the protective cover from the underside of the heat sink. 3. Place the heat sink(s) on top of the CPU and tighten the four positioning screws.
WARNING! • When you are installing the heat sink on...
Manual - Page 17

... you begin to install the memory: • Make sure that the motherboard supports the memory. It is recommended that memory of the
same capacity, brand, speed, and chips be used. • Always turn off the computer and unplug the power cord from the power outlet before installing
the memory to prevent hardware damage. • Memory modules have a foolproof design. A memory module can be...
Manual - Page 18
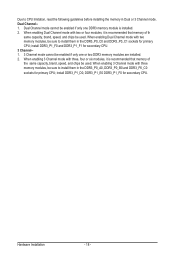
... be used. When enabling Dual Channel mode with two memory modules, be sure to install them in the DDR3_P0_C0 and DDR3_P0_C1 sockets for primary CPU; install DDR3_P1_F0 and DDR3_P1_F1 for secondary CPU. 3 Channel-1. 3 Channel mode cannot be enabled if only one or two DDR3 memory modules are installed. 2. When enabling 3 Channel mode with three, four or six...
Manual - Page 19

2-4-2 Installing a Memory
Before installing a memory module, make sure to turn off the computer and unplug the power cord from the power outlet to prevent damage to the memory module. Be sure to install DDR3 DIMMs on this motherboard. Follow these instructions to install the Memory: 1. Insert the DIMM memory module vertically into the DIMM slot, and push it down. 2. Close the plastic clip at both...
Manual - Page 20

...-down and all power sources have been disconnected from the server prior to installing a PCI card.
Failure to observe these warnings could result in personal injury or damage to equipment.
• The PCI riser assembly does not include a riser card or any cabling as standard. To install a PCI card, a riser card must be installed.
Follow these instructions to PCI Expansion card: 1. Remove the...
Manual - Page 33

...for primary CPU) PM Bus connector 8 pin power connector Intel LGA1356 socket (Primary CPU) LSI RAID Select connector BIOS write protect jumper LSI Firmware Readiness LED Mini SAS connector Mini SAS connector SATA SGPIO connector SATA 3Gb/s connectors SATA 6Gb/s connectors SATA3 port DOM support jumper SATA2 port DOM support jumper ME enable/disable jumper BIOS recovery jumper Clear password jumper...
Manual - Page 34

... 1 (for secondary CPU) Channel 3 slot 0 (for secondary CPU) Channel 3 slot 1 (for secondary CPU)
CAUTION! If a SATA type hard drive is connected to the motherboard, please ensure the jumper is closed and set to 2-3 pins (Normal mode), in order to reduce any risk of hard disk damage. Please refer to the following for SATA2_D and SATA3_D jumper setting instruction.
Hardware Installation
- 34 -
Manual - Page 46

... Default setting is Performance. CPU Management
Power Technology
Configure the power management features. Options available: Disable/Energy Efficient/Custom. Default setting is Custom.
(Note) This item is present only if you install a CPU that supports this feature. For more information about
Intel CPUs' unique features, please visit Intel's website.
BIOS Setup
- 46...
Manual - Page 70
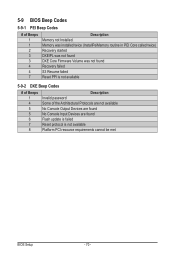
... not found Recovery failed S3 Resume failed Reset PPI is not available
5-9-2 DXE Beep Codes
# of Beeps 1 4 5 5 6 7 8
Description Invalid password Some of the Architectural Protocols are not available No Console Output Devices are found No Console Input Devices are found Flash update is failed Reset protocol is not available Platform PCI resource requirements cannot be met
BIOS Setup
- 70...