Gigabyte GV-N57U128D driver and firmware
Drivers and firmware downloads for this Gigabyte item
Related Gigabyte GV-N57U128D Manual Pages
Download the free PDF manual for Gigabyte GV-N57U128D and other Gigabyte manuals at ManualOwl.com
Manual - Page 1
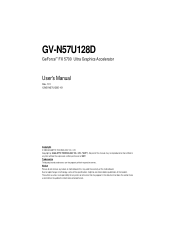
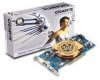
GV-N57U128D
GeForce™ FX 5700 Ultra Graphics Accelerator
User's Manual
Rev. 101 12MD-N57U128D-101
Copyright © 2003 GIGABYTE TECHNOLOGY CO., LTD Copyright by GIGA-BYTE TECHNOLOGY CO., LTD. ("GBT"). No part of this manual may be reproduced or transmitted in any from without the expressed, written permission of GBT. Trademarks Third-party brands and names...
Manual - Page 2
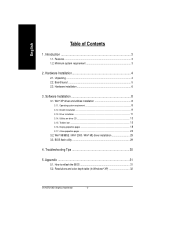
... Utilities on driver CD ...13 3.1.5. Taskbar icon ...15 3.1.6. Display properties pages 18 3.1.7. nView properties pages 24
3.2. Win® 98/98SE / Win® 2000 / Win® ME driver installation 29 3.3. BIOS flash utility 29
4. Troubleshooting Tips 30
5. Appendix 31
5.1. How to reflash the BIOS 31 5.2. Resolutions and color depth table (In Windows® XP 32
GV-N57U128D Graphics...
Manual - Page 3
... Pentium® III 650MHz or AMD Athlon 650MHz class processor or higher
• One available AGP3.0 compliant slot or better • Operating Systems Win® 98/98SE / Win® 2000 / Win® ME / Win® XP • 64MB system memory • 50MB of available disk space for full installation • CD-ROM or DVD-ROM drive
- 3 -
Introduction
Manual - Page 4
English
2. Hardware Installation
2.1. Unpacking
The GV-N57U128D package contains the following: The GV-N57U128D graphics accelerator GV-N57U128D user's manual GV-N57U128D driver and utility CD Power DVD CD Game CD TV-Out cable x 1 DVI-I to D-Sub connector
Expansion cards contain very delicate Integrated Circuit (IC) chips. To protect them against damage from static electricity, you should follow ...
Manual - Page 5
English
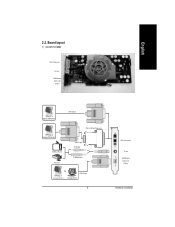
2.2. Board layout
1) GV-N57U128D
DVI-I Connector
TV-Out VGA Monitor Connector
(15pin)
Digital LCD Monitor
DVI Output
DVI-I to D-Sub Connector
Analog LCD Monitor NTSC / PAL TV Projector
VGA Output AV Output
S-VideoOutput
OR VGA Output
Analog LCD Monitor
Analog Monitor
- 5 -
DVI-I Connector TV-out
VGA Monitor Connector
(15pin)
Hardware Installation
Manual - Page 6
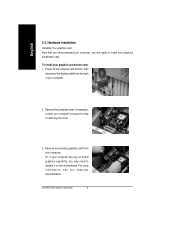
... the display cable from the back of your computer.
2. Remove the computer cover. If necessary, consult your computer's manual for help in removing the cover.
3. Remove any existing graphics card from your computer. Or, if your computer has any on-board graphics capability, you may need to disable it on the motherboard. For more information, see you computer documentation.
GV-N57U128D Graphics...
Manual - Page 7
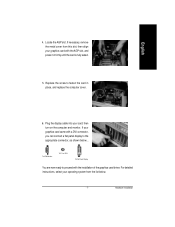
... computer cover.
6. Plug the display cable into your card; then turn on the computer and monitor. If your graphics card came with a DVI connector, you can connect a flat panel display to the appropriate connector, as shown below...
To VGA Monitor
To TV or VCR
To Flat Panel Display
You are now ready to proceed with the installation of the graphics card driver. For detailed instructions...
Manual - Page 8
... loading the graphics card drivers for the system, please make sure your system has installed DirectX 8 or later version.
• If you install the graphics card drivers for the motherboard, which consist of SIS, ALI or VIA chipsets, please install the appropriate driver program for that motherboard. Or please contact your motherboard nearest dealer for motherboard driver.
GV-N57U128D Graphics...
Manual - Page 9
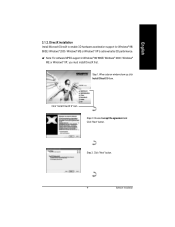
...hardware acceleration support for Windows® 98/ 98SE / Windows® 2000 / Windows® ME or Windows® XP to achieve better 3D performence. M Note: For software MPEG support in Windows® 98/ 98SE/ Windows® 2000 / Windows®
ME or Windows® XP, you must install DirectX first. Step 1. When autorun window show up, click Install DirectX 9 item.
Click "Install DirectX 9" item...
Manual - Page 11
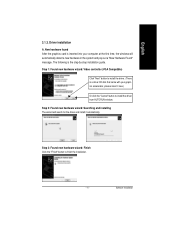
... the graphics card is inserted into your computer at the first time, the windows will automatically detect a new hardware in the system and pop out a "New Hardware Found" message. The following is the step-by-step installation guide.
Step 1: Found new hardware wizard: Video controller (VGA Compatible)
Click "Next" button to install the driver. (There is a driver CD disk that came...
Manual - Page 12
...CD disk into your CD-ROM, and then you can see the AUTORUN window. If it does not show up, please run "D:\setup.exe".
Step 1. When autorun window show up, click Install Display Driver item.
Click "Install Display Driver" item. Step 2. Click "Next" button.
Windows installings the components.
Step 3. Click "Finish" button to restart computer. Then the driver installation is completed.
GV-N57U128D...
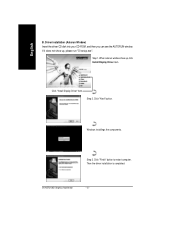
Manual - Page 13
... the driver CD disk into your CD-ROM, and then you can see the AUTORUN window. If it does not show up, please run "D:\setup.exe".
• Install V-Tuner:
Step 1. When autorun window show up, click V-Tuner item.
Click "V-Tuner" item.
Step 2. Click "Next" button.
Step 3. Enter your name and company.
Step 4. Click "Finish" button to restart computer...
Manual - Page 15
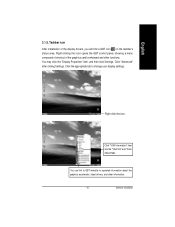
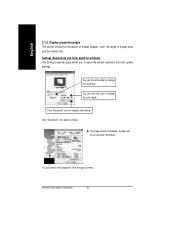
... Properties" item, and then click Settings. Click "Advanced" after clickng Settings. Click the appropriate tab to change your display settings.
Right click the icon.
Click "VGA Information" item into the "VGA Info" and "Color Adjust"tabs.
You can link to GBT website for updated information about the graphics accelerator, latest drivers, and other information.
- 15 -
Software Installation
Manual - Page 17
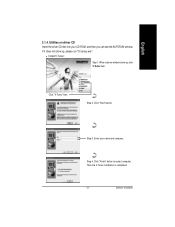
English
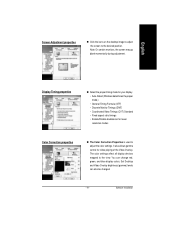
After installation of the display drivers, you will find a NVIDIA icon on the taskbar's status area. Clicking this icon open the control panel.
Right click the icon.
You can adjust the properties of the graphics accelertaor from here.
You can enable the nView function.
- 17 -
Software Installation
Manual - Page 18
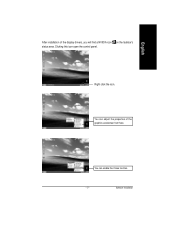
... the screen resolution and color quality settings.
You can move the slider to change the resolution.
You can click the item to change the color depth.
Click "Advanced" icon for adapter and setting.
Click "Advanced", into details settings:
n This page shows the Adapter, System and Driver versions information.
You can select other properties from the pop-out menu.
GV-N57U128D Graphics...
Manual - Page 19
... Correction properties
n The Color Correction Properties is used to adjust the color settings. It also allows gamma control for video playing of the Video Overlay. The color settings affect all display devices mapped to the view. You can change red, green, and blue display colors. Set Desktop and Video Overlay brightness (gamma) levels can also be changed.
- 19 -
Software Installation
Manual - Page 23
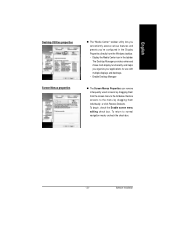
...in the Display Properties directly from the Windows taskbar. • Display the Media Center icon in the taskbar The Desktop Manager provides enhanced nView multi-display functionality and helps you organize your applications for use with multiple displays and desktops. • Enable Desktop Manager
... box. To return to normal navigation mode, uncheck the check box.
- 23 -
Software Installation
Manual - Page 25
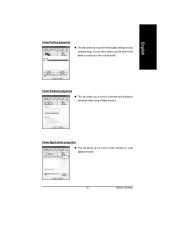
...all nView display settings for easy software setup. You can either select a profile from the list below or create your own custom profile.
nView Windows properties
n This tab allows you to control of window and dialog box placement when using multiple monitors.
nView Applications properties
n This tab allows you to control nView settings on a per application basis.
- 25 -
Software Installation
Manual - Page 29
... CD-ROM drive, substitute D with the correct drive letter.) 4. Click "OK". 5. Click on "Install Display Drivers" to begin the Installation Wizard. 6. Click "Next". 7. Click "Yes" to the license agreement. 8. Follow the Wizard's on-screen instructions to complete the installation.
3.3. BIOS flash utility
BIOS update procedure: MNote: Please download the newest BIOS from our website (www.gigabyte...
Manual - Page 30
... your motherboard. For
more information, consult your computer's manual or manufacturer. (NOTE: Some manufacturers do not allow the built-in graphics to be disabled or to become the secondary display.) n Make sure you selected the appropriate display device and graphics card when you installed the graphics driver. n If you have problems during bootup, start your computer in Safe Mode. In Windows...