HP Indigo 20000 driver and firmware
Drivers and firmware downloads for this Hewlett-Packard item

Related HP Indigo 20000 Manual Pages
Download the free PDF manual for HP Indigo 20000 and other HP manuals at ManualOwl.com
CA493-00130 Rev - Page 8
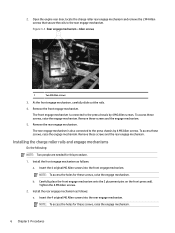
... screws, raise the engage mechanism.
b. Carefully place the front engage mechanism onto the 2 placement pins on the front press wall. Tighten the 4 M6 Allen screws.
2. Install the rear engage mechanism as follows:
a. Insert the 4 original M6 Allen screws into the rear engage mechanism.
NOTE: To access the holes for these screws...
CA493-00130 Rev - Page 9
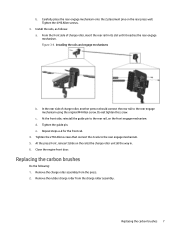
..., insert the rear rail in its slot until it reaches the rear engage mechanism. Figure 3-4 Installing the rails and engage mechanisms
b. In the rear side of charge roller, another person should connect... not tighten this screw.
c. At the front side, reinstall the guide pin to the rear rail, on the front engage mechanism. d. Tighten the guide pin. e. Repeat steps a-d for the front rail. 4. Tighten the...
CA493-00130 Rev - Page 11
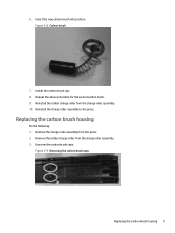
6. Insert the new carbon brush into position. Figure 3-8 Carbon brush
7. Install the carbon brush cap. 8. Repeat the above procedure for the second carbon brush. 9. Reinstall the rubber charge roller from the charge roller assembly. 10. Reinstall ...
CA493-00130 Rev - Page 14
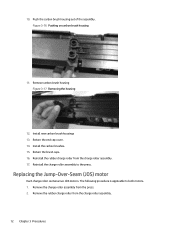
... assembly. Figure 3-16 Pushing on carbon brush housing
11. Remove carbon brush housing Figure 3-17 Removing the housing
12. Install new carbon brush housings 13. Return the end cap cover. 14. Install the carbon brushes. 15. Return the brush caps. 16. Reinstall the rubber charge roller from the charge roller assembly. 17...
CA493-00130 Rev - Page 23
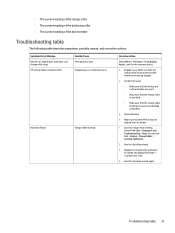
...table describes symptoms, possible causes, and corrective actions.
Symptom / Error Message
Oil pick-up, edge bands, dark dots, and ... carbon brushes are good.
- Make sure that the charge roller is installed.
- Make sure that the charge roller leveling process is successfully completed.... Systab, set BypassTableTopic > crJosActive to True.
4. Run the Auto Bias wizard again.
Troubleshooting table 21
CA493-00130 Rev - Page 24
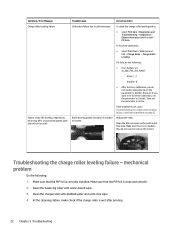
...Error Message Charge roller leveling failure
Failure of the JOS leveling, edge bands, bouncing, OPU, or poor print quality (dark side at front or rear)
Possible Cause
Corrective Action
Calibration failure due to software...set IO_SDV_PSS_JOS_FORCE:
- Active = -1
- Disable = 0
● After the force calibration, you do not need to manually ...the PIP foil is correctly installed. Make sure that the ...
CA493-00130 Rev - Page 28
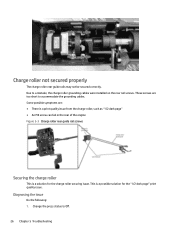
Charge roller not secured properly
The charge roller rear guide rails may not be secured correctly. Due to a mistake, the charge roller grounding cables were installed on the rear rail screws. These screws are too short to accommodate the grounding cables. Some possible symptoms are: ● There is a print quality issue from the charge roller...
CA493-00130 Rev - Page 29
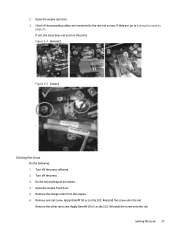
.... 3. Check if the grounding cables are connected to the rear rail screws. If they are, go to Solving the issue on
page 27. If not, the issue does not exist on the press. Figure 5-4 Incorrect
Figure 5-5 Correct
Solving the issue
Do the following: 1. Turn off the press software. 2. Turn off the press...
CA493-00130 Rev - Page 30
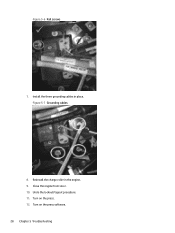
Figure 5-6 Rail screws
7. Install the three grounding cables in place. Figure 5-7 Grounding cables
8. Reinstall the charge roller in the engine. 9. Close the engine front door. 10. Undo the lockout/tagout procedure. 11. Turn on the press. 12. Turn on the press software. 28 Chapter 5 Troubleshooting
Performing the Customer Acceptance Test Procedure CATP -- CA493-02780 Rev 02 - Page 3
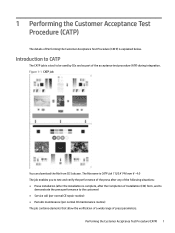
... part of the acceptance test procedure (ATP) during integration. Figure 1-1 CATP job
You can download the file from CE Suitcase. The file name is CATP Job 1120 X 746 mm V ... situations: ● Press installation (after the installation is complete, after the Completion of Installation (COI) form, and to
demonstrate the press performance to the customer) ● Service call (per normal CE repair...
Performing the Customer Acceptance Test Procedure CATP -- CA493-02780 Rev 02 - Page 4
...Load the Condat 90 substrate that is supplied with the press. 2. Load the CATP Job 1120 X 746 mm V - 4.0. 3. Open the Job Properties screen. Select the Linework and Resolution... optical density and gray scales with the X-Rite eXact 2 Portable
Spectrophotometer device. Set it to T mode.
CATP specifications for cyan, magenta, yellow, and black
Refer below for CATP specifications. 1. Print 30 copies ...
Performing the Customer Acceptance Test Procedure CATP -- CA493-02780 Rev 02 - Page 15
...HP Indigo 50000 Digital Press to the scope. Updated the following sections: ● Before printing the CATP ● CATP qualification procedure
Responsible Engineer (TS) Press Group Manager R&D Engineer Documentation Manager Configuration Control... version of this document.
This document contains valuable trade secrets and confidential information of HP Indigo Ltd. Nothing herein may be copied,...
Dripping Troubleshooting - Page 3
...C (68 to 77° F). 3. Chiller temperature set point is 6° C. 4. Identify the dripping shape ... coverage
Possible reasons
Ventilation and climate control performance
Troubleshooting Section
Ventilation & UC
Small...damage and cleanliness. Make sure it's properly installed in its place. 3. Check cleaning station ... meter device (8 ±0.2 liter/min). 7. Check PIP underlayer ...