Lexmark X850E - Mfp driver and firmware
Drivers and firmware downloads for this Lexmark item
Related Lexmark X850E Manual Pages
Download the free PDF manual for Lexmark X850E and other Lexmark manuals at ManualOwl.com
IPDS Printer and Host Setup Guide - Page 4
... LAN print server (optional card providing Ethernet or Fiber network connection). • Lexmark 802.11g Wireless Print Adapter • a Coax/Twinax Adapter for SCS option card for connection to a host via coax or twinax cables. Refer to
"Coax/Twinax Adapter for SCS Support" [page 53] for a list of printers which support this adapter. To install the printer, determine the host, host software...
IPDS Printer and Host Setup Guide - Page 5

IPDS Printer and Host Setup Guide Equipment Requirements And Specifications
Customer Support
If you cannot find answers in this guide about using the IPDS emulation, or require firmware updates, please contact your point of purchase, your local Lexmark office, or check the Lexmark support web site at http://support.lexmark.com.
5
IPDS Printer and Host Setup Guide - Page 6
... LAN. The printer must be configured with a Standard Network port or MarkNet internal LAN print server. Refer to the IPDS User's Guide for detailed instructions on using the control panel to select and change option settings.
Steps
The following steps must be completed to begin printing IPDS jobs. 1 Choose a Printer Port for Use in the Device Description 2 Create a PSFCFG 3 Create a Printer Device...
IPDS Printer and Host Setup Guide - Page 15
..., Bar Code Size, Host Resolution, and Fax Interrupt Settings 4 Modify the Auto-created Twinax Device Description or Use CRTDEVPRT to Create a Printer Device Description 5 Verify IPDS Printing 6 Troubleshooting
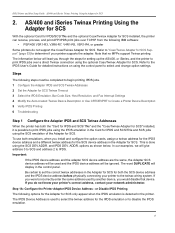
Step 1 Configure the Adapter IPDS and SCS Twinax Addresses
When the printer has both the "Card for IPDS and SCS/TNe" and the "Coax/Twinax Adapter for SCS" installed, it is possible to print...
IPDS Printer and Host Setup Guide - Page 22

... will lead you through the steps for setting up the MVS mainframe and printer to print IPDS jobs over a LAN. The printer must be configured with a Standard Network port or MarkNet internal LAN print server. Refer to the IPDS User's Guide for detailed instructions on using the control panel to select and change option settings. Software requirements for MVS are:
• PSF...
IPDS Printer and Host Setup Guide - Page 23
... and then select Settings > Setup Menu > Timeouts > Network Job Timeout. On MFPs, touch Menus and then select Settings > General Settings > Timeouts > Network Job Timeout. How to find Job Buffering on the control panel: Job Buffering is only visible as a menu setting if there is a hard disk installed in the printer. Press MENU or touch Menus and then select Network/Ports > Standard Network > Job...
IPDS Printer and Host Setup Guide - Page 35
... will lead you through the steps for setting up PSF/2 and the printer to print IPDS jobs over a LAN. The printer must be configured with a Standard Network port or a MarkNet internal LAN print server. Refer to the IPDS User's Guide for detailed instructions on using the control panel to select and change option settings. Refer to the PSF/2 documentation if you...
IPDS Printer and Host Setup Guide - Page 44
... instructions on using the control panel to select and change option settings.
Steps
The following steps must be completed to begin printing IPDS jobs. 1 Choose a Printer Port for Printing IPDS Jobs 2 Define the Printer to PSF/AIX 3 Configure the Printer's Print Server TCP/IP Settings 4 Configure the Printer's Network Job Timeout 5 Select the IPDS Emulation, Bar Code Size, Host Resolution, and Fax...
IPDS Printer and Host Setup Guide - Page 53
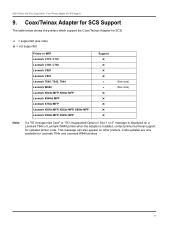
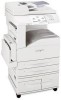
... MFP, X646e MFP Lexmark X646ef MFP Lexmark X782e MFP Lexmark X850e MFP, X852e MFP, X854e MFP Lexmark X940e MFP, X945e MFP
Support U U U U D D U U U U U
(See note) (See note)
Note:
If a "55 Unsupported Card" or "55 Unsupported Option in Slot 1 or 2" message is displayed on a Lexmark T64x or Lexmark W840 printer when the adapter is installed, contact printer technical support for updated printer...
IPDS Printer and Host Setup Guide - Page 55

... section in this guide for information on changing the timeout value. • for Twinax: "Set the Adapter for SCS Twinax Timeout", page 16 • for Coax: "Set the Adapter for SCS Coax Timeout" on page 31
IPDS Timeout = Host Controlled (when using Standard Network port or MarkNet internal LAN print server)
Note: The printer defaults to Host Controlled when receiving IPDS...
IPDS Printer and Host Setup Guide - Page 57
... saved in the printer memory. The memory cannot be used by IPDS.
Set Resource Save to "Off" to allow permanent downloaded resources from PostScript and PCL jobs to be deleted. On printers, Resource Save is found under MENU > Setup Menu > Settings. On MFPs, it is found under Menus > Settings > Print Settings > Setup Menu. Try reprinting the job after powering the printer OFF and ON...
IPDS Printer and Host Setup Guide - Page 58
...information on the minimum recommended installed memory for various printing requirements on each supported printer, refer to the appendix on memory requirements and recommendations in the IPDS Emulation User's Guide. C. If a LAN connection is used through the Standard Network port or a MarkNet internal LAN print server, try setting IPDS Timeout to Host Controlled and set the host release timer to...
IPDS Printer and Host Setup Guide - Page 60
... in the IPDS Emulation User's Guide.
Problem 14: 1565 EMUL ERROR LOAD EMUL OPTION
1565 EMUL ERROR LOAD EMUL OPTION appears on the display after updating the printer code.
Solution to Problem 14
The IPDS emulation version contained in the Card will not function with the printer code. Download the correct IPDS emulation version. See the section on support (page 5) for firmware update information.
60
IPDS Printer and Host Setup Guide - Page 61
... Printer and Host Setup Guide Printer Messages and Problems
Problem 15: Update Option Card Firmware
Update Option Card Firmware appears on the display.
Solution to Problem 15
This message indicates that the IPDS/SCS/TNe or printer firmware on the option card must be updated. See the section on support (page 5) for firmware update information. Warning: Continuing to use the printer without updating...
IPDS Printer and Host Setup Guide - Page 62
... on the flash. On printers, select MENU > Settings > Utilities Menu > Format Flash > Yes. On MFPs, select Menus > Settings > Print Settings > Utilities Menu > Format Flash > Yes.
Problem 21: 55 Unsupported Option in Slot X
The message "55 Unsupported Card" or "55 Unsupported Option in Slot 1 or 2" appears when the Coax /Twinax Adapter for SCS is installed. Please see "Coax/Twinax Adapter for SCS...
User's Reference - Page 17
... 1: Set up your Scan to PC profile 1 Launch the ScanBack Utility. If you installed the software using the default directories, click
Start, Programs, Lexmark, MFP, and then ScanBack Utility.
2 Select the MFP you want to use. If none are listed, see your systems person to obtain a list,
or click the Setup button to manually search for an IP address or...
User's Reference - Page 18
... Image window appears on your desktop indicating that your PC is
waiting to receive the scan output file.
Step 3: Scan your original documents
1 Locate the MFP you specified in the scan profile. 2 Load all pages in the automatic document feeder of the scanner. Place the pages according
to the drawing on the scanner.
3 On the control panel, press Fax/Scan...
Setup Guide - Page 3

... containing the fax modem port, follow all safety precautions of any equipment into which the card is being installed.
• Never install or use this equipment in wet locations.
• Before attempting to access the printer compartment where the option card is installed, you must remove the fax phone line cable first from the wall outlet, and then from the fax modem port of the...
Setup Guide - Page 17
... of the screws of the previously installed drawer.
8 Tighten the posts securely.
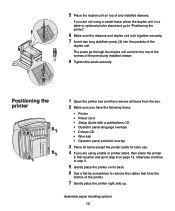
Positioning the printer
1 Open the printer box and then remove all items from the box. 2 Make sure you have the following items:
• Printer • Power cord • Setup Guide with a publications CD • Operator panel language overlays • Drivers CD • Wire bail • Operator...
Setup Guide - Page 19
... open the side door.
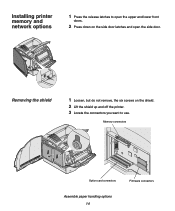
Removing the shield
1 Loosen, but do not remove, the six screws on the shield. 2 Lift the shield up and off the printer. 3 Locate the connectors you want to use.
Memory connectors
Option card connectors
Firmware connectors
Assemble paper handling options 14