MSI 790FX driver and firmware


Related MSI 790FX Manual Pages
Download the free PDF manual for MSI 790FX and other MSI manuals at ManualOwl.com
User Guide - Page 2
... Support
If a problem arises with your system and no solution can be obtained from the user's manual, please contact your place of purchase or local distributor. Alternatively, please try the following help resources for further guidance.
Visit the MSI website for FAQ, technical guide, BIOS updates, driver updates, and other information: http://global.msi.com.tw/index.php? func=service...
User Guide - Page 4
...
T h is eq uip men t h as been tested and found to comply with the limits for a Class B digital device, pursuant to Part 15 of the FCC Rules. These limits are designed to provide reasonable protection against harmful interference in a residential installation. This equipment generates, uses and can radiate radio frequency energy and, if not...
User Guide - Page 9
Appendix A Realtek Audio A-1 Installing the Realtek HD Audio Driver A-2 Software Configuration A-4 Hardware Setup A-19
Appendix B Overclocking Center B-1 Activating Overclocking Center B-2 System Info ...B-3 DOT ...B-5
Appendix C SB750 SATA RAID C-1 RAID Configuration C-2
Appendix D Drive Booster Manager D-1 Introduction ...D-2 RAID Configuration D-3
User Guide - Page 12
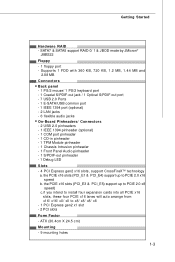
... & SATA8 support RAID 0/ 1 & JBOD mode by JMicron®
JMB322
Floppy - 1 floppy port - Supports 1 FDD with 360 KB, 720 KB, 1.2 MB, 1.44 MB and
2.88 MB
Connectors Back panel - 1 PS/2 mouse/ 1 PS/2 keyboard port - 1 Coaxial S/PDIF-out jack / 1 Optical S/PDIF-out port - 7 USB 2.0 Ports - 1 E-SATA/USB common port - 1 IEEE 1394 port (optional) - 2 LAN jacks - 6 flexible audio jacks On-Board Pinheaders...
User Guide - Page 14
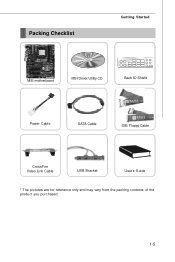
Packing Checklist
Getting Started
MSI motherboard
MSI Driver/Utility CD
Back IO Shield
Power Cable
SATA Cable
IDE/ Floppy Cable
CrossFire Video Link Cable
USB Bracket
User's Guide
* The pictures are for reference only and may vary from the packing contents of the product you purchased.
1-5
User Guide - Page 15
... chapter provides you with the information about hardware setup procedures. While doing the installation, be careful in holding the components and follow the installation procedures. For some components, if you install in the wrong orientation, the components will not work properly. Use a grounded wrist strap before handling computer components. Static electricity may damage the components...
User Guide - Page 17
Hardware Setup
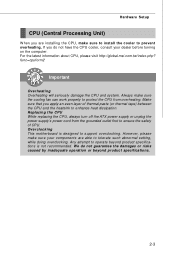
CPU (Central Processing Unit)
W hen you are installing the CPU, make sure to install the cooler to prevent overheating. If you do not have the CPU cooler, consult your dealer before turning on the computer. For the latest information about CPU, please visit http://global.msi.com.tw/index.php? func=cpuform2
Important
Overheating Overheating will seriously damage...
User Guide - Page 18
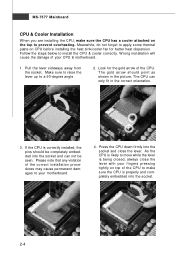
... to prevent overheating. Meanwhile, do not forget to apply some thermal paste on CPU before installing the heat sink/cooler fan for better heat dispersion. Follow the steps below to install the CPU & cooler correctly. W rong installation will cause the damage of your CPU & motherboard.
1. Pull the lever sideways away from the socket. Make sure to raise...
User Guide - Page 34

...Power
This button is used to switch GreenPower function of system. Once you press the button, the system will switch the GreenPower between disable and auto mode.
OC Dial Button and OC Dial Knob: OC GEAR & OC DRIVE.... This method does not need to install software or reboot. Please follow the steps below... increase the success rate, you should set the voltage in BIOS properly.
2. After each of the ...
User Guide - Page 37
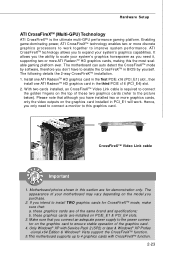
... graphics cards are installed on PCIE_E1 & PCI_E4 slots.
3. Make sure that you connect an adequate power supply to the power connector on the graphics card to ensure stable operation of the graphics card.
4. Only Windows® XP with Service Pack 2 (SP2) or later & Windows® XP Profes -sional x64 Edition & Windows® Vista support the CrossFireXTM function.
5.This motherboard supports up...
User Guide - Page 38
MS-7577 Mainboard
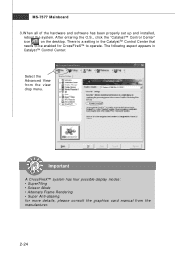
3.W hen all of the hardware and software has been properly set up and installed,
reboot the system. After entering the O.S., click the "Catalyst™ Control Center"
icon
on the desktop. There is a setting in the Catalyst™ Control Center that
needs to be enabled for CrossFireX™ to operate. The following aspect appears in
Catalyst...
User Guide - Page 61
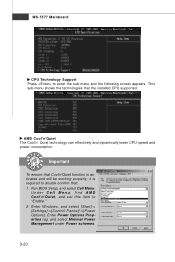
... lower CPU speed and power consumption.
Important
To ensure that Cool'n'Quiet function is activated and will be working properly, it is required to double confirm that: 1. Run BIOS Setup, and select Cell Menu.
Under Cell Menu, find AMD Cool'n'Quiet, and set this item to "Enable." 2. Enter Windows, and select [Start]-> [Settings]->[Control Pannel]->[Power Options]. Enter Power Options...
User Guide - Page 68
M-Flash
BIOS Setup
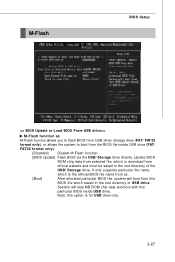
== BIOS Update or Load BIOS From USB drive==
M-Flash function as
M-Flash funcion allows you to flash BIOS from USB drive/ storage drive (FAT/ FAT32
format only), or allows the system to boot from the BIOS file inside USB drive (FAT/
FAT32 format only).
[Disabled]
Disable M-Flash function.
[BIOS Update] Flash BIOS via the USB/ Storage drive directly. Update BIOS
ROM ...
User Guide - Page 73
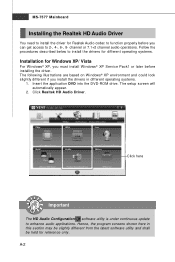
...environment and could look slightly different if you install the drivers in different operating systems.
1. Insert the application DVD into the DVD-ROM drive. The setup screen will automatically appear.
2. Click Realtek HD Audio Driver.
Click here
Important
The HD Audio Configuration software utility is under continuous update
to enhance audio applications. Hence, the program screens shown here...
User Guide - Page 74
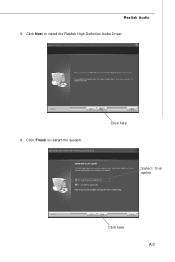
Realtek Audio 3. Click Next to install the Realtek High Definition Audio Driver.
4. Click Finish to restart the system.
Click here
Select this option
Click here A-3
User Guide - Page 75
MS-7577 Mainboard
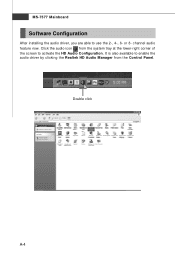
Software Configuration
After installing the audio driver, you are able to use the 2-, 4-, 6- or 8- channel audio feature now. Click the audio icon from the system tray at the lower-right corner of the screen to activate the HD Audio Configuration. It is also available to enable the audio driver by clicking the Realtek HD Audio M anager from the Control Panel.
Double click
a
A-4
User Guide - Page 93
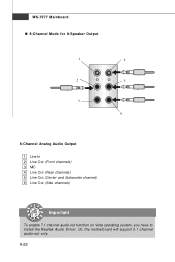
...8-Speaker Output
1
4
2
5
3 6
8-Channel Analog Audio Output
1 Line In 2 Line Out (Front channels) 3 MIC 4 Line Out (Rear channels) 5 Line Out (Center and Subwoofer channel) 6 Line Out (Side channels)
Important
To enable 7.1 channel audio-out function on Vista operating system, you have to install the Realtek Audio Driver. Or, the motherboard will support 5.1 channel audio-out only.
a
A-22
User Guide - Page 94
... and powerful utility that MSI has spent much research and efforts to develop, helps users to monitor or configure the hardware status of MSI Motherboard in windows, such as CPU clock, voltage, fan speed and temperature. Before you install the Overclocking Center, please make sure the system has meet the following requirements: 1. 256MB system memory. 2. DVD-ROM drive for software installation...
User Guide - Page 109
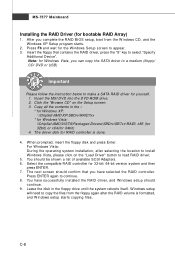
... follow the instruction below to make a SATA RAID driver for yourself. 1. Insert the MSI DVD into the DVD-ROM drive. 2. Click the "Browse CD" on the Setup screen. 3. Copy all the contents in the : * for Windows XP: \\ChipSet\AMD\XP\SBDrv\RAID7xx * for Windows Vista: \\ChipSet\AMD\VISTA\Packages\Drivers\SBDrv\SB7xx\RAID\ x86 (for 32bit) or x64(for 64bit) 4. The driver disk for RAID controller is...
User Guide - Page 110
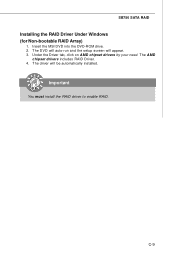
SB750 SATA RAID
Installing the RAID Driver Under Windows (for Non-bootable RAID Array)
1. Insert the MSI DVD into the DVD-ROM drive. 2. The DVD will auto-run and the setup screen will appear. 3. Under the Driver tab, click on AMD chipset drivers by your need. The AMD
chipset drivers includes RAID Driver. 4. The driver will be automatically installed.
Important
You must install the RAID driver to ...