MSI K8D driver and firmware


Related MSI K8D Manual Pages
Download the free PDF manual for MSI K8D and other MSI manuals at ManualOwl.com
User Guide - Page 2
... for a class A digital device, pursuant to part 15 of the FCC rules. These limits are designed to provide reasonable protection against harmful interference when the equipment is operated in a commercial environment. This equipment generates, uses and can radiate radio frequency energy and, if not installed and used in accordance with the instruction manual, may cause...
User Guide - Page 3
... Machines Corporation. Windows® 95/98...manual, please contact your place of purchase or local distributor. Alternatively, please try the following help resources for further guidance.
Visit the MSI website for FAQ, technical guide, BIOS updates, driver updates, and other information: http://www.msi.com.tw/program/service/faq/ faq/esc_faq_list.php Contact our technical staff at: support@msi...
User Guide - Page 5
... DP CPU Cooling System 2-4 Memory ...2-6 Installing DDR Modules 2-6 DIMM Configurations 2-7 Memory Population Rules 2-7 Power Supply ...2-8 SSI 24-Pin Power Connector: JPWR1 2-8 SSI 8-Pin Power Connector: JPWR2 2-8 SSI 5-Pin Power Connector: J2 2-8 Back Panel ...2-9 Connectors ...2-10 Floppy Disk Drive Connector: FDD1 2-10 Hard Disk Connectors: IDE1 & IDE2 2-10 Serial ATA RAID 0, 1, 10...
User Guide - Page 14

... chapter provides you with the information about hardware setup procedures. While doing the installation, be careful in holding the components and follow the installation procedures. For some components, if you install in the wrong orientation, the components will not work properly.
Use a grounded wrist strap before handling computer components. Static electricity may damage the components...
User Guide - Page 16
Hardware Setup
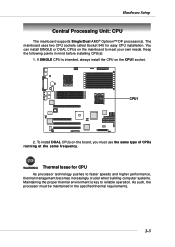
Central Processing Unit: CPU
The mainboard supports Single/Dual AMD® Opteron™ DP processor(s). The mainboard uses two CPU sockets called Socket 940 for easy CPU installation. You can install SINGLE or DUAL CPUs on the mainboard to meet your own needs. Keep the following points in mind before installing CPU(s):
1. If SINGLE CPU is intended, always install the CPU on...
User Guide - Page 17
... SSI Server Board
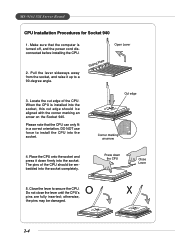
CPU Installation Procedures for Socket 940
1. Make sure that the computer is turned off, and the power cord disconnected before installing the CPU.
2. Pull the lever sideways away from the socket, and raise it up to a 90-degree angle.
Sliding Plate
Open Lever
3. Locate the cut edge of the CPU. When the CPU is installed into the...
User Guide - Page 18
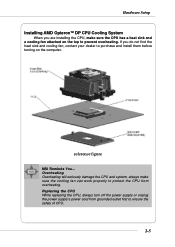
... to purchase and install them before turning on the computer.
reference figure
MSI Reminds You... Overheating Overheating will seriously damage the CPU and system, always make sure the cooling fan can work properly to protect the CPU from overheating. Replacing the CPU While replacing the CPU, always turn off the power supply or unplug the power supply's power cord from...
User Guide - Page 19
... SSI Server Board
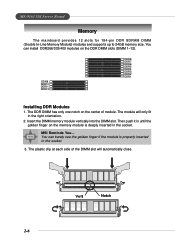
Memory
The mainboard provides 12 slots for 184-pin DDR SDRAM DIMM (Double In-Line Memory Module) modules and supports up to 24GB memory size. You can install DDR266/333/400 modules on the DDR DIMM slots (DIMM 1~12).
DDR9 DDR10 DDR11 DDR12
DDR8 DDR7 DDR6 DDR5 DDR4 DDR3 DDR2 DDR1
Installing DDR Modules...
User Guide - Page 20
... Setup
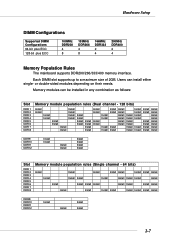
DIMM Configurations
Supported DIMM Configurations 64-bit plus ECC
128-bit plus ECC
100MHz DDR200 4
8
133MHz DDR266 4
8
166MHz DDR333 2
4
200MHz DDR400 2
4
Memory Population Rules
The mainboard supports DDR200/266/333/400 memory interface.
Each DIMM slot supports up to a maximum size of 2GB. Users can install either single- or double-sided modules depending on their needs.
Memory...
User Guide - Page 21
MS-9161 SSI Server Board
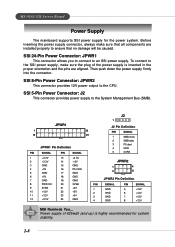
Power Supply
The mainboard supports SSI power supply for the power system. Before inserting the power supply connector, always make sure that all components are installed properly to ensure that no damage will be caused.
SSI 24-Pin Power Connector: JPWR1
This connector allows you to connect to an SSI power supply. To connect to...
User Guide - Page 23
..., case, LAN, USB Ports, CPU/system power supply fans, ... and etc.
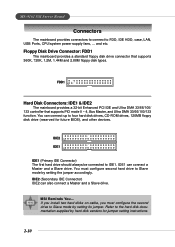
Floppy Disk Drive Connector: FDD1
The mainboard provides a standard floppy disk drive connector that supports 360K, 720K, 1.2M, 1.44M and 2.88M floppy disk types.
FDD1
Hard Disk Connectors: IDE1 & IDE2
The mainboard provides a 32-bit Enhanced PCI IDE and Ultra DMA 33/66/100/ 133 controller that supports PIO mode 0 ~ 4, Bus Master...
User Guide - Page 24
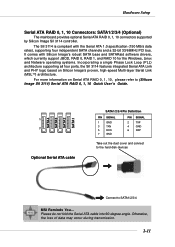
... Serial ATA RAID 0, 1, 10 connectors supported by Silicon Image SiI 3114 controller.
The SiI 3114 is compliant with the Serial ATA 1.0 specification (150 MB/s data rates), supporting four independent SATA channels and a 32-bit 33/66MHz PCI bus. It comes with Silicon Image's robust SATA base and SATARaid software drivers, which currently support JBOD, RAID 0, RAID 1, and RAID 10 for the Windows...
User Guide - Page 32
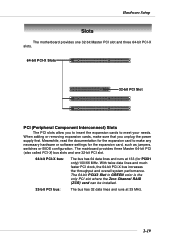
... that you unplug the power supply first. Meanwhile, read the documentation for the expansion card to make any necessary hardware or software settings for the expansion card, such as jumpers, switches or BIOS configuration. The mainboard provides three Master 64-bit PCI (also called PCI-X) bus slots and one 32-bit PCI slot.
64-bit PCI-X bus:
The bus has 64 data lines...
User Guide - Page 34
... to run the Setup program when: ” An error message appears on the screen during the system boot-
ing up, and requests you to run SETUP. ” You want to change the default settings for customized features.
MSI Reminds You... 1. The items under each BIOS category described in this chapter are under continuous update for better system...
User Guide - Page 35

MS-9161 SSI Server Board
Entering Setup
Power on the computer and the system will start POST (Power On Self Test) process. When the message below appears on the screen, press key to enter Setup.
Press F2 to enter SETUP
If the message disappears before you respond and you still wish to enter Setup, restart the system by turning...
User Guide - Page 38
... Values F9 Setup Defaults
Esc Exit ↔ Select Menu Enter Sele8ct Sub-Menu F10 Save and Exit
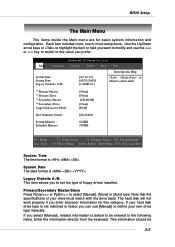
System Time The time format is .
System Date The date format is .
Legacy Diskette A:/B: This item allows you to set the type of floppy drives installed.
Primary/Secondary Master/Slave Press PgUp/ or PgDn/ to select [Manual], [None...
User Guide - Page 40
... Setup Utility Main Advanced Security Power Boot Exit
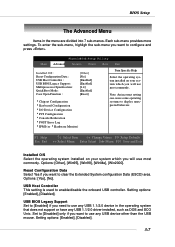
Installed O/S : Reset Configuration Data : USB Host Controller : USB BIOS Legacy Support : Multiprocessor Specification : QuickBoot Mode : Case Open Function :
[Other] [No] [Enabled] [Enabled] [1.4] [Enabled] [Reset]
8Chipset Configuration 8Keyboard Configuration 8I/O Device Configuration 8PCI Configuration 8Console Redirection 8POST Error...
User Guide - Page 44
... your system has a PS/2 mouse port and you install a serial pointing device, select [Disabled].
Floppy Disk Controller The item is used to enable or disable the onboard Floppy controller. Select [Enabled] when you have installed a floppy disk drive and want to use it. Options: [Enabled], [Disabled].
Onboard PCI IDE The chipset contains a PCI IDE interface with support for two IDE channels. Select...
User Guide - Page 49

... Utility
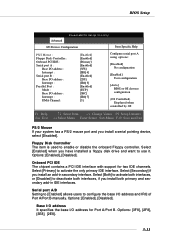
IPMI
Item Specific Help
IPMI Specification Version BMC Firmware Version Setting PEF Configuration Clear System Event Log Existing Event Log number SYS Firmware Progress BIOS POST Watchdog 8System Event Log
1.5 3.24 [Enabled] [Disabled] 12 [Enabled] [Enabled]
Select this line to en/disable COM port on BMC.
FFF111 HHeHellpeplp ↑↓↑SS↓eelleSeccettleIIcttteemImtem...
User Guide - Page 64
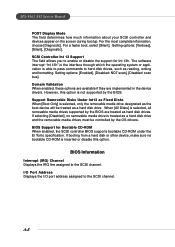
... drives must be controlled by the OS drivers. BIOS Support for Bootable CD-ROM When enabled, the SCSI controller BIOS supports bootable CD-ROM under the El Torito specification. If booting from a hard disk or other device, make sure no bootable CD-ROM is inserted or disable this option.
BIOS Information
Interrupt (IRQ) Channel Displays the IRQ line assigned to the SCSI channel. I/O Port Address...