MSI K9AU driver and firmware

Related MSI K9AU Manual Pages
Download the free PDF manual for MSI K9AU and other MSI manuals at ManualOwl.com
User Guide - Page 2
...
Technical Support
If a problem arises with your system and no solution can be obtained from the user's manual, please contact your place of purchase or local distributor. Alternatively, please try the following help resources for further guidance.
Visit the MSI website for FAQ, technical guide, BIOS updates, driver updates and other information: http://www.msi.com/index.php?func=service...
User Guide - Page 4
...
T h is eq uip men t h as been tested and found to comply with the limits for a Class B digital device, pursuant to Part 15 of the FCC Rules. These limits are designed to provide reasonable protection against harmful interference in a residential installation. This equipment generates, uses and can radiate radio frequency energy and, if not...
User Guide - Page 13
... chapter provides you with the information about hardware setup procedures. While doing the installation, be careful in holding the components and follow the installation procedures. For some components, if you install in the wrong orientation, the components will not work properly. Use a grounded wrist strap before handling computer components. Static electricity may damage the components...
User Guide - Page 15
Hardware Setup
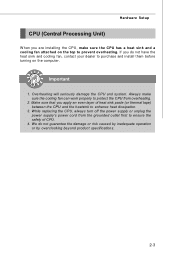
CPU (Central Processing Unit)
W hen you are installing the CPU, make sure the CPU has a heat sink and a cooling fan attached on the top to prevent overheating. If you do not have the heat sink and cooling fan, contact your dealer to purchase and install them before turning on the computer.
Important
1. Overheating will seriously damage...
User Guide - Page 16
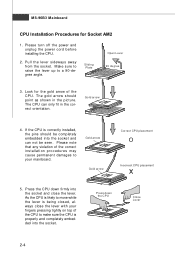
... AM2
1. Please turn off the power and unplug the power cord before installing the CPU.
2. Pull the lever sideways away from the socket. Make sure to raise the lever up to a 90-degree angle.
Sliding Pla te
Open Lever 90 degree
3. Look for the gold arrow of the CPU. The gold arrow should point as...
User Guide - Page 17
Hardware Setup
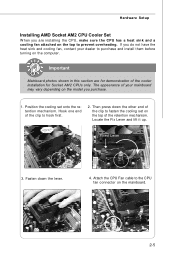
Installing AMD Socket AM2 CPU Cooler Set
W hen you are installing the CPU, make sure the CPU has a heat sink and a cooling fan attached on the top to prevent overheating. If you do not have the heat sink and cooling fan, contact your dealer to purchase and install them before turning on the computer.
Important
Mainboard photos shown...
User Guide - Page 18
....
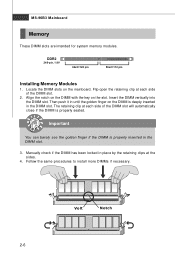
DDR2
240-pin, 1.8V
64x2=128 pin
56x2=112 pin
Installing Memory Modules
1. Locate the DIMM slots on the mainboard. Flip open the retaining clip at each side of the DIMM ...
Important
You can barely see the golden finger if the DIMM is properly inserted in the DIMM slot.
3. Manually check if the DIMM has been locked in place by the retaining clips at the sides.
4. Follow the same procedures to...
User Guide - Page 19
...Setup
Power Supply
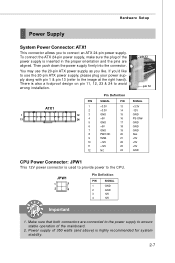
System Power Connector: ATX1
This connector allows you to connect an ATX 24-pin power supply. To connect the ATX 24-pin power supply, make sure the plug of the power supply is inserted in the proper orientation and the pins are aligned. Then push down the power...5V +5V +5V GND
CPU Power Connector: JPW1
This 12V power connector is used to provide power to the CPU.
JPW1
1
3
2...
User Guide - Page 28
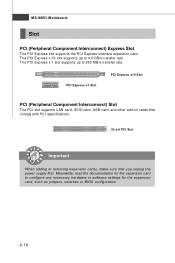
... PCI slot supports LAN card, SCSI card, USB card, and other add-on cards that comply with PCI specifications.
32-bit PCI Slot
Important
When adding or removing expansion cards, make sure that you unplug the power supply first. Meanwhile, read the documentation for the expansion card to configure any necessary hardware or software settings for the expansion card, such as jumpers, switches or BIOS...
User Guide - Page 30
....
2. Upon boot-up, the 1st line appearing after the memory count is the BIOS version. It is usually in the format: A96B3KMS V1.0 071608 where: 1st digit refers to BIOS maker as A = AMI, W = AWARD, and P = PHOENIX. 2nd - 5th digit refers to the model number. 6th digit refers to the chipset as I = Intel, N = nVidia, A = ATi , K=AMD and V = VIA. 7th...
User Guide - Page 33
Main
BIOS Setup
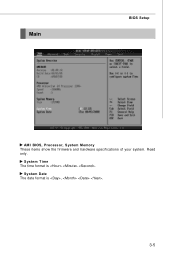
AM I BIOS, Processor, System M emory These items show the firmware and hardware specifications of your system. Read only.
System Time The time format is .
System Date The date format is , .
3-5
User Guide - Page 40
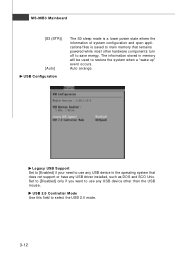
... main memory that remains powered while most other hardware components turn off to save energy. The information stored in memory will be used to restore the system when a "wake up" event occurs. Auto arrange.
Legacy USB Support Set to [Enabled] if your need to use any USB device in the operating system that does not support or have any USB driver installed...