MSI P1 driver and firmware


Related MSI P1 Manual Pages
Download the free PDF manual for MSI P1 and other MSI manuals at ManualOwl.com
User Guide - Page 2
... obtained from the user's manual, please contact your place of purchase or local distributor. Alternatively, please try the following help resources for further guidance.
Visit the MSI website at http://global.msi.com.tw/index.php? func=faqIndex for FAQ, technical guide, BIOS updates, driver updates, and other information. Contact our technical staff at http://support.msi.com.tw/.
ii
User Guide - Page 4

... for a class A digital device, pursuant to part 15 of the FCC rules. These limits are designed to provide reasonable protection against harmful interference when the equipment is operated in a commercial environment. This equipment generates, uses and can radiate radio frequency energy and, if not installed and used in accordance with the instruction manual, may cause...
User Guide - Page 8

... Assembly 2-19 Rack Mounting ...2-30 Chapter 3 BIOS Setup 3-1 Entering Setup ...3-2 The Menu Bar ...3-4 Main ...3-5 Advanc ed ...3-6 Boot ...3-20 Security ...3-23 Chipset ...3-24 Exit ...3-26 Appendix A Intel ICH9R SATA RAID A-1 ICH9R Introduction A-2 BIOS Configuration A-3 Installing Driver ...A-9 Installing Software A-11 RAID Migration Instructions A-15 Degraded RAID Array A-22
viii
User Guide - Page 17
... Setup
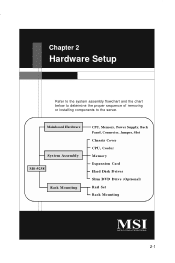
Chapter 2
Hardware Setup
Refer to the system assembly flowchart and the chart below to determine the proper sequence of removing or installing components to the server.
Mainboard Hardware
System Assembly MS-9258
Rack Mounting
CPU, Memory, Power Supply, Back Panel, Connector, Jumper, Slot Chassis Cover CPU, Cooler Memory Expansion Card Hard Disk Drives Slim DVD Drive (Optional) Rail Set...
User Guide - Page 19

Hardware Setup
CPU (Central Processing Unit)
This mainboard supports dual-core Intel® Xeon® processor 3000 series, quad-core Intel® Xeon® processor 3200 series, W olfdale and Yorkfield processors in LGA775 package. W hen you install the CPU, make sure that you install the cooler to prevent overheating. If you do not have the CPU cooler, consult your dealer before...
User Guide - Page 20

...
64x2=128 pin
56x2=112 pin
Dual-Channel Mode Population Rule
In Dual-Channel mode, the memory modules can transmit and receive data with two data bus lines simultaneously. Dual-Channel mode is enabled when the installed memory capacities of both DIMM channels are equal. If different speed DIMMs are used between channels, the...
User Guide - Page 21
Hardware Setup
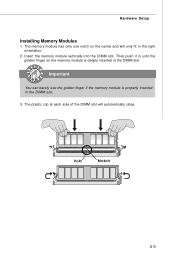
Installing Memory Modules
1. The memory module has only one notch on the center and will only fit in the right orientation.
2. Insert the memory module vertically into the DIMM slot. Then push it in until the golden finger on the memory module is deeply inserted in the DIMM slot.
Important
You can barely see the...
User Guide - Page 22
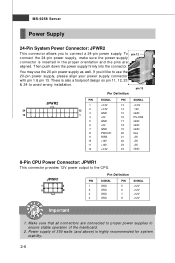
...-pin power supply, please align your power supply connector with pin 1 & pin 13. There is also a foolproof design on pin 11, 12, 23 & 24 to avoid wrong installation.
pin...
+5V
10
+12V
22
+5V
11
+12V
23
+5V
12
+3.3V
24
GND
8-Pin CPU Power Connector: JPWR1
This connector provides 12V power output to the CPU.
JPWR1
1
4
5
8
Pin Definition
PIN
SIGNAL
1
GND
2
GND
3
GND
4
GND...
User Guide - Page 24
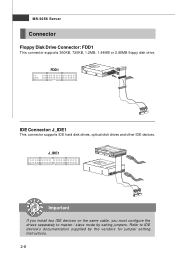
... 360KB, 720KB, 1.2MB, 1.44MB or 2.88MB floppy disk drive. FDD1
IDE Connector: J_IDE1
This connector supports IDE hard disk drives, optical disk drives and other IDE devices. J_IDE1
Important
If you install two IDE devices on the same cable, you must configure the drives separately to master / slave mode by setting jumpers. Refer to IDE device's documentation supplied by the vendors for jumper...
User Guide - Page 32
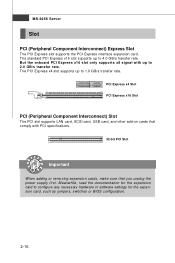
... PCI slot supports LAN card, SCSI card, USB card, and other add-on cards that comply with PCI specifications.
32-bit PCI Slot
Important
When adding or removing expansion cards, make sure that you unplug the power supply first. Meanwhile, read the documentation for the expansion card to configure any necessary hardware or software settings for the expansion card, such as jumpers, switches or BIOS...
User Guide - Page 34
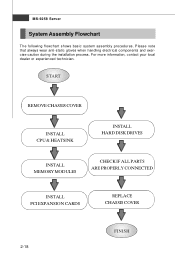
... wear anti-static gloves when handling electrical components and exercise caution during the installation process. For more information, contact your local dealer or experienced technician.
START
REMOVE CHASSIS COVER
INSTALL CPU & HEATSINK
INSTALL HARD DISK DRIVES
INSTALL MEMORY MODULES
CHECK IF ALL PARTS ARE PROPERLY CONNECTED
INSTALL PCI EXPANSION CARDS
REPLACE CHASSIS COVER
FINISH
2-18
User Guide - Page 66

... the TPM ownership. Read only. USB Configuration
Legacy USB Support Set to [Enabled] if you need to use any USB 1.1/2.0 device in the operating system that does not support or have any USB 1.1/2.0 driver installed, such as DOS and SCO Unix.
USB 2.0 Controller Mode This setting specifies the operation mode of the onboard USB 2.0 controller.
BIOS EHCI Hand-Off This setting allows you to enable or...
User Guide - Page 73
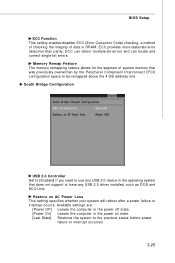
... memory that was previously overwritten by the Peripheral Component Interconnect (PCI) configuration space to be remapped above the 4 GB address line. South Bridge Configuration
USB 2.0 Controller Set to [Enabled] if you need to use any USB 2.0 device in the operating system that does not support or have any USB 2.0 driver installed, such as DOS and SCO Unix.
Restore on AC Power Loss This setting...
User Guide - Page 83

... or USB) you created in step 3 and press Enter.
6. Select "Intel(R) ICH8R/ICH9R SATA RAID Controller" an press ENTER. 7. The next screen should confirm that you have selected the Intel® RAID
controller. Press ENTER again to continue. 8. You have successfully installed the Intel® Matrix Storage Manager driver, and
W indows setup should continue. 9. Leave the disk in the floppy drive until...
User Guide - Page 84

MS-9258 Server † Confirming Windows Vista/XP/2003 Driver Installation
1. From W indows Vista/XP/2003, open the Control Panel from My Computer followed by the System icon.
2. Choose the Hardware tab, then click the Device M anager tab. 3. Click the "+" in front of the SCSI and RAID Controllers hardware type. The
driver Intel(R) ICH9R SATA RAID Controller should appear.
A-10
User Guide - Page 85
Intel ICH9R SATA RAID
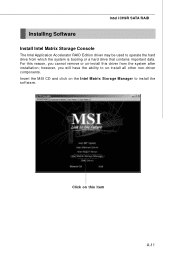
Installing Software
Install Intel Matrix Storage Console
The Intel Application Accelerator RAID Edition driver may be used to operate the hard drive from which the system is booting or a hard drive that contains important data. For this reason, you cannot remove or un-install this driver from the system after installation; however, you will have the ability to un-install all...
User Guide - Page 86

MS-9258 Server The InstallShield Wizard will begin automatically for installation showed as following: Click on the Next button to proceed the installation in the welcoming window.
A-12
User Guide - Page 87

Intel ICH9R SATA RAID The window shows the components to be installed. Click Next button to continue.
After reading the license agreement in the following window, click Yes button to continue.
A-13
User Guide - Page 88

MS-9258 Server The following window appears to show the Readme File Information. It shows the system requirements and installation information.
Once the installation is complete, the following window appears.
A-14
User Guide - Page 89

... of RAID when upgrading to a second SATA hard drive:
1. BIOS must be configured for RAID before installing W indows on the single SATA hard drive. Refer to On-Chip ATA Devices for properly setting of the BIOS.
2. Install the Intel Application Accelerator RAID Driver during W indows Setup. Refer to Installing Software for instructions on installing the driver during W indows Setup.
3. Install the...