Sony CCD-FX511 driver and firmware

Related Sony CCD-FX511 Manual Pages
Download the free PDF manual for Sony CCD-FX511 and other Sony manuals at ManualOwl.com
Primary User Manual - Page 2

... complies with the Class B limits for radio noise emissions set out in Radio Interference Regulations.
Owner's Record
The model and serial numbers are located on the bottom. Record the serial number in the space provided on the right hand. Refer to these numbers whenever you call upon your Sony dealer regarding this product.
Model No. CCD-FX511 Serial No.
Primary User Manual - Page 3
...
Setting the BEEP switch
Installing the lithium battery
Setting the date and time
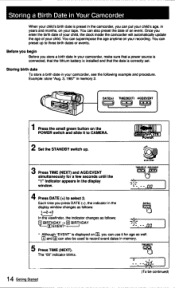
Storing a birth date in your camcorder
Basic Camera Operation
How to record Playing back a tape Using the Remote Commander Getting the most out of your battery pack
Advanced Camera Operation
Connecting alternative power sources
Using household current
Using a car battery
Recording with the camera
Recording...
Primary User Manual - Page 5
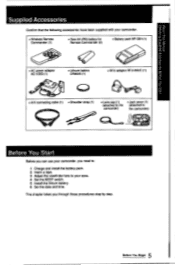
...the following accessories have been supplied with your camcorder.
• Wireless Remote Commander (1)
• Size AA (R6) battery for Remote Commander (2)
• Battery pack NP-55H (1)
• AC power adaptor AC-V25S (1)
• Lithium battery CR2025 (1)
tc)
• RFU adaptor RFU-90UC (1)
• A/V connecting cable (1) • Shoulder strap (1)
• Lens cap (1) • Jack...
Primary User Manual - Page 6
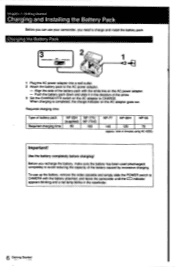
...install the battery pack.
Charging the Battery Pack
00*E0C..0C4 0E.E. V0,0C OU0
Mg)
4
1 Plug the AC power adaptor into a wall outlet. 2 Attach the battery pack to the AC power...AC power adaptor. - Push the battery pack down and slide it in the direction of the arrow. 3 Set the...remove the video cassette and simply slide the POWER switch to
CAMERA with the b'attery attached, and leave the camcorder...
Primary User Manual - Page 7
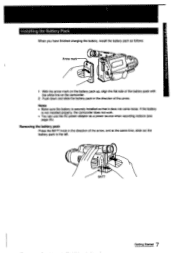
... Battery Pack
When you have finished charging the battery, install the battery pack as follows:
eltbow:-
Arrow mark toog
r
1 With the arrow mark ... Make sure the battery is securely installed so that it does not come loose. If the battery
is not installed properly, the camcorder does not work. • You can use the AC power adaptor as a power source when recording indoors (see
page 25). Removing ...
Primary User Manual - Page 8

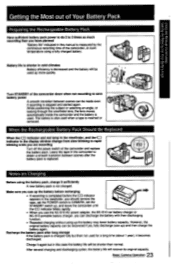
... viewfinder. When they blink rapidly. replace the battery pack. The battery life indicator in the display window always shows the remaining battery capacity when the POWER switch is set to CAMERA or VTR with a power source
attached.
Notes
pFMMIDE
- Yr, 4 ,
i
Display window
Viet,4filnder
• Charge the battery pack when the black bar of the battery life indicator...
Primary User Manual - Page 9
...power source is attached.
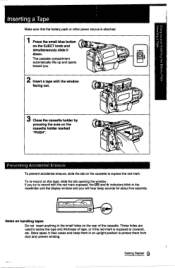
1 Press the small blue button
on the EJECT knob and
simultaneously slide it down.
The cassette compartment automatically lifts up and opens toward you.
• •
2 Insert a tape with the window...re-record on this tape, slide the tab opening the window. If you try to record with the red mark exposed, the and indicators blink in the viewfinder and the display window ...
Primary User Manual - Page 11
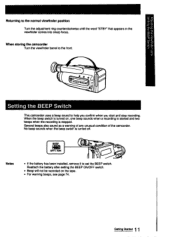
... beep switch is turned off.
Notes
BEEP
1:::i :IA I
OFFI ION
%,
•
• If the battery has been installed, remove it to set the BEEP switch.
Reattach the battery after setting the BEEP ON/OFF switch. • Beep will not be recorded on the tape. • For warning beeps, see page 74.
Getting Started 11
Primary User Manual - Page 12
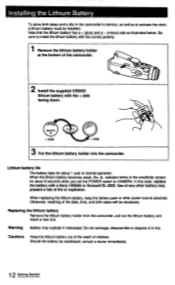
...camcorder's memory, as well as to activate the clock, a lithium battery must be installed. Note that the lithium battery has a + (plus) and a - (minus) side as illustrated below. Be sure to install the ...blinks in the viewfinder screen for about 5 seconds when you set the POWER switch to CAMERA. In this case, replace the battery with a Sony CR2025 or Duracell DL-2025. Use of any other battery may...
Primary User Manual - Page 13
... a lithium battery is installed.
3,4,5,6 0 0
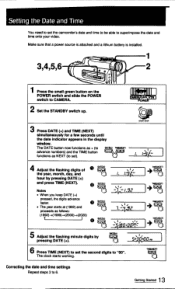
1 Press the small green button on the POWER switch and slide the POWER switch to CAMERA.
IIIII=IIII■
L... _1T 11,
• OWE
2 Set the STANDBY switch up.
ocl•
,O... A
START STOP
3 Press DATE (+) and TIME (NEXT)
simultaneously for a few seconds until
the date indicator appears in the display
window. The DATE button...
Primary User Manual - Page 14
.... 3, 1987" in memory 2.
• •
o
DATE 4.) TIME NEXT) AGE/EVENT
I=
I=1
l=1
1 Press the small green button on the POWER switch and slide it to CAMERA.
111117:::111
. LW• •.w 1• MA
2 Set the STANDBY switch up.
3 Press TIME (NEXT) and AGE/EVENT simultaneously for a few seconds until the "1" indicator appears in the display window.
CL-'-
MOT...
Primary User Manual - Page 17
... lamp
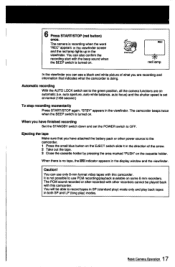
In the viewfinder you can see a black and white picture of what you are recording and information that indicates what the camcorder is doing.
Automatic recording With the AUTO LOCK switch set to the green position, all the camera functions are on automatic (i.e. auto aperture, auto white balance, auto focus) and the shutter...
Primary User Manual - Page 23
...
indicator in the display window change from slow blinking to rapid blinking while you are recording
Turn off the power switch of the... recording is completed before the ,C.X7 indicator appears in the viewfinder, you should remove the tape, set the POWER switch to CAMERA, set ... recovered if you fully discharge (use up) and then charge the
battery again. Recharge the battery pack after long storage
...
Primary User Manual - Page 24
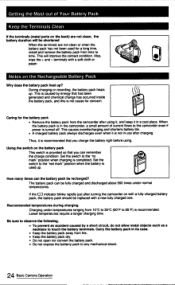
... has not been used for a long time, install and remove the battery pack from time to time...the battery pack heat up? During charging or recording. the battery pack heats up. This is caused...amount of current flows to the camcorder even if power is turned off. This causes overdischarging and shortens...condition. Set the switch to the "no mark" position when charging is completed. Set the ...Camera Operation
Primary User Manual - Page 28
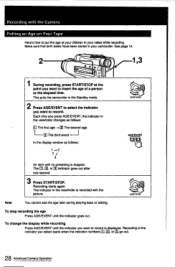
...follows:
El The first age -40 The second age
1-EI The third event 4---1
In the display window as follows:
1-42
3
An item with no presetting is skipped. The El,El, orEl indicator goes...or editing.
To stop recording the age Press AGE/EVENT until the indicator goes out.
To change the display while recording Press AGE/EVENT until the indicator you want to record is displayed. Recording of the indicator you...
Primary User Manual - Page 30
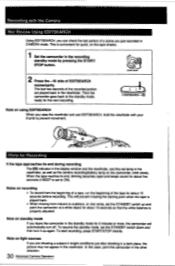
... recording The indicator in the display window and the viewfinder, and the red lamp in the viewfinder, as well as the camera recording/battery lamp on the camcorder, blink slowly. When the tape reaches its end, blinking becomes rapid and beeps sound for about five seconds (if BEEP is set to ON).
Notes on recording • To record...
Primary User Manual - Page 36
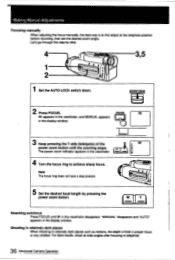
... the telephoto position before recording. then set the desired zoom angle. Let's go through this step by step.
4
3,5
1
0 00 0
0
0
2
1 Set the AUTO LOCK switch down.
'AUTO LOCK ic1- -1
2 Press FOCUS.
FOCUS
trk.
c appears in the viewfinder, and MANUAL appears
in the display window.
Loam'
3 Keep pressing the T side (telehpoto) of the
cg,
power zoom button until the...
Primary User Manual - Page 38
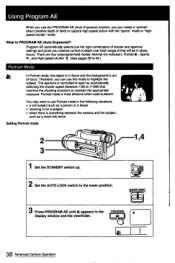
...use this mode to highlight the subject. The aperture is controlled to open by automatically selecting the shutter speed (between ...camera and the subject.
such as a chain link fence
Setting Portrait mode
1,4
1 Set the STANDBY switch up. 2 Set the AUTO LOCK switch to the lower position.
*PC*
O •
4)4. SWAT STOP
(AUTO LOCK)
3 Press PROGRAM AE until a appears in the
PROGRAM
ir
display window...
Primary User Manual - Page 39
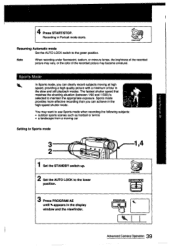
... to use Sports mode when recording the following subjects: • outdoor sports scenes such as football or tennis • a landscape from a moving car
Setting to Sports mode
0
PM,
1 Set the STANDBY switch up.
2 Set the AUTO LOCK to the lower
position.
3 Press PROGRAM AE
until 41,appears in the display window and the viewfinder.
1.4
START STOP...
Primary User Manual - Page 74
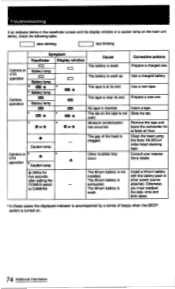
...-25CLH video head cleaning tape. Consult your nearest Sony dealer.
$ blinks for five seconds
The lithium battery is not Install a lithium battery
installed.
with the battery pack or
after setting the
The lithium battery is
other power source
POWER switch
-
exhausted.
attached. Otherwise.
to CAMERA.
The lithium battery is
you must readjust
weak.
the date, time and...