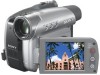
Sony DCR-HC36 - MiniDV Digital Handycam Camcorder driver and firmware
Drivers and firmware downloads for this Sony item
Related Sony DCR-HC36 Manual Pages
Download the free PDF manual for Sony DCR-HC36 and other Sony manuals at ManualOwl.com
Operating Guide - Page 3
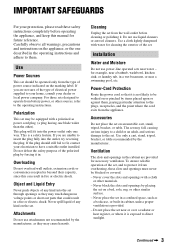
...instructions completely before operating the appliance, and keep this manual for future reference. Carefully observe all warnings, precautions and instructions on the appliance, or the one described in the operating instructions and adhere to them.
Use
Power Sources
This set... the exterior of the set.
Installation
Water and Moisture
Do not use power-line operated sets near water - for example...
Operating Guide - Page 6
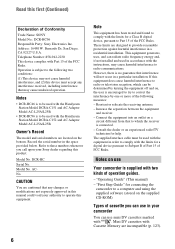
... to comply with the limits for a digital device pursuant to Subpart B of Part 15 of FCC Rules.
Notes on use
Your camcorder is supplied with two kinds of operation guides.
- "Operating Guide" (This manual) - "First Step Guide" for connecting the
camcorder to a computer and using the supplied software (stored on the supplied CD-ROM)
Types of cassette you can use in...
Operating Guide - Page 11
Printing recorded images (PictBridge compliant printer 82 Jacks to connect external devices 84
Using a Computer
Before referring to the "First Step Guide" on your computer 86 Installing the software and "First Step Guide" on a computer 89 Viewing "First Step Guide 93 Creating a DVD (Direct Access to "Click to DVD 94 Connecting an analog VCR to the computer via your camcorder
(Signal convert ...
Operating Guide - Page 12
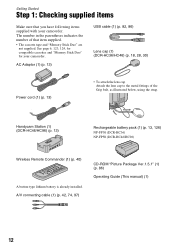
..., for compatible cassettes and "Memory Stick Duo" for your camcorder.
AC Adaptor (1) (p. 13)
USB cable (1) (p. 82, 86)
Lens cap (1) (DCR-HC36/HC46) (p. 18, 28, 30)
Power cord (1) (p. 13)
• To attach the lens cap Attach the lens cap to the metal fittings of the Grip belt, as illustrated below, using the strap.
Handycam Station (1) (DCR-HC46/HC96) (p. 13)
Rechargeable...
Operating Guide - Page 24
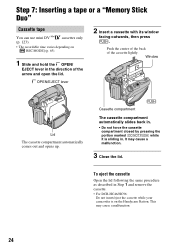
... a malfunction.
3 Close the lid.
To eject the cassette
Open the lid following the same procedure as described in Step 1 and remove the cassette.
• For DCR-HC46/HC96: Do not insert/eject the cassette while your camcorder is on the Handycam Station. This may cause a malfunction.
24
Operating Guide - Page 49
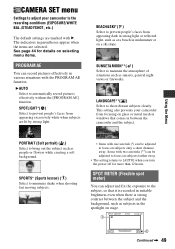
CAMERA SET menu
Settings to adjust your camcorder to the recording conditions (EXPOSURE/WHITE BAL./STEADYSHOT, etc.)
The default settings are marked with B. The indicators in parentheses appear when the items are selected. See page 44 for details on selecting menu items.
PROGRAM AE
You can record... farther away.
• The setting returns to [AUTO] when you turn the power off for more than 12 hours...
Operating Guide - Page 86
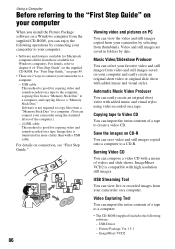
... supplied CD-ROM. For "First Step Guide," see page 89.
• There are 2 ways to connect your camcorder to a computer.
- USB cable This method is good for copying video and sound recorded on a tape to the computer, copying files from a "Memory Stick Duo" to a computer, and copying files to a "Memory Stick Duo." Software is not required to copy files from a "Memory Stick Duo" to a computer. (You...
Operating Guide - Page 87
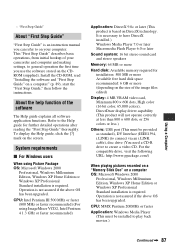
... Step Guide"
"First Step Guide" is an instruction manual you can refer to on your computer. This "First Step Guide" describes basic operations, from initial hookup of your camcorder and computer and making settings, to general operation the first time you use the software stored on the CDROM (supplied). Install the CD-ROM, read "Installing the software and "First Step Guide" on a computer" (p. 89...
Operating Guide - Page 88
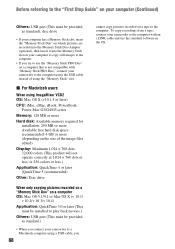
... drive
When only copying pictures recorded on a "Memory Stick Duo" on a computer OS: Mac OS 9.1/9.2 or Mac OS X (v 10.1/
v 10.2/v 10.3/v 10.4)
Application: QuickTime 3.0 or later (This must be installed to play back movies.)
Others: USB port (This must be provided as standard.)
• When you connect your camcorder to a Macintosh computer using a USB cable, you
88
cannot copy pictures recorded...
Operating Guide - Page 89
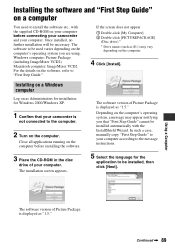
... computer before installing the software.
3 Place the CD-ROM in the disc
drive of your computer. The installation screen appears.
The software version of Picture Package is displayed as "1.5."
Depending on the computer's operating system, a message may appear notifying you that "First Step Guide" cannot be installed automatically with the InstallShield Wizard. In such a case, manually copy "First...
Operating Guide - Page 90
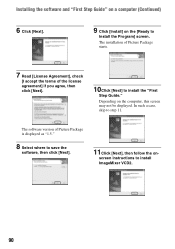
... license agreement] if you agree, then click [Next].
10Click [Next] to install the "First
Step Guide."
Depending on the computer, this screen may not be displayed. In such a case, skip to step 11.
The software version of Picture Package is displayed as "1.5."
8 Select where to save the
software, then click [Next].
11Click [Next], then follow the on-
screen...
Operating Guide - Page 92
... it was copied to.
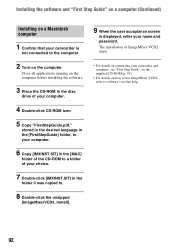
8 Double-click the unzipped
[ImageMixerVCD2_Install].
9 When the user acceptance screen
is displayed, enter your name and password. The installation of ImageMixer VCD2 starts.
• For details on connecting your camcorder and computer, see "First Step Guide" on the supplied CD-ROM (p. 93).
• For details on how to use ImageMixer VCD2, refer to software's on...
Operating Guide - Page 93
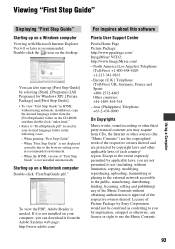
... "First Step Guide" - When "First Step Guide" is not displayed
correctly due to the browser setting even in recommended environment. - When the HTML version of "First Step Guide" is not installed automatically.
Starting up on a Macintosh computer
Double-click "FirstStepGuide.pdf."
To view the PDF, Adobe Reader is needed. If it is not installed on your computer, you can download it from...
Operating Guide - Page 94
... Mode Launcher] is set up for each Windows XP user.
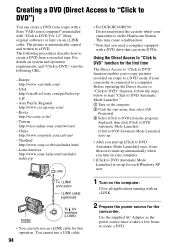
To i.LINK connector
i.LINK cable (optional)
DV
To DV
Interface
(i.LINK)
• You can only use an i.LINK cable for this operation. You cannot use a USB cable.
94
1 Turn on the computer.
Close all applications running with an i.LINK.
2 Prepare the power source for the
camcorder. Use the supplied...
Operating Guide - Page 97
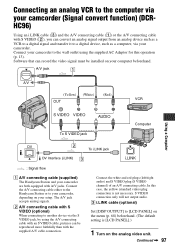
... an analog signal output from an analog device such as a VCR to a digital signal and transfer it to a digital device, such as a computer, via your camcorder. Connect your camcorder to the wall outlet using the supplied AC Adaptor for this operation (p. 13). Software that can record the video signal must be installed on your computer beforehand.
A/V jack
1
A/V
(Yellow) (White) (Red)
VCR...
Operating Guide - Page 113
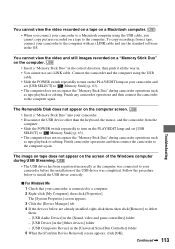
... you connect your camcorder to a Macintosh computer using the USB cable, you cannot copy pictures recorded on a tape to the computer. To copy recordings from a tape, connect your camcorder to the computer with an i.LINK cable and use the standard software in the OS.
You cannot view the video and still images recorded on a "Memory Stick Duo" on the computer.
• Insert a "Memory Stick Duo" in...
Operating Guide - Page 114
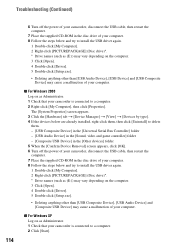
...- [USB Composite Device] in the [Universal Serial Bus Controller] folder - [USB Audio Device] in the [Sound, video and game controller] folder - [Composite USB Device] in the [Other devices] folder 5 When the [Confirm Device Removal] screen appears, click [OK]. 6 Turn off the power of your camcorder, disconnect the USB cable, then restart the computer. 7 Place the supplied CD-ROM in the disc drive...
Operating Guide - Page 115
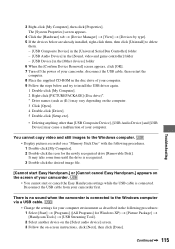
...
them. - [USB Composite Device] in the [Universal Serial Bus Controller] folder - [USB Audio Device] in the [Sound, video and game controller] folder - [USB Device] in the [Other devices] folder 6 When the [Confirm Device Removal] screen appears, click [OK]. 7 Turn off the power of your camcorder, disconnect the USB cable, then restart the computer. 8 Place the supplied CD-ROM in the disc drive of...
Operating Guide - Page 128
... as Digital Televisions, DVD, MICROMV or HDV recorders/players are not compatible with DV devices. Before connecting to other devices, be sure to confirm whether the device is compatible with a DV device or not. For details on precautions and compatible application software, refer also to the operating instructions for the device to be connected.
About the required i.LINK cable
Use the Sony i.LINK...
Operating Guide - Page 139
... REMAINING 68
Remaining battery 36 Remote Commander 40 REMOTE CTRL (Remote control 68 Remote sensor 35 RESET button 35 Reversal Playback 64 Review button 36
S
S VIDEO cable ...43, 72, 75, 97 S VIDEO jack.....43, 72, 75, 97 Searching for the starting point 39 Self-diagnosis display.........117 SELF-TIMER 53 SEPIA 62 Setting the date and time ......23...