Sony VPL-EW130 driver and firmware

Related Sony VPL-EW130 Manual Pages
Download the free PDF manual for Sony VPL-EW130 and other Sony manuals at ManualOwl.com
Operating Instructions - Page 2

Table of Contents
Overview
Location and Function of Controls .... 3 Main unit 3 Connector Panel 4 Remote Commander and Control Panel 5
Preparation
Connecting the Projector 7 Connecting a Computer 7 Connecting a Video equipment .... 8 Connecting an External Monitor and Audio Equipment 10
Others
Indicators 23 Messages List 24 Troubleshooting 25 Replacing the Lamp 27 Cleaning the Air ...
Operating Instructions - Page 6

... Mode" (page 21) and "Standby Mode" (page 21) on the INSTALL SETTING menu and "Power Saving Mode" (page 19) on the SET SETTING menu.
Others g Infrared transmitter
About Remote Commander operation
• Direct the Remote Commander toward the remote control detector.
• The shorter the distance between the Remote Commander and the projector is, the wider the angle within which the...
Operating Instructions - Page 11
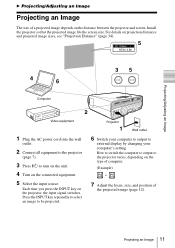
... switches. Press the INPUT key repeatedly to select an image to be projected.
6 Switch your computer to output to
external display by changing your computer's setting. How to switch the computer to output to the projector varies, depending on the type of computer.
(Example)
+
7 Adjust the focus, size, and position of
the projected image (page 12).
Projecting...
Operating Instructions - Page 13
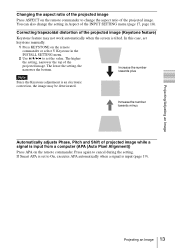
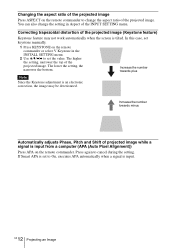
...set
keystone manually.
1 Press KEYSTONE on the remote commander or select V Keystone in the INSTALL SETTING menu.
2 Use V/v/B/b to set the value. The higher the setting, narrower the top of the projected image. The lower the setting...is input from a computer (APA (Auto Pixel Alignment))
Press APA on the remote commander. Press again to cancel during the setting. If Smart APA is set to On, executes...
Operating Instructions - Page 15
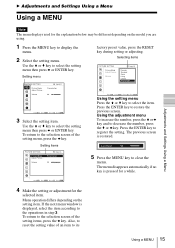
... the
menu.
The menu disappears automatically if no key is pressed for a while.
Sel:
Set:
Back: Eixt:
4 Make the setting or adjustment for the
selected item.
Menu operation differs depending on the setting item. If the next menu window is displayed, select the item according to the operations in step 3. To return to the selection...
Operating Instructions - Page 21
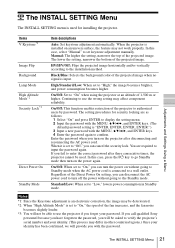
... Background Lamp Mode High Altitude Mode*2 Security Lock*3
Direct Power On Standby Mode
Item descriptions
Auto: Set keystone adjustment automatically. When the projector is installed on an uneven surface, the feature may not work properly. In this case, select "Manual" to set keystone adjustment manually. Manual: The higher the setting, narrower the top of the projected image. The lower...
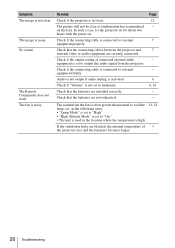
Operating Instructions - Page 25

... attached securely, the
29
projector cannot be turned on.
No image.
Check if the connecting cable is connected to external
-
equipment firmly.
Check if the computer signal is set for output to an external
11
monitor. If you set your computer, such as a notebook
computer, to output the signal to both your computer's display
and an external monitor, the...
Operating Instructions - Page 26
... connected.
Check if the output setting of connected external audio equipment is set to output the audio signal from the projector.
Check if the connecting cable is connected to external equipment firmly.
Audio is not output if audio muting is activated.
Check if "Volume" is not set to minimum.
Check that the batteries are installed correctly.
Check that the batteries...
Operating Instructions - Page 28

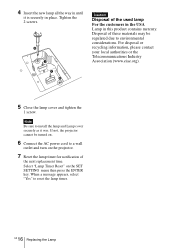
... Be sure to install the lamp and Lamp cover securely as it was. If not, the projector cannot be turned on.
6 Connect the AC power cord to a wall
outlet and turn on the projector.
7 Reset the lamp timer for notification of
the next replacement time. Select "Lamp Timer Reset" on the SET SETTING menu then press...
Operating Instructions - Page 34
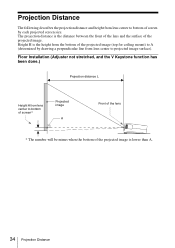
... from the bottom of the projected image (top for ceiling mount) to A (determined by drawing a perpendicular line from lens center to projected image surface).
Floor Installation (Adjuster not stretched, and the V Keystone function has been done.)
Projection distance L
Height H from lens center to bottom of screen*
Projected image
A
Front of the...
Operating Instructions - Page 36
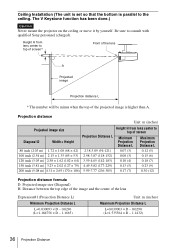
Ceiling Installation (The unit is set so that the bottom is parallel to the ceiling. The V Keystone function has been done.)
Caution
Never mount the projector on the ceiling or move it by yourself. Be sure to consult with qualified Sony personnel (charged).
Height H from lens center to top of screen*
Front of the lens...
Operating Instructions - Page 40

... muting 6 Auto Input Search 19
B
Background 21 Brightness 16
C
CC Display 19 Color 16 Color System 19 Color Temp 16 Connecting a computer 7 Connecting a Video equipment 8 Connecting an external monitor and audio
equipment 10 Connector panel 3, 4 Contrast 16 Control panel 5
D
DDE 16 Digital Zoom 5 Direct Power On 21 Dot Phase 17
E
ECO MODE (Energy-saving mode) ......... 6
F
fH...
Quick Reference Manual - Page 22

.... Refer servicing to qualified personnel only.
WARNING THIS APPARATUS MUST BE EARTHED.
WARNING When installing the unit, incorporate a readily accessible disconnect device in the fixed wiring, or connect the power plug to... or an experienced radio/TV technician for help.
If you have any questions about this product, you may call; Sony Customer Information Service Center 1-800-222-7669 or http://www...
Quick Reference Manual - Page 24

... power supply. If voltage adaptation is required, consult with qualified Sony personnel.
• Should any liquid or solid object fall into the cabinet, unplug the unit and have it checked by qualified Sony ...the floor when moving the projector installed on the floor.
• Do not carry the projector with the cabinet on and with its cover open.
• Do not install the unit in a location...
Quick Reference Manual - Page 25

...For dealers • Be sure to secure the cabinet cover firmly
when installing to the ceiling firmly.
On Installation
• When installing the unit, leave space between any walls, etc. and the unit...• Avoid using if the unit is tilted more than 15 degrees horizontally.
• Avoid installing the unit in a very dusty or extremely smoky environment. Otherwise, the air filter will become ...
Quick Reference Manual - Page 26
... Altitude Mode" to "On" in the INSTALL SETTING menu. Failing to set this mode when using the unit at high altitudes could have adverse effects, such as reducing the reliability of certain components.
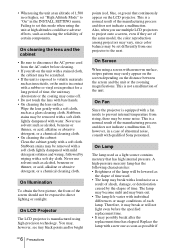
On cleaning the lens and the cabinet
• Be sure to disconnect the AC power cord from the AC outlet before...
Quick Reference Manual - Page 28

... as shown in the illustration.
AC power cord (1) HD D-sub 15 pin cable (1.8 m) (1) (1-967100-11/Sony)
2 Insert a lithium battery.
Lens cap (1)
With the 3 (plus) side facing up.
Quick Reference Manual (this manual) (1) Operating Instructions (CD-ROM) (1)
Using the CD-ROM Manuals
Insert the supplied CD-ROM into the CD-ROM drive of your computer, and the CD-ROM will start automatically in a few...
Quick Reference Manual - Page 30

... switches. Press the INPUT key repeatedly to select an image to be projected.
6 Switch your computer to output to
external display by changing your computer's setting. How to switch the computer to output to the projector varies, depending on the type of computer.
(Example)
+
7 Adjust the focus, size, and position of
the projected image (page 11).
GB...
Quick Reference Manual - Page 32
...set
keystone manually.
1 Press KEYSTONE on the remote commander or select V Keystone in the INSTALL SETTING menu.
2 Use V/v/B/b to set the value. The higher the setting, narrower the top of the projected image. The lower the setting...is input from a computer (APA (Auto Pixel Alignment))
Press APA on the remote commander. Press again to cancel during the setting. If Smart APA is set to On, executes...
Quick Reference Manual - Page 36
... Be sure to install the lamp and Lamp cover securely as it was. If not, the projector cannot be turned on.
6 Connect the AC power cord to a wall
outlet and turn on the projector.
7 Reset the lamp timer for notification of
the next replacement time. Select "Lamp Timer Reset" on the SET SETTING menu then press...