Sony VPL HS60 - Home Theater Video Projector driver and firmware
Drivers and firmware downloads for this Sony item
Related Sony VPL HS60 Manual Pages
Download the free PDF manual for Sony VPL HS60 and other Sony manuals at ManualOwl.com
Operating Instructions - Page 2

... questions about this product, you may call: Sony Customer Information Service Center 1-800-222-7669 or http://www.sony.com/ The number below is for FCC related matters only. Declaration of Conformity Trade Name: SONY Model No.: VPL-HS51A/HS60 Responsible Party: Sony Electronics Inc.
2
Address: 16530 Via Esprillo, San Diego CA 92127 U.S.A. Telephone Number: 858-942-2230
This device...
Operating Instructions - Page 3

... in Canada (VPL-HS60 only) This Class B digital apparatus complies with Canadian ICES-003.
Voor de klanten in Nederland Gooi de batterij niet weg maar lever deze in als klein chemisch afval (KCA).
The socket-outlet should be installed near the equipment...of this product, please contact your local Civic Office, your household waste disposal service or the shop where you purchased the product.
3
Operating Instructions - Page 5

...
Precautions 6
Connections and Preparations
Unpacking 7 Step 1: Installing the Projector ...........8
Before Setting Up the Projector ... 9 Installing the Projector and
a Screen 10 Step 2: Connecting the Projector .....13
Connecting to a DVD Player/ Recorder or Digital Tuner 13
Connecting to Video Equipment 15 Connecting to a Computer ..........16 Step 3: Adjusting the Picture Size and...
Operating Instructions - Page 7

... to make sure it contains the following items:
• Remote control (1) • Size AA (R6) batteries (2)
• Air filter (for replacement) (1)
• AC power cord (1) • CD-ROM (Application software)
(VPL-HS51A only) (1)
• Operating Instructions (this manual) (1)
Inserting the batteries into the remote control
Insert the batteries E side first as shown in the illustration...
Operating Instructions - Page 8

Step 1: Installing the Projector
The projector's lens shift feature allows you to choose a variety of installation locations for your projector. You can enjoy home entertainment with this projector in the following situations.
Enjoying home theater
Watching sports, etc. with your company
Enjoying video games on a large screen
Viewing images shot by a digital video camera on a large screen
8 ...
Operating Instructions - Page 9

... (intake or exhaust), see "Location of Controls" on pages 60 to 62.
When installing the unit at altitudes When using the projector at an altitude of 1,500 m or higher, set "High Altitude Mode" in the Installation menu to "On." (1 page 41) Failing to set this mode when using the projector at high altitudes could have adverse effects...
Operating Instructions - Page 10

...on the size of the screen.
1 Determine the installation position of the projector and screen.
You can obtain a good quality picture if you position the projector with the center of the lens within the areas ... of the screen and the center of the projector's lens when using both the vertical and horizontal lens shift features with the horizontal lens shift set to the maximum value*
* The distances ...
Operating Instructions - Page 11

...934 1121 1245
(9 7/8) (14 3/4) (19 5/8) (24 5/8) (29 1/2) (36 7/8) (44 1/4) (49 1/8)
To calculate the installation measurements (SS: Screen Size) a (minimum) = {(SS × 21.27/0.7227) - 35.160899} × 1.025 b ... 1524
(12 1/8) (18)
(24 1/8) (30)
(36)
(45)
(54 1/8) (60)
To calculate the installation measurements (SS: Screen Size) a (minimum) = {(SS × 21.27/0.5906) - 35.160899} ×...
Operating Instructions - Page 12

...
Screen
3 Project an image on the screen and adjust the picture so that it
fits the screen. (1 page 17) To project an image, connect video equipment to the projector. (1 page 13)
Note When using a screen with an uneven surface, stripes pattern may rarely appear on the screen depending on the distance between...
Operating Instructions - Page 17

... and Preparations
Step 3: Adjusting the Picture Size and Position
Project an image on the screen and then adjust the picture position.
VPL-HS60
ON/STANDBY indicator
LIGHT
INPUT
DYNAMIC STANDARD CINEMA PICTURE MODE
USER 1 USER 2 USER 3
ENTER
Adjusters
Remote control detector
VPL-HS51A
Remote control detector ON/STANDBY indicator
Adjusters
Tip The I/1 (on/standby), INPUT, MENU, and M/m/
Operating Instructions - Page 20

... picture size using the zoom ring.
Zoom ring
7 Adjust the focus using the focus ring.
Focus ring
To adjust the tilt of the installation surface
If the projector is installed on an uneven surface, use the adjusters to keep the projector level.
Turn to adjust. Adjusters
20 Step 3: Adjusting the Picture Size and Position
Operating Instructions - Page 21
Connections and Preparations
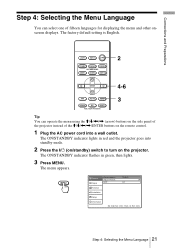
Step 4: Selecting the Menu Language
You can select one of fifteen languages for displaying the menu and other onscreen displays. The factory default setting is English.
LIGHT
INPUT
2
DYNAMIC STANDARD CINEMA PICTURE MODE
USER 1 USER 2 USER 3
ENTER
4-6
APA
ADJ PIC
MENU
3
WIDE MODE
RCP
RESET
REAL COLOR PROCESSING
Tip You can operate the menu using the M/m/
Operating Instructions - Page 22

... M or m to select "Language," and press , or ENTER.
or
ENTER
Picture Signal Function
Status : Language : Input-A Signal Sel. Color System :
On English Center
White
Installation
Setup
Information
Sel :
Set :
Exit :
6 Press M or m to select a language, and press ENTER.
The menu changes to the selected language.
ENTER
To clear the menu
Press MENU.
22...
Operating Instructions - Page 30

... the adjustment items with the remote control. The adjusted data can be...windows* are displayed in sequence.
Contrast t Brightness t Color t Hue t Sharpness
R Lamp Control
r Black Level Adj.
R
r
Advanced Iris T DDE T Color Temp. T Gamma Correction
* Some of the above adjustment windows will not be displayed depending on the input signal. For details, see "Input Signals and Adjustable/setting...
Operating Instructions - Page 32

...video source when you are adjusting the picture using Real Color Processing.
1 Press RCP on the remote control.
2 Press M or m to select "User 1," "User 2" or "User 3," then
press ,. The RCP (Real Color Processing) window... will be colored and the other portions will be displayed in black and white. The reference palette in the RCP window also shows the adjustable colors. Decide the target while...
Operating Instructions - Page 33

...
RCP (Real Color Processing)
Color Select : Position : Range : RCP Color : RCP Hue :
Sel :
0 0
Set :
Red Adjust Adjust
Exit :
4 Adjust the color of the specified portions.
Press M or m to select "RCP Color... adjustment is complete, press RCP.
The RCP window disappears and the normal picture is restored. The adjusted data will be stored in a memory selected in step 2 and will be recalled later...
Operating Instructions - Page 34
...
INPUT
DYNAMIC STANDARD CINEMA PICTURE MODE
USER 1 USER 2 USER 3
ENTER
2 - 4
APA
ADJ PIC
MENU
1
WIDE MODE
RCP
RESET
REAL COLOR PROCESSING
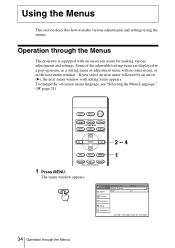
1 Press MENU.
The menu window appears.
MENU
Picture Signal
Picture Mode : Adjust Picture RCP :
Function
Installation
Setup
Information
Sel:
Set:
Cinema Off
Back: Exit:
34 Operation through the Menus
Operating Instructions - Page 35

... and
press , or ENTER.
The setting items are displayed in a pop-up menu, in a setting menu, in an adjustment menu or in the next menu window.
Pop-up menu Setting items
or
ENTER
Picture Signal Function
Status : Language : Input-A Signal Sel. Color System :
On English Center White
Installation
Setup
Information
Sel :
Set:
Exit:
Setting menu
Picture Mode
Dynamic Standard...
Operating Instructions - Page 36

Next menu window Setting items
Picture Signal Function Installation Setup Information
Adjust Picture Contrast : Brightness : Color : Hue : Sharpness : Black Level Adj. : Gamma Correction : Color Temp : DDE : Cinema Black Pro
Cinema 80 50 50 50 50 Off Off Low Film
Sel:
Set:
Back:
Exit:
4 Make the setting or adjustment on an item.
When changing the adjustment level To...
Operating Instructions - Page 37
...
Picture Mode : Adjust Picture RCP :
Function
Installation
Setup
Information
Sel:
Set:
Cinema Off
Back: Exit:
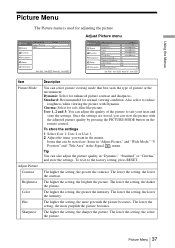
Adjust Picture menu
Picture Signal Function Installation Setup Information
Adjust Picture
Contrast :
80
Brightness :
... adjusted picture quality by pressing the PICTURE MODE button on the remote control.
To store the settings 1 Select User 1, User 2 or User 3. 2 Adjust the...