ASRock X299 Taichi driver and firmware
Related ASRock X299 Taichi Manual Pages
Download the free PDF manual for ASRock X299 Taichi and other ASRock manuals at ManualOwl.com
User Manual - Page 5
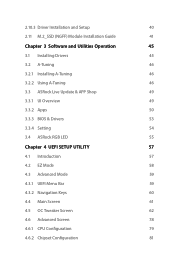
2.10.3 Driver Installation and Setup
40
2.11 M.2_SSD (NGFF) Module Installation Guide
41
Chapter 3 Software and Utilities Operation
45
3.1 Installing Drivers
45
3.2 A-Tuning
46
3.2.1 Installing A-Tuning
46
3.2.2 Using A-Tuning
46
3.3 ASRock Live Update & APP Shop
49
3.3.1 UI Overview
49
3.3.2 Apps
50
3.3.3 BIOS & Drivers
53
3.3.4 Setting
54
3.4 ASRock RGB LED
55
Chapter 4...
User Manual - Page 7
... Package Contents
• ASRock X299 Taichi Motherboard (ATX Form Factor) • ASRock X299 Taichi Quick Installation Guide • ASRock X299 Taichi Support CD • 1 x I/O Panel Shield • 1 x ASRock SLI_HB_Bridge_2S Card (Optional) • 1 x ASRock 3-Way SLI-2S1S Bridge Card (Optional) • 4 x Serial ATA (SATA) Data Cables (Optional) • 2 x ASRock WiFi 2.4/5 GHz Antennas...
User Manual - Page 38
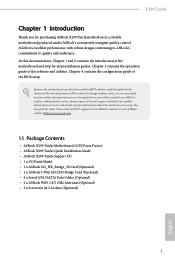
... SLITMand Quad SLITM Operation Guide
This motherboard supports NVIDIA® SLITM , 3-Way SLITM and Quad SLITM (Scalable Link Interface) technology that allows you to install up to three identical PCI Express x16 graphics cards. Currently, NVIDIA® SLITM and Quad SLITM technology supports Windows® 10 64-bit *This feature is only supported with CPU with 44 lanes or 28...
User Manual - Page 42
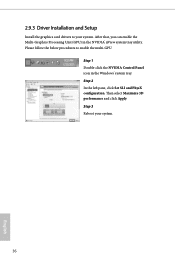
2.9.3 Driver Installation and Setup
Install the graphics card drivers to your system. After that, you can enable the Multi-Graphics Processing Unit (GPU) in the NVIDIA® nView system tray utility. Please follow the below procedures to enable the multi-GPU.
Step 1 Double-click the NVIDIA Control Panel icon in the Windows® system tray. Step 2 In the left...
User Manual - Page 43
X299 Taichi
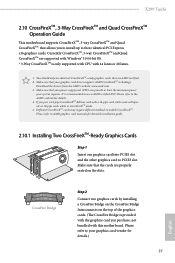
2.10 CrossFireXTM, 3-Way CrossFireXTM and Quad CrossFireXTM Operation Guide
This motherboard supports CrossFireXTM, 3-way CrossFireXTM and Quad CrossFireXTM that allows you to install up to three identical PCI Express x16 graphics cards. Currently CrossFireXTM, 3-way CrossFireXTM and Quad CrossFireXTM are supported with Windows® 10 64-bit OS. * 3-Way CrossFireXTM is only supported...
User Manual - Page 46
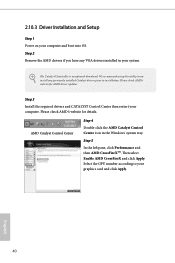
2.10.3 Driver Installation and Setup
Step 1 Power on your computer and boot into OS. Step 2 Remove the AMD drivers if you have any VGA drivers installed in your system.
The Catalyst Uninstaller is an optional download. We recommend using this utility to uninstall any previously installed Catalyst drivers prior to installation. Please check AMD's website for AMD driver updates.
Step 3
Install the...
User Manual - Page 51
X299 Taichi
Chapter 3 Software and Utilities Operation
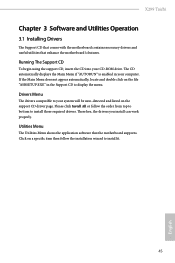
3.1 Installing Drivers
The Support CD that comes with the motherboard contains necessary drivers and useful utilities that enhance the motherboard's features.
Running The Support CD
To begin using the support CD, insert the CD into your CD-ROM drive. The CD automatically displays the Main Menu if "AUTORUN" is enabled in your computer. If the ...
User Manual - Page 52
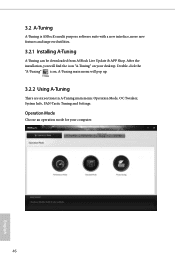
3.2 A-Tuning
A-Tuning is ASRock's multi purpose software suite with a new interface, more new features and improved utilities.
3.2.1 Installing A-Tuning
A-Tuning can be downloaded from ASRock Live Update & APP Shop. After the installation, you will find the icon "A-Tuning" on your desktop. Double-click the "A-Tuning" icon, A-Tuning main menu will pop up.
3.2.2 Using A-Tuning
There are six sections...
User Manual - Page 55
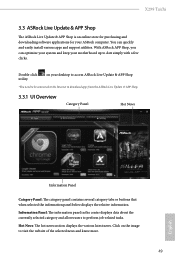
... and downloading software applications for your ASRock computer. You can quickly and easily install various apps and support utilities. With ASRock APP Shop, you can optimize your system and keep your motherboard up to date simply with a few clicks.
Double-click utility.
on your desktop to access ASRock Live Update & APP Shop
*You need to be connected to the Internet to download apps...
User Manual - Page 59
X299 Taichi
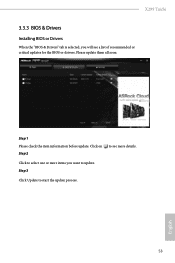
3.3.3 BIOS & Drivers
Installing BIOS or Drivers
When the "BIOS & Drivers" tab is selected, you will see a list of recommended or critical updates for the BIOS or drivers. Please update them all soon.
Step 1 Please check the item information before update. Click on Step 2
to see more details.
Click to select one or more items you want to update. Step 3
Click Update to start the ...
User Manual - Page 63
X299 Taichi
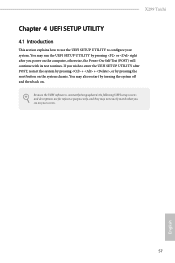
Chapter 4 UEFI SETUP UTILITY
4.1 Introduction
This section explains how to use the UEFI SETUP UTILITY to configure your system. You may run the UEFI SETUP UTILITY by pressing or right after you power on the computer, otherwise, the Power-On-Self-Test (POST) will continue with its test routines. If you wish to enter the UEFI SETUP UTILITY...
User Manual - Page 68
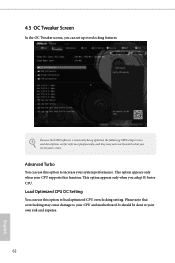
... set up overclocking features.
Because the UEFI software is constantly being updated, the following UEFI setup screens and descriptions are for reference purpose only, and they may not exactly match what you see on your screen.
Advanced Turbo
You can use this option to increase your system performance. This option appears only when your CPU supports...
User Manual - Page 94
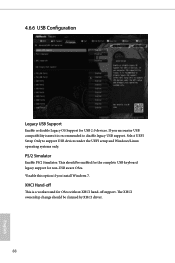
... issues it is recommended to disable legacy USB support. Select UEFI Setup Only to support USB devices under the UEFI setup and Windows/Linux operating systems only.
PS/2 Simulator
Enable PS/2 Simulator. This should be enabled for the complete USB keyboard legacy support for non-USB aware OSes. *Enable this option if you install Windows 7.
XHCI Hand-off
This is a workaround for OSes...
User Manual - Page 96
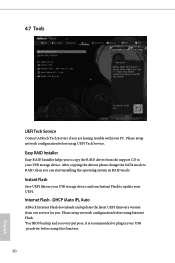
... driver from the support CD to your USB storage device. After copying the drivers please change the SATA mode to RAID, then you can start installing the operating system in RAID mode.
Instant Flash
Save UEFI files in your USB storage device and run Instant Flash to update your UEFI.
Internet Flash - DHCP (Auto IP), Auto
ASRock Internet Flash downloads and updates the latest UEFI firmware version...
User Manual - Page 97
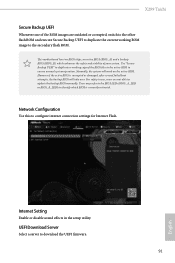
... are not able to update the backup BIOS manually. Users may refer to the BIOS LEDs (BIOS_A_LED or BIOS_B_LED) to identify which BIOS is currently activated.
Network Configuration
Use this to configure internet connection settings for Internet Flash.
Internet Setting
Enable or disable sound effects in the setup utility.
UEFI Download Server
Select a server to download the UEFI firmware.
91
English
Quick Installation Guide - Page 7
... Package Contents
• ASRock X299 Taichi Motherboard (ATX Form Factor) • ASRock X299 Taichi Quick Installation Guide • ASRock X299 Taichi Support CD • 1 x I/O Panel Shield • 1 x ASRock SLI_HB_Bridge_2S Card (Optional) • 1 x ASRock 3-Way SLI-2S1S Bridge Card (Optional) • 4 x Serial ATA (SATA) Data Cables (Optional) • 2 x ASRock WiFi 2.4/5 GHz Antennas...
RAID Installation Guide - Page 7
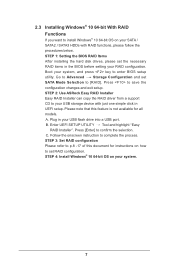
... Storage Configuration and set SATA Mode Selection to [RAID]. Press to save the configuration changes and exit setup. STEP 2: Use ASRock Easy RAID Installer Easy RAID Installer can copy the RAID driver from a support CD to your USB storage device with just one simple click in UEFI setup. Please note that this feature is not available for all models A. Plug in your USB flash drive into a USB port...
RAID Installation Guide - Page 23
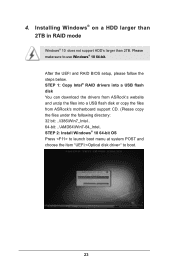
...and RAID BIOS setup, please follow the steps below. STEP 1: Copy Intel® RAID drivers into a USB flash disk You can download the drivers from ASRock's website and unzip the files into a USB flash disk or copy the files from ASRock's motherboard support CD. (Please copy the files under the following directory: 32 bit: ..\i386\Win7_Intel.. 64-bit: ..\AMD64\Win7-64_Intel.. STEP 2: Install Windows...
RAID Installation Guide - Page 24
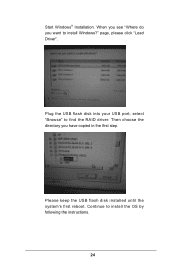
Start Windows® Installation. When you see "Where do you want to install Windows?" page, please click "Load Driver".
Plug the USB flash disk into your USB port; select "Browse" to find the RAID driver. Then choose the directory you have copied in the first step.
Please keep the USB flash disk installed until the system's first reboot. Continue to install the OS by following the instructions.
...
RAID Installation Guide - Page 25
... hard disk (ex. Disk volume > 2TB), it may take more time to boot into Windows® or install driver/utilities. If you encounter this problem, you will need to follow the instructions below to fix this problem. Windows® 10 64-bit: A. Please request the hotfix KB2505454 through this link:
http://support.microsoft.com/kb/2505454/ B. After installing Windows®...