Asus AP1710-E1 driver and firmware
Related Asus AP1710-E1 Manual Pages
Download the free PDF manual for Asus AP1710-E1 and other Asus manuals at ManualOwl.com
AP1710-E1 English version manual - Page 2
... or liability for any errors or inaccuracies that may appear in this manual, including the products and software described in it. Product warranty or service will not be extended if: (1) the product is repaired, modified or altered, unless such repair, modification of alteration is authorized in writing by ASUS; or (2) the serial number of the product...
AP1710-E1 English version manual - Page 3
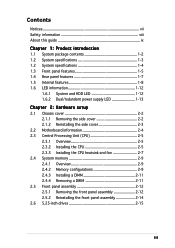
... Dual/redundant power supply LED 1-13
Chapter 2: Hardware setup
2.1 Chassis cover 2-2 2.1.1 Removing the side cover 2-2 2.1.2 Reinstalling the side cover 2-3
2.2 Motherboard information 2-4 2.3 Central Processing Unit (CPU 2-5
2.3.1 Overview 2-5 2.3.2 Installing the CPU 2-5 2.3.3 Installing the CPU heatsink and fan 2-7 2.4 System memory 2-9 2.4.1 Overview 2-9 2.4.2 Memory configurations...
AP1710-E1 English version manual - Page 4
... HDD blower 2-42 2.10.4 SATA/SCSI backplane 2-46 2.10.5 Floppy disk drive 2-48 2.10.6 Front I/O board 2-50 2.10.7 Chassis footpads and roller wheels 2-52 2.10.8 Power suppy modules 2-54
Chapter 3: Installation options
3.1 Installing a second SCSI drive cage 3-2 3.2 Installing an IDE drive cage 3-5 3.3 Upgrading to a dual or redundant power supply 3-7 3.4 Installing a power supply module...
AP1710-E1 English version manual - Page 5
...
5.1 Managing and updating your BIOS 5-2 5.1.1 Creating a bootable floppy disk 5-2 5.1.2 AFUDOS utility 5-3 5.1.3 ASUS CrashFree BIOS 2 utility 5-6 5.1.4 ASUS Update utility 5-7
5.2 BIOS setup program 5-10 5.2.1 BIOS menu screen 5-11 5.2.2 Menu bar 5-11 5.2.3 Navigation keys 5-11 5.2.4 Menu items 5-12 5.2.5 Sub-menu items 5-12 5.2.6 Configuration fields 5-12 5.2.7 Pop-up window 5-12...
AP1710-E1 English version manual - Page 10
...U T I O N : Information to prevent damage to the components when trying to complete a task. I M P O R T A N T : Instructions that you MUST follow to complete a task. N O T E : Tips and information to aid in completing a task.
Reference
Visit the ASUS websites worldwide that provide updated information for all ASUS hardware and software products. Refer to the ASUS contact information for details.
x
AP1710-E1 English version manual - Page 84
....
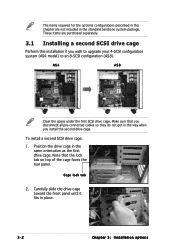
3.1 Installing a second SCSI drive cage
Perform this installation if you wish to upgrade your 4-SCSI configuration system (AS4 model) to an 8-SCSI configuration (AS8).
AS4
AS8
Clear the space under the first SCSI drive cage. Make sure that you disconnect all pre-connected cables so they do not get in the way when you install the second drive cage.
To install a second SCSI drive cage...
AP1710-E1 English version manual - Page 87
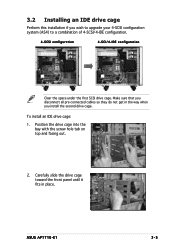
... disconnect all pre-connected cables so they do not get in the way when you install the second drive cage.
To install an IDE drive cage: 1. Position the drive cage into the
bay with the screw hole tab on top and facing out.
2. Carefully slide the drive cage toward the front panel until it fits in place.
ASUS AP1710-E1
3-5
AP1710-E1 English version manual - Page 89
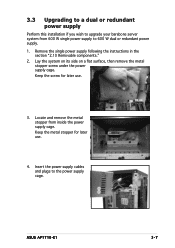
... system on its side on a flat surface, then remove the metal
stopper screw under the power supply cage. Keep the screw for later use.
3. Locate and remove the metal stopper from inside the power supply cage. Keep the metal stopper for later use.
4. Insert the power supply cables and plugs to the power supply cage.
ASUS AP1710-E1
3-7
AP1710-E1 English version manual - Page 91
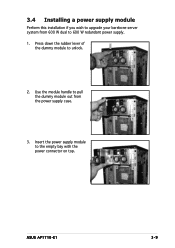
... to upgrade your barebone server system from 600 W dual to 600 W redundant power supply. 1. Press down the rubber lever of
the dummy module to unlock.
2. Use the module handle to pull the dummy module out from the power supply case.
3. Insert the power supply module to the empty bay with the power connector on top.
ASUS AP1710-E1
3-9
AP1710-E1 English version manual - Page 106
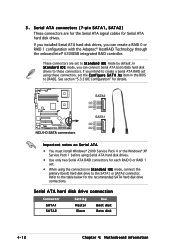
... in the BIOS to [RAID]. See section "5.3.5 IDE Configuration" for details.
NCLV-D
NCLV-D SATA connectors
SATA2
GND RSATA_TXP2 RSATA_TXN2
GND RSATA_RXP2 RSATA_RXN2
GND
SATA1
GND RSATA_TXP1 RSATA_TXN1
GND RSATA_RXP1 RSATA_RXN1
GND
Important notes on Serial ATA
• You must install Windows® 2000 Service Pack 4 or the Windows® XP Service Pack 1 before using Serial ATA hard disk drives...
AP1710-E1 English version manual - Page 116
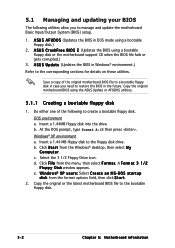
... the motherboard support CD when the BIOS file fails or gets corrupted.)
3. A S U S U p d a t e (Updates the BIOS in Windows® environment.)
Refer to the corresponding sections for details on these utilities.
Save a copy of the original motherboard BIOS file to a bootable floppy disk in case you need to restore the BIOS in the future. Copy the original motherboard BIOS using the ASUS Update or...
AP1710-E1 English version manual - Page 117
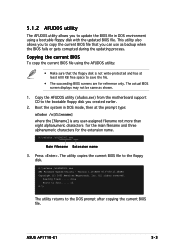
... Extension name
3. Press . The utility copies the current BIOS file to the floppy disk.
A:\>afudos /oOLDBIOS1.rom AMI Firmware Update Utility - Version 1.19(ASUS V2.07(03.11.24BB)) Copyright (C) 2002 American Megatrends, Inc. All rights reserved.
Reading flash ..... done Write to file...... ok A:\>
The utility returns to the DOS prompt after copying the current BIOS file.
ASUS AP1710-E1
5-3
AP1710-E1 English version manual - Page 118
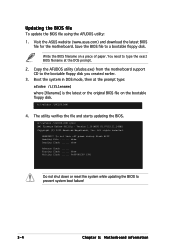
...is the latest or the original BIOS file on the bootable floppy disk.
A:\>afudos /iNCLVD.ROM
4. The utility verifies the file and starts updating the BIOS.
A:\>afudos /iNCLVD.ROM /pbnc AMI Firmware Update Utility - Version 1.19(ASUS V2.07(03.11.24BB)) Copyright (C) 2002 American Megatrends, Inc. All rights reserved.
WARNING!! Do not turn off power during flash BIOS Reading file ....... done Reading...
AP1710-E1 English version manual - Page 119
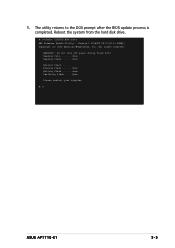
...iNCLVD.ROM /pbnc AMI Firmware Update Utility - Version 1.19(ASUS V2.07(03.11.24BB)) Copyright (C) 2002 American Megatrends, Inc. All rights reserved.
WARNING!! Do not turn off power during flash BIOS Reading file ....... done Reading flash ...... done
Advance Check ...... Erasing flash ...... done Writing flash ...... done Verifying flash .... done
Please restart your computer
A:\>
ASUS AP1710-E1...
AP1710-E1 English version manual - Page 121
... Service Provider (ISP).
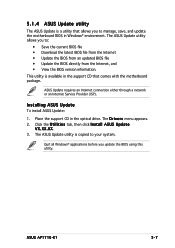
Installing ASUS Update
To install ASUS Update:
1. Place the support CD in the optical drive. The D r i v e r s menu appears. 2. Click the U t i l i t i e s tab, then click I n s t a l l A S U S U p d a t e
V X . X X . X X. 3. The ASUS Update utility is copied to your system.
Quit all Windows® applications before you update the BIOS using this utility.
ASUS AP1710-E1...
AP1710-E1 English version manual - Page 122
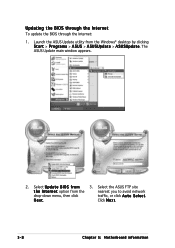
...BIOS through the Internet
To update the BIOS through the Internet:
1. Launch the ASUS Update utility from the Windows® desktop by clicking S t a r t > P r o g r a m s > A S U S > A S U S U p d a t e > A S U S U p d a t e. The ASUS Update main window appears.
2. Select U p d a t e B I O S f r o m
3. Select the ASUS FTP site
t h e I n t e r n e t option from the
nearest you to avoid network...
AP1710-E1 English version manual - Page 123
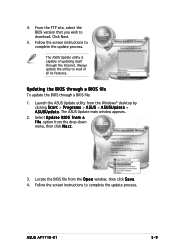
...; desktop by clicking S t a r t > P r o g r a m s > A S U S > A S U S U p d a t e > A S U S U p d a t e. The ASUS Update main window appears.
2. Select U p d a t e B I O S f r o m a f i l e option from the drop-down menu, then click N e x t.
3. Locate the BIOS file from the O p e n window, then click S a v e. 4. Follow the screen instructions to complete the update process.
ASUS AP1710-E1
5-9
AP1710-E1 English version manual - Page 124
... can enable the security password feature or change the power management settings. This requires you to reconfigure your system using the BIOS Setup program so that the computer can recognize these changes and record them in the CMOS RAM of the firmware hub.
The firmware hub on the motherboard stores the Setup utility. When you start up the computer, the system provides you...
AP1710-E1 English version manual - Page 129
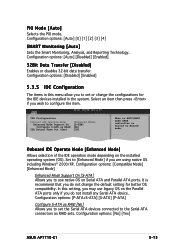
... the default setting for better OS compatibility. In this setting, you may use legacy OS on the Parallel ATA ports only if you do not install any Serial ATA device. Configuration options: [P-ATA+S-ATA] [S-ATA] [P-ATA]
Configure S-ATA as RAID [No] Allows you to set the Serial ATA devices connected to the Serial ATA connectors as RAID sets. Configuration options: [No] [Yes]
ASUS AP1710-E1
5-15
AP1710-E1 English version manual - Page 157
... installed on the sockets.
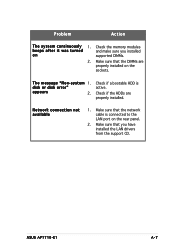
T h e m e s s a g e " N o n - s y s t e m 1.
disk or disk error"
appears
2.
Check if a bootable HDD is active.
Check if the HDDs are properly installed.
Network connection not available
1. Make sure that the network cable is connected to the LAN port on the rear panel.
2. Make sure that you have installed the LAN drivers from the support CD.
ASUS AP1710-E1...