Asus ET1602 - Eee Top - 1 GB RAM driver and firmware
Drivers and firmware downloads for this Asus item

Related Asus ET1602 Manual Pages
Download the free PDF manual for Asus ET1602 and other Asus manuals at ManualOwl.com
User Manual - Page 2
... part of this manual, including the products and software described in it, may be reproduced, transmitted, transcribed, stored in a retrieval system, or translated into any language in any form or by any means, except documentation kept by the purchaser for backup purposes, without the express written permission of ASUSTeK COMPUTER, INC. ("ASUS"). Products and...
User Manual - Page 4
... transmitter must be installed to provide a separation distance of at least 20 cm from all persons and must not be co-located or operating in conjunction with any other antenna or transmitter. End-users and installers must be provide with antenna installation instructions and transmitter operating conditions for satisfying RF exposure compliance.
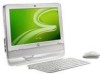
Eee Top ET16 Series
User Manual - Page 7
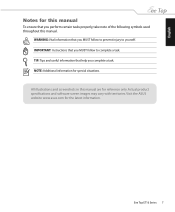
...of the following symbols used throughout this manual.
WARNING: Vital information that you MUST follow to prevent injury to yourself. IMPORTANT: Instructions that you MUST follow to complete a... in this manual are for reference only. Actual product specifications and software screen images may vary with territories. Visit the ASUS website www.asus.com for the latest information.
Eee Top ET16 Series ...
User Manual - Page 9
... your retailer.
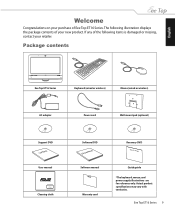
Package contents
Eee Top ET16 Series
Keyboard (wired or wireless)
Mouse (wired or wireless)
AC adapter
Power cord
Wall mount pad (optional)
Support DVD
User Manual
User manual
R
Rock Solid Heart Touching
Cleaning cloth
Software DVD
Software Manual
Software manual
Warranty card
Recovery DVD
Quick Guide
Quick guide
*The keyboard, mouse, and power supply illustrations are for...
User Manual - Page 11
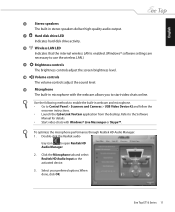
... methods to enable the built-in webcam and microphone. • Go to Control Panel > Scanners and Cameras > USB Video Device #2 and follow the
onscreen instructions. • Launch the CyberLink YouCam application from the desktop. Refer to the Software
Manual for details. • Start video chats with Windows® Live Messenger or Skype™.
To optimize the microphone performance through...
User Manual - Page 17
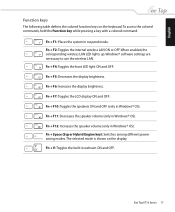
... + F2: Toggles the internal wireless LAN ON or OFF. When enabled, the corresponding wireless LAN LED lights up. Windows® software settings are necessary to use the wireless LAN. Fn + F4: Toggles the front LED light ON and OFF. Fn + F5: Decreases the display brightness. Fn + F6: Increases the display brightness. Fn + F7: Toggles the LCD display ON and OFF. Fn + F10...
User Manual - Page 18

...° 0°
0°
35°
Mounting to the wall
To mount your Eee Top to the wall, purchase the optional wall mount pad (160mm x 92mm) and a wall mount kit (VESA 75). Install the wall mount pad according to the following instructions. 1. Remove the four screws on the stand to
release the stand. Keep the...
User Manual - Page 19
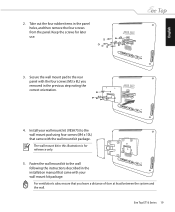
...the four screws (M3 x 8L) you removed in the previous step noting the correct orientation.
4. Install your wall mount kit (VESA75) to the wall mount pad using four screws (M4 x 10L) that... instructions described in the installation manual that came with your wall mount kit package. For ventilation's sake, ensure that you leave a distance of 6cm at least between the system and the wall.
Eee Top ET16...
User Manual - Page 21
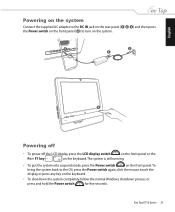
... front panel. To
bring the system back to the OS, press the Power switch again, click the mouse, touch the
display, or press any key on the keyboard.
• To shut down the system completely, follow the normal Windows shutdown process or
press and hold the Power switch
for five seconds.
Eee Top ET16 Series 21
User Manual - Page 22

English
Calibrating the screen
Eee Top comes with one of the following two software tools that allow you to adjust touch screen precision.The software tool installed in your Eee Top may vary with territories.
Type A
1. From the Windows® desktop, click Start > All Programs > Touch Package > Touch tool. 2. Click General and then click 9 pts.
linearization.
3. Touch and hold the...
User Manual - Page 23
English
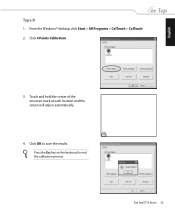
Type B
1. From the Windows® desktop, click Start > All Programs > CalTouch > CalTouch. 2. Click 4 Points Calibration.
3. Touch and hold the center of the onscreen mark at each location and the screen will adjust automatically.
4. Click OK to save the results. Press the Esc key on the keyboard to end the calibration process.
Eee Top ET16 Series 23
User Manual - Page 25
...
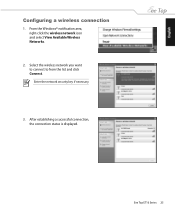
Configuring a wireless connection
1. From the Windows® notification area, right-click the wireless network icon and select View Available Wireless Networks.
2. Select the wireless network you want to connect to from the list and click Connect. Enter the network security key if necessary.
3. After establishing a successful connection, the connection status is displayed.
Eee Top ET16 Series...
User Manual - Page 31
English
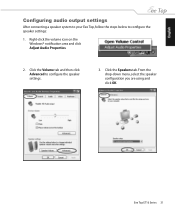
Configuring audio output settings
After connecting a speaker system to your Eee Top, follow the steps below to configure the speaker settings:
1. Right-click the volume icon on the Windows® notification area and click Adjust Audio Properties.
2. Click the Volume tab and then click Advanced to configure the speaker settings.
3. Click the Speakers tab. From the drop-down...
User Manual - Page 33
... hard disk drive is in good working order. Before using the recovery DVD, copy your data files (such as Outlook PST files) to a USB device or to a network drive and make note of any customized configuration settings (such as network settings).
You need to connect a USB optical drive to your computer before inserting the recovery DVD.
1. Turn on your computer and press . 2. When the Eee Top logo...
User Manual - Page 34

.... Before using the recovery partition, copy your data files (such as Outlook PST files) to a USB device or to a network drive and make note of any customized configuration settings (such as network settings). 1. Turn on your computer and press . 2. When the Eee Top logo appears, press (requires a recovery partition). 3. The ASUS Recovery CD/DVD window appears. Select Recover system to a partition...