Asus ET2701INKI driver and firmware

Related Asus ET2701INKI Manual Pages
Download the free PDF manual for Asus ET2701INKI and other Asus manuals at ManualOwl.com
ET2700I series user's Manual for English Edition - Page 2
... part of this manual, including the products and software described in it, may be reproduced, transmitted, transcribed, stored in a retrieval system, or translated into any language in any form or by any means, except documentation kept by the purchaser for backup purposes, without the express written permission of ASUSTeK COMPUTER, INC. ("ASUS"). Products and...
ET2700I series user's Manual for English Edition - Page 5
... the dealer or an experienced radio/TV technician for help.
CAUTION: Any changes or modifications not expressly approved by the guarantee of this device could void the user's authority to operate the equipment.
RF exposure warning This equipment must be installed and operated in accordance with provided instructions and the antenna(s) used for this...
ET2700I series user's Manual for English Edition - Page 13

... cause hearing damage or loss. Adjustment of the volume control as well as the equalizer to settings other than the center position may increase the earphones or headphones output voltage and the sound pressure level.
TV Tuner (on selected models)
Note to CATV System Installer-This reminder is provided to call the CATV systems...
ET2700I series user's Manual for English Edition - Page 16
..., audio recordings, and multimedia applications.
4 Remote Control Receiver
The remote control receiver receives the infrared signal from the remote control.
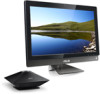
5 LCD display (Touch-enabled function on selected models)
The LCD display features optimal resolution. Touch-enabled models bring digital life to your fingertips.
6
Hard Disk Drive LED
Indicates hard disk drive activity...
ET2700I series user's Manual for English Edition - Page 20

...(BD) and may have recordable (R) or re-writable (RW) capabilities. See the marketing specifications for details on each model.
9 Optical Drive Electronic Eject
The optical drive eject has an electronic eject button for opening the tray. You can also eject the optical drive tray through any software player or by right clicking the optical drive in Windows "Computer" and selecting Eject.
20...
ET2700I series user's Manual for English Edition - Page 21
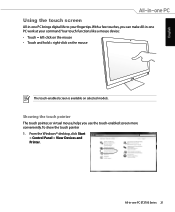
... the touch screen
All-in-one PC brings digital life to your fingertips. With a few touches, you can make All-in-one PC work at your command. Your touch functions like a mouse device: • Touch = left-click on the...-enabled screen more conveniently. To show the touch pointer 1. From the Windows® desktop, click Start
> Control Panel > View Devices and Printer.
All-in-one PC ET2700 Series 21
ET2700I series user's Manual for English Edition - Page 27
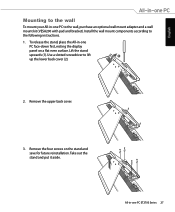
... to the wall
To mount your All-in-one PC to the wall, purchase an optional wall mount adapter and a wall mount kit (VESA200 with pad and bracket). Install the wall mount components according to the following instructions.
1. To release the stand, place the All-in-one
PC face-down first, resting the...
ET2700I series user's Manual for English Edition - Page 29
English
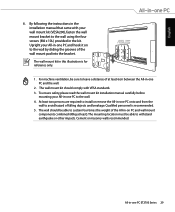
6. By following the instructions in the installation manual that came with your wall mount kit (VESA200), fasten the wall mount bracket to the wall using...standards. 3. To ensure safety, please read the wall mount kit installation manual carefully before
mounting your All-in-one PC to the wall. 4. At least two persons are required to install or remove the All-in-one PC onto and from the
...
ET2700I series user's Manual for English Edition - Page 30
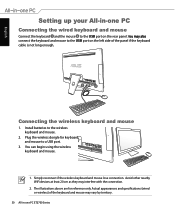
... if the keyboard cable is not long enough.�
1
2
Connecting the wireless keyboard and mouse
1. Install batteries to the wireless keyboard and mouse.
2. Plug the wireless dongle for keyboard and mouse to a USB port.
3. You can begin using the wireless keyboard and mouse.
1. Simply reconnect if the wireless keyboard and mouse lose connection. Avoid other nearby WiFi devices at least 20...
ET2700I series user's Manual for English Edition - Page 31
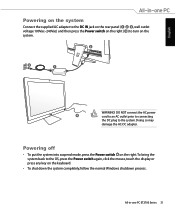
... the system. Doing so may
damage the AC-DC adapter.
Powering off
• To put the system into suspend mode, press the Power switch on the right. To bring the system back to the OS, press the Power switch again, click the mouse, touch the display or press any key on the keyboard.
• To...
ET2700I series user's Manual for English Edition - Page 32
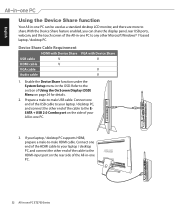
... enabled, you can share the display panel, rear USB ports, webcam, and the touch screen of the All-in-one PC to any other Microsoft Windows® 7-based laptop / desktop PC.
Device Share Cable Requirement
HDMI with Device Share VGA with Device Share
USB cable
V
V
HDMI cable
V
VGA cable
V
Audio cable
V
1. Enable the Device Share function under the System Setup menu in the OSD. Refer...
ET2700I series user's Manual for English Edition - Page 33
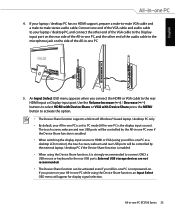
... connect the HDMI or VGA cable to the rear HDMI-input or Display-input port. Use the Volume Increase ( ) / Decrease ( ) buttons to select HDMI with Device Share or VGA with Device Share press the MENU button to activate the option. • The Device Share function supports a Microsoft Windows®-based laptop / desktop PC only. • By default, your All-in-one PC is set to PC...
ET2700I series user's Manual for English Edition - Page 34
English
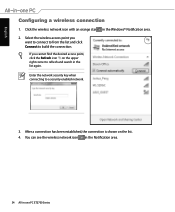
Configuring a wireless connection
1. Click the wireless network icon with an orange star in the Windows® Notification area. 2. Select the wireless access point you
want to connect to from the list and click Connect to build the connection.
If you cannot find the desired access point, ...
ET2700I series user's Manual for English Edition - Page 35
English
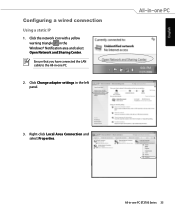
Configuring a wired connection
Using a static IP
1. Click the network icon with a yellow warning triangle in the Windows® Notification area and select Open Network and Sharing Center. Ensure that you have connected the LAN cable to the All-in-one PC.
2. Click Change adapter settings in the left panel.
3. Right-click Local Area Connection and select Properties...
ET2700I series user's Manual for English Edition - Page 40
... ASUS. DO NOT connect other devices to this jack. Doing so may damage the device.
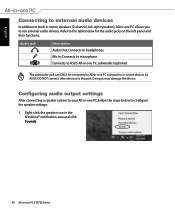
Configuring audio output settings
After connecting a speaker system to your All-in-one PC, follow the steps below to configure the speaker settings:
1. Right-click the speaker icon in the Windows® notification area and click Sounds.
40 All-in-one PC...
ET2700I series user's Manual for English Edition - Page 42
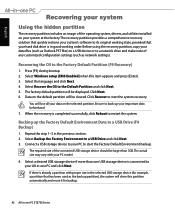
... is in good working order. Before using the recovery partition, copy your data files (such as Outlook PST files) to a USB device or to a network drive and make note of any customized configuration settings (such as network settings).
Recovering the OS to the Factory Default Partition (F9 Recovery)
1. Press [F9] during bootup. 2. Select Windows setup [EMS Enabled] when this item appears and press...