Asus T2-PH1 - Terminator - 0 MB RAM driver and firmware
Drivers and firmware downloads for this Asus item

Related Asus T2-PH1 Manual Pages
Download the free PDF manual for Asus T2-PH1 and other Asus manuals at ManualOwl.com
User Guide - Page 4

...3.5.1 Playing an audio CD/DVD 3-11 3.5.2 Tuning into an FM radio station 3-11 3.5.3 Presetting a station 3-12 3.5.4 Adjusting the volume 3-12
Chapter 4: Motherboard Info
4.1 Introduction 4-2 4.2 Motherboard layout 4-2 4.3 Jumpers 4-3 4.4 Connectors 4-5
Chapter 5: BIOS Information
5.1 Managing and updating your BIOS 5-2 5.1.1 Creating a bootable floppy disk 5-2 5.1.2 ASUS EZ Flash utility...
User Guide - Page 8

... of the ASUS T2-PH1. The chapter lists the system features, including introduction on the front and rear panel, and internal components. 2. Chapter 2: Basic installation This chapter provides step-by-step instructions on how to install components in the system. 3. Chapter 3: Starting up This chapter helps you power up the system and install drivers and utilities from the support CD...
User Guide - Page 9

...T A N T : Instructions that you MUST follow to complete a task. N O T E : Tips and additional information to aid in completing a task.
Where to find more information
Refer to the following sources for additional information and for product and software updates. 1. ASUS Websites
The ASUS websites worldwide provide updated information on ASUS hardware and software products. Refer to the ASUS contact...
User Guide - Page 22
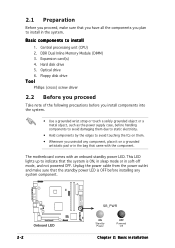
2.1 Preparation
Before you proceed, make sure that you have all the components you plan to install in the system.
Basic components to install
1. Central processing unit (CPU) 2. DDR Dual Inline Memory Module (DIMM) 3. Expansion card(s) 4. Hard disk drive 5. Optical drive 6. Floppy disk drive
Tool
Phillips (cross) screw driver
2.2 Before you proceed
Take note of the following precautions before you...
User Guide - Page 27

..., do not remove the PnP cap unless you are installing a CPU.
3. Lift the load lever in the direction of the arrow to a 135º angle.
Retention tab A B Load lever
3
4. Lift the load plate with your thumb and forefinger to a 100º angle (A), then push the PnP cap from the load plate window to remove (B).
PnP cap Load plate
B A
ASUS T2-PH1
2-7
User Guide - Page 40

2.10 Installing a hard disk drive (HDD)
The system supports one Ultra ATA/133 IDE or one Serial ATA hard disk drive.
To install an IDE hard disk drive:
1. Locate the HDD tray lock screw on the other side of the chassis.
2. Remove the lock screw with a Philips screw driver. Keep the screw for later use.
1
2
3. Slide the HDD tray outward until the tray slots...
User Guide - Page 47

Chapter 3
This chapter helps you power up the system and install drivers and utilities from the support CD.
MODE
ASUS T2-PH1
Starting up
User Guide - Page 48

... supports Windows® 2000/XP operating systems (OS). Always install the latest OS version and corresponding updates so you can maximize the features of your hardware.
Because motherboard settings and hardware options vary, use the setup procedures presented in this chapter for general reference only. Refer to your OS documentation for more information.
3.2 Powering up
The system has two power...
User Guide - Page 49

... device drivers if the system detects installed devices. Install the necessary drivers to activate the devices.
QFE Update
Installs the Quick Fix Engineering (QFE) driver updates.
Make sure you install the QFE Update only b e f o r e installing Microsoft® Windows® XP Service Pack 1.
Intel Chipset INF Update Program
Installs the Intel® Chipset INF Update Program.
ASUS T2-PH1...
User Guide - Page 50

...`97 Audio Driver
Installs the Realtek® AC`97 audio driver.
Marvell Gigabit LAN Driver
Installs the Marvell® Gigabit LAN Driver.
USB 2.0 Card Reader Software
Installs the driver for the storage card reader.
USB 2.0 Driver
Click this item to install the USB 2.0 driver.
3.3.3 Utilities menu
The Utilities menu shows the applications and other software that the motherboard supports.
ASUS PC...
User Guide - Page 51

ASUS Update
Installs the ASUS Update that allows you to update the motherboard BIOS and drivers. This utility requires an Internet connection either through a network or an Internet Service Provider (ISP). See page 5-8 for details.
ASUS Screensaver
Bring life to your idle screen by installing the ASUS Screensaver.
Adobe Acrobat Reader V5.0
The Acrobat® Acrobat Reader® software is for ...
User Guide - Page 53

...> A S U S R a d i o P l a y e r V 1 . 0 > A S U S R a d i o P l a y e r V 1 . 0 from the Windows® desktop.
3. The ASUS Radio Player panel appears.
Station frequency
Preset station list Close ASUS Radio Minimize ASUS Radio Power button
Clock
Increase the volume Decrease the volume Mute/Sound on button
Store button Edit button
Tune left
Stop
Scan left
Tune right Scan right
ASUS T2-PH1
3-7
User Guide - Page 60

4.1 Introduction
The ASUS T2-PH1 motherboard comes already installed in the ASUS T2-PH1 system. This chapter provides technical information about the motherboard for future upgrades or system reconfiguration.
4.2 Motherboard layout
24.89cm (9.8in)
PS/2
T:Mouse B:Keyboard
VGA1
IOC_MB ATX12V1
PARALLEL PORT
Line Out
Line In
Mic In
USB12
CD
ALC655
AUX
FP_AUDIO
CHA_FAN
USBPW12 USBPW34
...
User Guide - Page 70

... for Serial ATA hard disk drives.
On the motherboard, the Serial ATA connectors are only labeled as "SATA." Refer to the illustration below to identify the SATA1 and SATA2 connectors.
SATA connectors
®
SATA1
GND RSATA_RXN1 RSATA_RXP1 GND RSATA_TXN1 RSATA_TXP1 GND
SATA2
GND RSATA_RXN2 RSATA_RXP2 GND RSATA_TXN2 RSATA_TXP2 GND
Important notes on Serial ATA
• You must install Windows...
User Guide - Page 74

... restore the BIOS in the future. Copy the original motherboard BIOS using the ASUS Update or AFUDOS utilities.
5.1.1 Creating a bootable floppy disk
1. Do either one of the following to create a bootable floppy disk.
DOS environment a. Insert a 1.44MB floppy disk into the drive. b. At the DOS prompt, type format A:/S then press .
Windows® XP environment a. Insert a 1.44 MB floppy disk to the...
User Guide - Page 75

... BIOS to prevent system boot failure!
• A "Floppy not found!" error message appears if there is no floppy disk in the drive. A "P5G6T.ROM not found!" error message appears if the correct BIOS file is not found in the floppy disk. Make sure that you rename the BIOS file to P5G6T.ROM.
• The EZ Flash utility does not support BIOS update using a USB floppy.
ASUS T2-PH1...
User Guide - Page 77

... or the original BIOS file on the bootable floppy disk.
A:\>afudos /iP5G6T.ROM
4. The utility reads the file and starts updating the BIOS.
A:\>afudos /iP5G6T.ROM AMI Firmware Update Utility - Version 1.19(ASUS V2.07(03.11.24BB)) Copyright (C) 2003 American Megatrends, Inc. All rights reserved.
WARNING!! Do not turn off power during flash BIOS Reading file ..... done Reading flash .... done Search...
User Guide - Page 80

... BIOS file • Update the BIOS directly from the Internet, and • View the BIOS version information. This utility is available in the support CD that comes with the motherboard package.
ASUS Update requires an Internet connection either through a network or an Internet Service Provider (ISP).
Installing ASUS Update
To install ASUS Update:
1. Place the support CD in the optical drive...
User Guide - Page 82

... the BIOS version that you wish to download. Click Next.
5. Follow the screen instructions to complete the update process.
The ASUS Update utility is capable of updating itself through the Internet. Always update the utility to avail all its features.
Updating the BIOS through a BIOS file
To update the BIOS through a BIOS file:
1. Launch the ASUS Update utility from the Windows® desktop by...
User Guide - Page 83

... can enable the security password feature or change the power management settings. This requires you to reconfigure your system using the BIOS Setup program so that the computer can recognize these changes and record them in the CMOS RAM of the firmware hub.
The firmware hub on the motherboard stores the Setup utility. When you start up the computer, the system provides you...