Asus PRIME A320M-C R2.0 driver and firmware
Drivers and firmware downloads for this Asus item
Related Asus PRIME A320M-C R2.0 Manual Pages
Download the free PDF manual for Asus PRIME A320M-C R2.0 and other Asus manuals at ManualOwl.com
User Guide - Page 2
.... Copies of these licenses are included in this product. Where the applicable license entitles you to the source code of such software and/or other additional data, you may obtain it for a period of three years after our last shipment of the product, either (1) for free by downloading it from http://support.asus.com/download or...
User Guide - Page 4
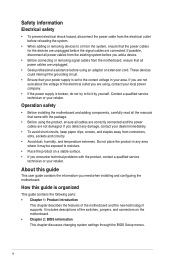
... try to fix it by yourself. Contact a qualified service technician or your retailer.
Operation safety
• Before installing the motherboard and adding components, carefully read all the manuals that came with the package.
• Before using the product, ensure all cables are correctly connected and the power cables are not damaged. If you detect any damage, contact...
User Guide - Page 5
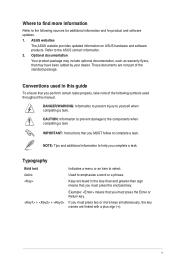
... updates.
1. ASUS websites
The ASUS website provides updated information on ASUS hardware and software products. Refer to the ASUS contact information.
2. Optional documentation
Your product package may include optional documentation, such as warranty flyers, that may have been added by your dealer. These documents are not part of the standard package.
Conventions used in this guide
To ensure...
User Guide - Page 8
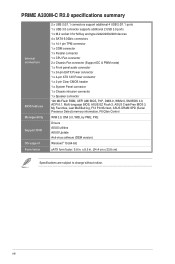
... connector 128 Mb Flash ROM, UEFI AMI BIOS, PnP, DMI3.0, WfM2.0, SM BIOS 3.0, ACPI 6.1, Multi-language BIOS, ASUS EZ Flash 3, ASUS CrashFree BIOS 3, My Favorites, Last Modified log, F12 PrintScreen, ASUS DRAM SPD (Serial Presence Detect) memory information, F6 Qfan Control
WfM 2.0, DMI 3.0, WOL by PME, PXE
Drivers ASUS utilities ASUS Update Anti-virus software (OEM version)
Windows® 10 (64...
User Guide - Page 9
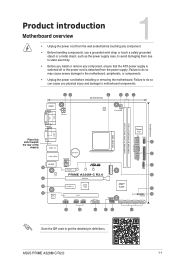
... +VRM
CHA_FAN2
DVI VGA
24.4cm(9.6in)
SOCKET AM4 DDR4 DIMM_A1 (64bit, 288-pin module) DDR4 DIMM_B1 (64bit,288-pin module)
EATXPWR
HDMI
COM1
Place this side towards the rear of the
chassis
USB3_3-6
LAN_USB12
AUDIO
18
19 18 17
Realtek 8111H
ALC 887
Super I/O
COM2
15
BATTERY
CPU_FAN CHA_FAN1
2280 PCIEX1_1
2260
2242
PRIME A320M-C R2.0
PCIEX16
M.2(SOCKET3...
User Guide - Page 10
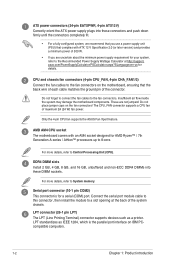
... more details, refer to System memory.
Serial port connector (10-1 pin COM2) This connector is for a serial (COM) port. Connect the serial port module cable to this connector, then install the module to a slot opening at the back of the system chassis.
LPT connector (26-1 pin LPT) The LPT (Line Printing Terminal) connector supports devices such as a printer. LPT standardizes as IEEE...
User Guide - Page 11
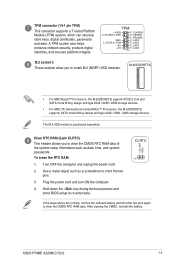
...; Processors, the M.2(SOCKET3) supports SATA mode M Key design and type 2242 / 2260 / 2280 storage devices.
The M.2 SSD module is purchased separately.
Clear RTC RAM (2-pin CLRTC) This header allows you to clear the CMOS RTC RAM data of the system setup information such as date, time, and system passwords. To erase the RTC RAM:
1. Turn OFF the computer and unplug the power...
User Guide - Page 12
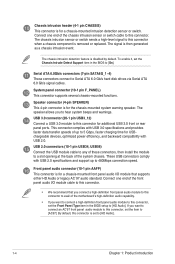
... feature is disabled by default. To enable it, set the Chassis Intrude Detect Support item in the BIOS to [On].
Serial ATA 6.0Gb/s connectors (7-pin SATA6G_1~4) These connectors connect to Serial ATA 6.0 Gb/s hard disk drives via Serial ATA 6.0 Gb/s signal cables.
System panel connector (10-1 pin F_PANEL) This connector supports several chassis-mounted functions.
Speaker connector (4-pin SPEAKER...
User Guide - Page 15
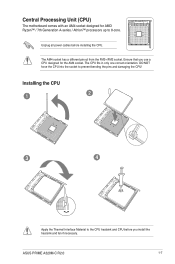
... socket. Ensure that you use a CPU designed for the AM4 socket. The CPU fits in only one correct orientation. DO NOT force the CPU into the socket to prevent bending the pins and damaging the CPU!
Installing the CPU
1
2
3
4
Apply the Thermal Interface Material to the CPU heatsink and CPU before you install the heatsink and fan if necessary.
ASUS PRIME A320M-C R2.0
1-7
User Guide - Page 16
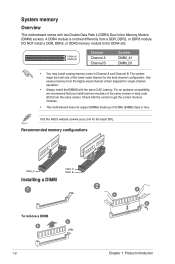
... optimum compatibility, we recommend that you install memory modules of the same version or data code (D/C) from the same vendor. Check with the vendor to get the correct memory modules.
• This motherboard does not support DIMMs made up of 512Mb (64MB) chips or less.
Visit the ASUS website at www.asus.com for the latest QVL.
Recommended...
User Guide - Page 17
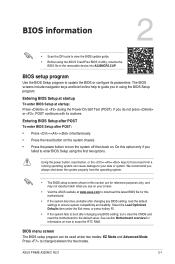
... to boot after changing any BIOS setting, try to clear the CMOS and reset the motherboard to the default value. See section Motherboard overview for information on how to erase the RTC RAM.
BIOS menu screen The BIOS setup program can be used under two modes: EZ Mode and Advanced Mode. Press to change between the two modes.
ASUS PRIME A320M-C R2.0
2-1
User Guide - Page 18
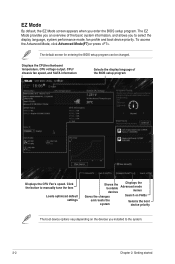
... default screen for entering the BIOS setup program can be changed.
Displays the CPU/motherboard temperature, CPU voltage output, CPU/ chassis fan speed, and SATA information
Selects the display language of the BIOS setup program
Displays the CPU Fan's speed. Click the button to manually tune the fans
Loads optimized default settings
Shows the bootable devices
Displays the Advanced mode
menus...
User Guide - Page 19
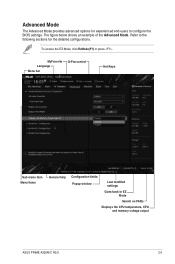
... to the following sections for the detailed configurations.
To access the EZ Mode, click EzMode(F7) or press .
MyFavorite Language Menu bar
Q-Fan control
Hot Keys
Sub-menu item Menu items
General help
Configuration fields Popup window
Last modified settings
Goes back to EZ Mode
Search on FAQs
Displays the CPU temperature, CPU and memory voltage output
ASUS PRIME A320M-C R2.0
2-3
User Guide - Page 20
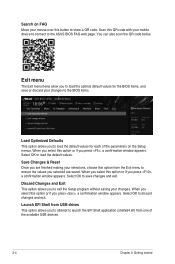
... mouse over this button to show a QR code. Scan this QR code with your mobile device to connect to the ASUS BIOS FAQ web page. You can also scan the QR code below.
Exit menu
The Exit menu items allow you to load the optimal default values for the BIOS items, and save or discard your changes to...
User Guide - Page 21
...a Class B digital device, pursuant to Part 15 of the FCC Rules. These limits are designed to provide reasonable protection against harmful interference in a residential installation. This equipment ...dealer or an experienced radio/TV technician for help.
The use of shielded cables for connection of the monitor to the graphics card is required to assure ... l'appareil.
ASUS PRIME A320M-C R2.0
A-1