Asus RS120-E3 PA2 driver and firmware


Related Asus RS120-E3 PA2 Manual Pages
Download the free PDF manual for Asus RS120-E3 PA2 and other Asus manuals at ManualOwl.com
User Guide - Page 4

...2-20 2.8.3 Device fan 2-21 2.8.4 Power supply module 2-22 2.8.5 Optical drive 2-23 2.8.6 Motherboard 2-25
Chapter 3: Installation options
3.1 Rackmount rail kit items 3-2 3.2 Rack rails assembly 3-2 3.3 Attaching the rails to the rack 3-3 3.4 Rackmounting the server 3-4
Chapter 4: Motherboard information
4.1 Motherboard layout 4-2 4.2 Jumpers 4-4 4.3 Connectors 4-9
Chapter 5: BIOS setup...
User Guide - Page 6
...174; Matrix Storage Manager 6-38
6.4 Global Array Manager 6-39
Chapter 7: Driver installation
7.1 RAID driver installation 7-2 7.1.1 Creating a RAID driver disk 7-2 7.1.2 Installing the RAID controller driver 7-3
7.2 LAN driver installation 7-12 7.2.1 Windows® 2000/2003 Server 7-12 7.2.2 Red Hat® Enterprise ver. 3.0 7-13
7.3 VGA driver installation 7-14 7.3.1 Windows® 2000...
User Guide - Page 31
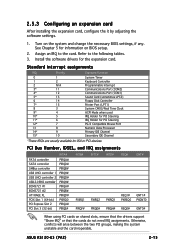
...Floppy Disk Controller Printer Port (LPT1) System CMOS/Real Time Clock ACPI Mode when used IRQ Holder for PCI Steering IRQ Holder for PCI Steering PS/2 Compatible Mouse Port Numeric Data Processor Primary IDE Channel Secondary IDE Channel
*These IRQs are usually available for ISA or PCI devices.
PCI Bus Number, IDSEL, and IRQ assignments
PATA controller SATA controller SMBus controller USB UHCI...
User Guide - Page 68
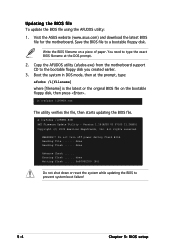
...the latest or the original BIOS file on the bootable floppy disk, then press .
A:\>afudos /iP5MTR.rom
The utility verifies the file, then starts updating the BIOS file.
A:\>afudos /iP5MTR.ROM AMI Firmware Update Utility - Version 1.19(ASUS V2.07(03.11.24BB)) Copyright (C) 2002 American Megatrends, Inc. All rights reserved.
WARNING!! Do not turn off power during flash BIOS Reading file ....... done...
User Guide - Page 69
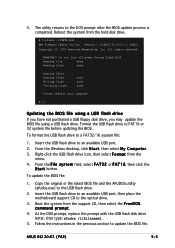
... the USB flash drive to an available USB port, then place the motherboard support CD to the optical drive.
3. Boot the system from the support CD, then select the F r e e D O S command prompt.
4. At the DOS prompt, replace the prompt with the USB flash disk drive letter, then type: afudos /i[filename].
3. Follow the instructions in the previous section to update the BIOS file.
ASUS RS120-E3 (PA2...
User Guide - Page 72
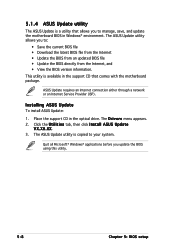
... BIOS file • Update the BIOS directly from the Internet, and • View the BIOS version information. This utility is available in the support CD that comes with the motherboard package.
ASUS Update requires an Internet connection either through a network or an Internet Service Provider (ISP).
Installing ASUS Update
To install ASUS Update:
1. Place the support CD in the optical drive...
User Guide - Page 74
... the BIOS version that you wish to download. Click Next.
5. Follow the screen instructions to complete the update process.
The ASUS Update utility is capable of updating itself through the Internet. Always update the utility to avail all its features.
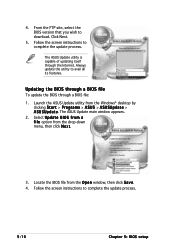
Updating the BIOS through a BIOS file
To update the BIOS through a BIOS file:
1. Launch the ASUS Update utility from the Windows® desktop by...
User Guide - Page 75
... can enable the security password feature or change the power management settings. This requires you to reconfigure your system using the BIOS Setup program so that the computer can recognize these changes and record them in the CMOS RAM of the firmware hub.
The firmware hub on the motherboard stores the Setup utility. When you start up the computer, the system provides you...
User Guide - Page 79
... or RAID 0+1 configuration; supported on Windows® 2000/2003 Server/XP and Red Hat® Enterprise ver. 3.0). Refer to section 4 . 2 J u m p e r s for details.
Place a jumper cap on pins 2-3 of the RAID_SEL1 jumper to use the Intel® Matrix Storage Manager (for RAID 0, RAID 1, RAID 0+1, or software RAID 5 configuration; supported on Windows® 2000/2003 Server/XP).
ASUS RS120-E3 (PA2...
User Guide - Page 106
... e r. These utilities support SATA hard disk drives and allow creation of RAID 0, RAID 1, RAID 0+1, or software RAID 5 (Intel® Matrix Storage Manager only) configuration.
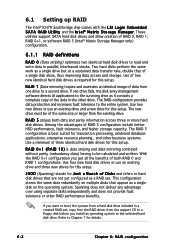
6.1.1 RAID definitions
R A I D 0 (Data striping) optimizes two identical hard disk drives to read and write data in parallel, interleaved stacks. Two hard disks perform the same work as a single drive but at a sustained data...
User Guide - Page 107
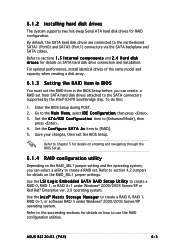
...Installing hard disk drives
The system supports two hot-swap Serial ATA hard disk drives for RAID configuration.
By default, the SATA hard disk drives are connected to the motherboard SATA1 (Port0) and SATA3 (Port1) connectors via the SATA backplane and SATA cables.
Refer to sections 1 . 5 I n t e r n a l c o m p o n e n t s and 2 . 4 H a r d d i s k d r i v e s for details on SATA hard disk drive...
User Guide - Page 146

... the independent hard disk drive or bootable array. This part provides instructions on how to install the RAID controller drivers during OS installation.
7.1.1 Creating a RAID driver disk
You may have to use another system to create the RAID driver disk from the system/motherboard support CD or from the Internet.
A floppy disk with the RAID driver is required when installing Windows® 2000/XP...
User Guide - Page 147
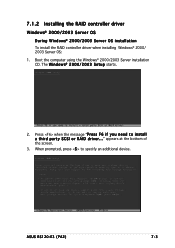
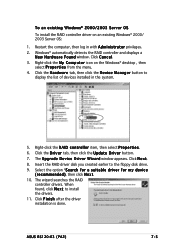
...: 1. Boot the computer using the Windows® 2000/2003 Server installation CD. The W i n d o w s® 2 0 0 0 / 2 0 0 3 S e t u p starts.
2. Press when the message "P r e s s F 6 i f y o u n e e d t o i n s t a l l a t h i r d p a r t y S C S I o r R A I D d r i v e r . . ." appears at the bottom of the screen.
3. When prompted, press to specify an additional device.
ASUS RS120-E3 (PA2)
7-3
User Guide - Page 148
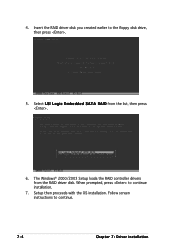
... Insert the RAID driver disk you created earlier to the floppy disk drive, then press .
5. Select L S I L o g i c E m b e d d e d S A T A R A I D from the list, then press .
6. The Windows® 2000/2003 Setup loads the RAID controller drivers from the RAID driver disk. When prompted, press to continue installation.
7. Setup then proceeds with the OS installation. Follow screen instructions to...
User Guide - Page 149
... the RAID driver disk you created earlier to the floppy disk drive.
9. Select the option "S e a r c h f o r a s u i t a b l e d r i v e r f o r m y d e v i c e ( r e c o m m e n d e d ), then click N e x t.
10. The wizard searches the RAID controller drivers. When found, click N e x t to install the drivers.
11. Click F i n i s h after the driver installation is done.
ASUS RS120-E3 (PA2)
7-5
User Guide - Page 150
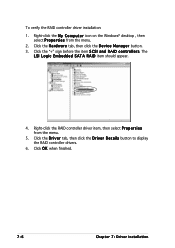
To verify the RAID controller driver installation: 1. Right-click the M y C o m p u t e r icon on the Windows® desktop , then
select P r ...RAID controller driver item, then select P r o p e r t i e s from the menu.
5. Click the D r i v e r tab, then click the D r i v e r D e t a i l s button to display the RAID controller drivers.
6. Click O K when finished.
7-6
Chapter 7: Driver installation
User Guide - Page 155
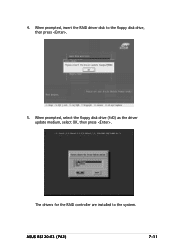
4. When prompted, insert the RAID driver disk to the floppy disk drive, then press .
5. When prompted, select the floppy disk drive (fd0) as the driver update medium, select OK, then press .
The drivers for the RAID controller are installed to the system.
ASUS RS120-E3 (PA2)
7-11
User Guide - Page 156
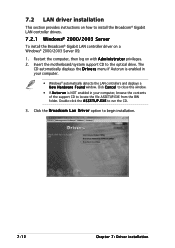
7.2 LAN driver installation
This section provides instructions on how to install the Broadcom® Gigabit LAN controller drivers.
7.2.1 Windows® 2000/2003 Server
To install the Broadcom® Gigabit LAN controller driver on a Windows® 2000/2003 Server OS:
1. Restart the computer, then log on with A d m i n i s t r a t o r privileges. 2. Insert the motherboard/system support CD to the ...
User Guide - Page 158
... Adapter (VGA) driver.
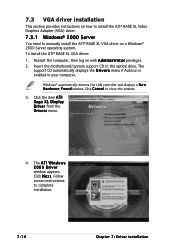
7.3.1 Windows® 2000 Server
You need to manually install the ATI® RAGE XL VGA driver on a Windows® 2000 Server operating system. To install the ATI® RAGE XL VGA driver:
1. Restart the computer, then log on with A d m i n i s t r a t o r privileges. 2. Insert the motherboard/system support CD to the optical drive. The
support CD automatically displays...
User Guide - Page 164
...Intel® Pentium® 4 CPU that supports the Intel® EM64T. 2. Install a 64-bit operating system (Windows® XP Professional x64
Edition or Windows® Server 2003 x64 Edition). 3. Install the 64-bit drivers for the motherboard components and devices
from the support CD. 4. Install the 64-bit drivers for expansion cards or add-on devices, if any.
Refer to the expansion card or add-on...