Asus RS720-E6 RS12 driver and firmware

Related Asus RS720-E6 RS12 Manual Pages
Download the free PDF manual for Asus RS720-E6 RS12 and other Asus manuals at ManualOwl.com
User Guide - Page 4
... Redundant power supply module 2-20 2.8.3 Installing ASUS PIKE RAID card (optional 2-21 2.8.4 Installing ASMB4 series management board (optional) 2-23
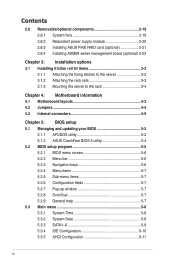
Chapter 3: Installation options 3.1 Installing friction rail kit items 3-2
3.1.1 Attaching the fixing latches to the server 3-2 3.1.2 Attaching the rack rails 3-3 3.1.3 Mounting the server to the rack 3-4
Chapter 4: Motherboard information...
User Guide - Page 6
...; Matrix Storage Manager 6-30 Rebuilding the RAID 6-30 Setting the Boot array in the BIOS Setup Utility 6-32
Chapter 7: Driver installation 7.1 RAID driver installation 7-2
7.1.1 Creating a RAID driver disk 7-2 7.1.2 Installing the RAID controller driver 7-5 7.2 Intel® chipset device installation 7-17 7.3 LAN driver installation 7-19 7.4 VGA driver installation 7-22 7.5 Management...
User Guide - Page 13
...
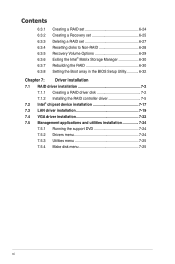
The ASUS RS720-E6/RS12 is a server featuring the ASUS Z8PE-D18 server board. The server supports Intel® LGA1366 Xeon® series processors with EM64T technology, plus other latest technologies through the chipsets onboard.
Model Name Processor / System Bus
Core Logic
ASUS Features
Fan Speed Control
ASWM 2.0
Total Slots
Capacity
Memory
Memory Type
Memory Size
Total PCI/PCI-X/ PCI...
User Guide - Page 33
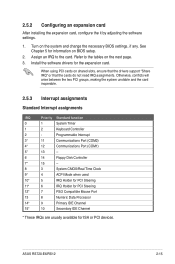
...13
--
6
14
Floppy Disk Controller
7*
15
--
8
3
System CMOS/Real Time Clock
9*
4
ACPI Mode when used
10*
5
IRQ Holder for PCI Steering
11*
6
IRQ Holder for PCI Steering
12*
7
PS/2 Compatible Mouse Port
13
8
Numeric Data Processor
14*
9
Primary IDE Channel
15*
10
Secondary IDE Channel
* These IRQs are usually available for ISA or PCI devices.
ASUS RS720-E6/RS12
2-15
User Guide - Page 67
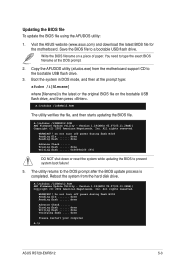
...iZ8NRD12.ROM AMI Firmware Update Utility - Version 1.19(ASUS V2.07(03.11.24BB)) Copyright (C) 2002 American Megatrends, Inc. All rights reserved.
WARNING!! Do not turn off power during flash BIOS Reading file ....... done Reading flash ...... done
Advance Check ...... Erasing flash ...... done Writing flash ...... done Verifying flash .... done
Please restart your computer
A:\>
ASUS RS720-E6/RS12...
User Guide - Page 69
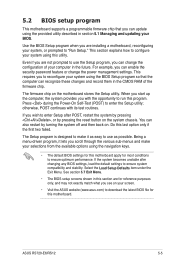
... can enable the security password feature or change the power management settings. This requires you to reconfigure your system using the BIOS Setup program so that the computer can recognize these changes and record them in the CMOS RAM of the firmware chip.
The firmware chip on the motherboard stores the Setup utility. When you start up the computer, the system provides you...
User Guide - Page 100
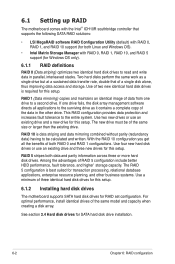
... tolerance, and higher` storage capacity. The RAID 5 configuration is best suited for transaction processing, relational database applications, enterprise resource planning, and other business systems. Use a minimum of three identical hard disk drives for this setup.
6.1.2 Installing hard disk drives
The motherboard supports SATA hard disk drives for RAID set configuration. For optimal performance...
User Guide - Page 102

... the SATA hard disk drives.
2. During POST, the LSI MegaRAID software RAID configuration utility automatically detects the installed SATA hard disk drives and displays any existing RAID set(s). Press + to enter the utility.
LSI MegaRAID Software RAID BIOS Version A.08 09161344R
LSI SATA RAID Found at PCI Bus No: Dev No:1F
Device present at Port 0
ST3160812AS
152114MB
Device present at Port...
User Guide - Page 132
...provides instructions on how to install the RAID controller drivers during OS installation.
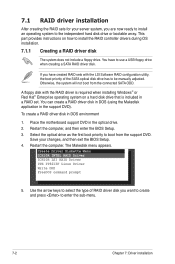
7.1.1 Creating a RAID driver disk
The system does not include a floppy drive. You have to use a USB floppy drive when creating a SATA RAID driver disk.
If you have created RAID sets with the LSI Software RAID configuration utility, the boot priority of the SATA optical disk drive has to be manually adjusted...
User Guide - Page 134
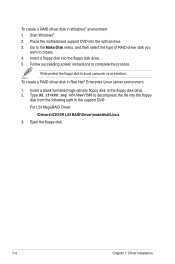
... a RAID driver disk in Windows® environment 1. Start Windows®. 2. Place the motherboard support DVD into the optical drive. 3. Go to the Make Disk menu, and then select the type of RAID driver disk you
want to create. 4. Insert a floppy disk into the floppy disk drive. 5. Follow succeeding screen instructions to complete the process.
Write-protect the floppy disk to avoid computer virus...
User Guide - Page 135
...of one or more mass storage devices installed in your system, or you have chosen to manually specify an adapter. Currently, Setup will load support for the following mass storage devices(s):
* To specify additional SCSI adapters, DVD-ROM drives, or special disk controllers for use with Windows, including those for which you have a device support disk from a mass storage device manufacturer, press...
User Guide - Page 136
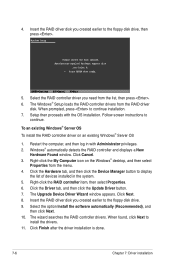
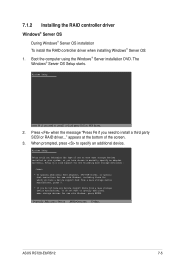
...list, then press . 6. The Windows® Setup loads the RAID controller drivers from the RAID driver
disk. When prompted, press to continue installation. 7. Setup then proceeds with the OS installation. Follow screen instructions to
continue.
To an existing Windows® Server OS To install the RAID controller driver on an existing Windows® Server OS
1. Restart the computer, and then log in...
User Guide - Page 137
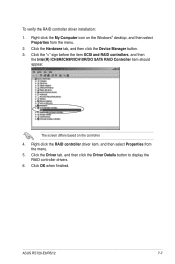
... SCSI and RAID controllers, and then
the Intel(R) ICH8R/ICH9R/ICH10R/DO SATA RAID Controller item should appear.
The screen differs based on the controller. 4. Right-click the RAID controller driver item, and then select Properties from
the menu. 5. Click the Driver tab, and then click the Driver Details button to display the
RAID controller drivers. 6. Click OK when finished.
ASUS RS720-E6/RS12...
User Guide - Page 138
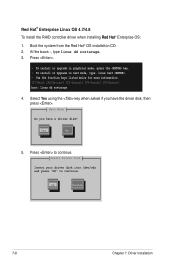
...; Enterprise Linux OS 4.7/4.8 To install the RAID controller driver when installing�R��e�d�H��a�t® Enterprise OS: 1. Boot the system from the Red Hat® OS installation CD. 2. At the boot:, type linux dd nostorage. 3. Press .
- To install or upgrade in graphical mode, press the key. - To install or upgrade in text mode, type: linux...
User Guide - Page 141
... module arguments
OK
Back
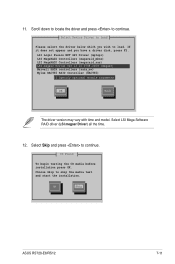
The driver version may vary with time and model. Select LSI Mega Software RAID driver (LSI megasr Driver) all the time.
12. Select Skip and press to continue.
CD Found
To begin testing the CD media before installation press OK. Choose Skip to skip the media test and start the installation.
OK
Skip
ASUS RS720-E6/RS12
7-11
User Guide - Page 143
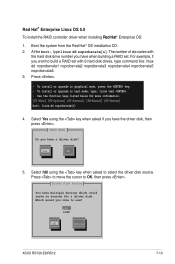
... the driver disk, then press .
Main Menu
Do you have a driver disk?
Yes
No
5. Select fd0 using the key when asked to select the driver disk source. Press to move the cursor to OK, then press .
Driver Disk Source
You have multiple devices which could serve as sources for a driver disk. Which would you like to use?
fd0 scd0
OK
Cancel
ASUS RS720-E6/RS12...
User Guide - Page 146
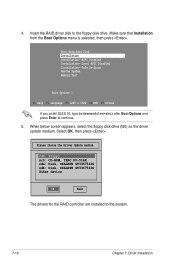
... Options and press Enter to continue. 5. When below screen appears, select the floppy disk drive (fd0) as the driver update medium. Select OK, then press .
Please choose the Driver Update medium.
fd0: Floppy sr0: CD-ROM, TEAC DV-516E sda: Disk, SEAGATE ST336754SS sdb: Disk, SEAGATE ST336754SS Other device
OK
Back
The drivers for the RAID controller are installed to the system.
7-16
Chapter...
User Guide - Page 147
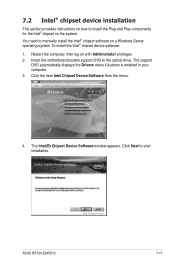
... the computer, then log on with Administrator privileges. 2. Insert the motherboard/system support DVD to the optical drive. The support
DVD automatically displays the Drivers menu if Autorun is enabled in your computer. 3. Click the item Intel Chipset Device Software from the menu.
4. The Intel(R) Chipset Device Software window appears. Click Next to start installation.
ASUS RS720-E6/RS12
7-17
User Guide - Page 149
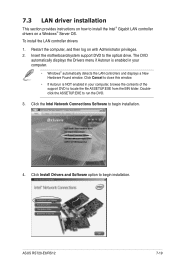
...Found window. Click Cancel to close this window.
• If Autorun is NOT enabled in your computer, browse the contents of the support DVD to locate the file ASSETUP.EXE from the BIN folder. Doubleclick the ASSETUP.EXE to run the DVD.
3. Click the Intel Network Connections Software to begin installation.
4. Click Install Drivers and Software option to begin installation.
ASUS RS720-E6/RS12
7-19
User Guide - Page 150

5. Click Next when the Intel(R) Network Connections-InstallShield Wizard window appears.
6. Toggle I accept the terms in the license agreement and click Next to continue.
7. Click the Intel(R) PROSet for Windows Device Manager box, and then click Next to start the installation.
7-20
Chapter 7: Driver installation