Asus VivoPC VM62 driver and firmware
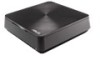
Related Asus VivoPC VM62 Manual Pages
Download the free PDF manual for Asus VivoPC VM62 and other Asus manuals at ManualOwl.com
Warranty Card English/Thai/Turkish - Page 3
... failure caused by improper installation, operation, cleaning or maintenance, accident, damage, misuse, abuse, non-ASUS modifications to the product, any third party software programs, normal wear and tear or any other event, act, default or omission outside ASUS' control. For further details, see section 5 of this Warranty Card. All components that an ASUS Service Center repaired or replaced...
Warranty Card English/Thai/Turkish - Page 4
... support hotline phone number can be found at http://www.asus.com/support.
• You will be requested by ASUS to perform some of the Product's troubleshooting tasks or actions, which may include the following:
• Restoring the Product's operating system, factory-installed drivers, and applications to the factory default settings.
• Installing updates, patches or service packs...
Warranty Card English/Thai/Turkish - Page 5
... malfunction of a peripheral device such as printer, optical drive, network card, or USB device, etc.;
(h) Damage to the Product caused by an external electrical fault or any accident;
(i) Damage to the Product resulting from use outside of the operation, storage parameters, or environment detailed in the User's Manual;
(j) Damage to the Product caused by third party software or virus(es); or...
VM62N Users manual English - Page 2
... ASUS. ASUS ASSUMES NO RESPONSIBILITY OR LIABILITY FOR ANY ERRORS OR INACCURACIES THAT MAY APPEAR IN THIS MANUAL, INCLUDING THE PRODUCTS AND SOFTWARE DESCRIBED IN IT.
Copyright © 2015 ASUSTeK COMPUTER INC. All Rights Reserved.
LIMITATION OF LIABILITY
Circumstances may arise where because of a default on ASUS' part or other liability, you are entitled to recover damages from ASUS...
VM62N Users manual English - Page 3
...
Connect the AC power adapter to your VivoPC 14
Connect a display panel to your VivoPC 16
Connect the USB cable from keyboard or mouse 17
Turn on your Vivo PC 18
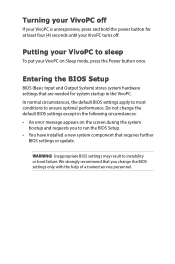
Turning your VivoPC off 19
Putting your VivoPC to sleep 19
Entering the BIOS Setup 19
Quickly enter the BIOS 20
Memory upgrade
21
Upgrading memory modules 22
Appendix
29
Safety information 30
Setting up your...
VM62N Users manual English - Page 4

About this manual
This manual provides information about the hardware and software features of your PC, organized through the following chapters:
Chapter 1: Getting to know your VivoPC This chapter details the hardware components of your VivoPC.
Chapter 2: Using your VivoPC This chapter provides you with information on using your VivoPC.
Chapter 3: Memory upgrade This chapter provides you with ...
VM62N Users manual English - Page 19

...: • An error message appears on the screen during the system
bootup and requests you to run the BIOS Setup. • You have installed a new system component that requires further
BIOS settings or update.
WARNING! Inappropriate BIOS settings may result to instability or boot failure. We strongly recommend that you change the BIOS settings only with the help of a trained service personnel.
VM62N Users manual English - Page 22

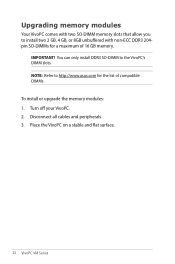
... 204pin SO-DIMMs for a maximum of 16 GB memory.
IMPORTANT! You can only install DDR3 SO-DIMM to the VivoPC's DIMM slots. NOTE: Refer to http://www.asus.com for the list of compatible DIMMs. To install or upgrade the memory modules: 1. Turn off your VivoPC. 2. Disconnect all cables and peripherals. 3. Place the VivoPC on a stable and flat surface.
22...
VM Series Users Manual English - Page 4

About this manual
This manual provides information about the hardware and software features of your PC, organized through the following chapters:
Chapter 1: Getting to know your VivoPC This chapter details the hardware components of your VivoPC.
Chapter 2: Using your VivoPC This chapter provides you with information on using your VivoPC.
Chapter 3: Memory upgrade This chapter provides you with ...
VM Series Users Manual English - Page 19
...: • An error message appears on the screen during the system
bootup and requests you to run the BIOS Setup. • You have installed a new system component that requires further
BIOS settings or update.
WARNING! Inappropriate BIOS settings may result to instability or boot failure. We strongly recommend that you change the BIOS settings only with the help of a trained service personnel.
VM Series Users Manual English - Page 22
... 204pin SO-DIMMs for a maximum of 16 GB memory.
IMPORTANT! You can only install DDR3 SO-DIMM to the VivoPC's DIMM slots. NOTE: Refer to http://www.asus.com for the list of compatible DIMMs. To install or upgrade the memory modules: 1. Turn off your VivoPC. 2. Disconnect all cables and peripherals. 3. Place the VivoPC on a stable and flat surface.
22...
Windows 7 and USB 3.0 driver installation for 100 Series.English - Page 1
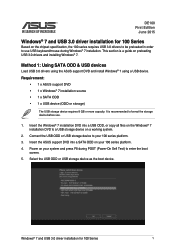
... is a guide on preloading USB 3.0 drivers and installing Windows® 7.
Method 1: Using SATA ODD & USB devices
Load USB 3.0 drivers using the ASUS support DVD and install Windows® 7 using a USB device.
Requirement: • 1 x ASUS support DVD • 1 x Windows® 7 installation source • 1 x SATA ODD • 1 x USB device (ODD or storage)
The USB storage device requires 8 GB...
Windows 7 and USB 3.0 driver installation for 100 Series.English - Page 2
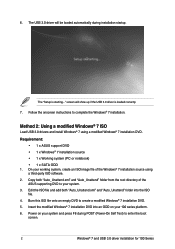
...ISO
Load USB 3.0 drivers and install Windows® 7 using a modified Windows® 7 installation DVD.
Requirement: • 1 x ASUS support DVD • 1 x Windows® 7 installation source • 1 x Working system (PC or notebook) • 1 x SATA ODD
1. On your working system, create an ISO image file of the Windows® 7 installation source using a third-party ISO software.
2. Copy both...
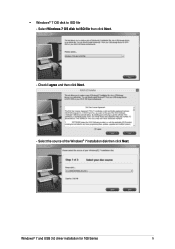
Windows 7 and USB 3.0 driver installation for 100 Series.English - Page 3
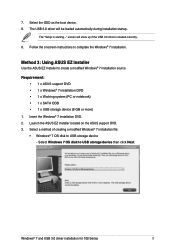
... USB storage device (8 GB or more)
1. Insert the Windows® 7 installation DVD. 2. Launch the ASUS EZ Installer located on the ASUS support DVD. 3. Select a method of creating a modified Windows® 7 installation file:
• Windows® 7 OS disk to USB storage device - Select Windows 7 OS disk to USB storage device then click Next.
Windows® 7 and USB 3.0 driver installation for...
Windows 7 and USB 3.0 driver installation for 100 Series.English - Page 4
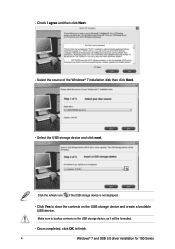
... Next. - Select the source of the Windows® 7 installation disk then click Next.
- Select the USB storage device and click next.
Click the refresh icon if the USB storage device is not displayed.
- C lick Yes to clear the contents on the USB storage device and create a bootable USB device.
Make sure to backup contents on the USB storage device, as it will be formatted.
- Once...
Windows 7 and USB 3.0 driver installation for 100 Series.English - Page 5
•
Windows® 7 OS disk to ISO file - Select Windows 7 OS disk to ISO file then click Next.
- Check I agree and then click Next.
- Select the source of the Windows® 7 installation disk then click Next.
Windows® 7 and USB 3.0 driver installation for 100 Series
5
Windows 7 and USB 3.0 driver installation for 100 Series.English - Page 6
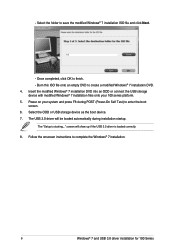
... (Power-On Self Test) to enter the boot
screen. 6. Select the ODD or USB storage device as the boot device. 7. The USB 3.0 driver will be loaded automatically during installation startup.
The "Setup is starting..." screen will show up if the USB 3.0 driver is loaded correctly. 8. Follow the onscreen instructions to complete the Windows® 7 installation.
6
Windows® 7 and USB 3.0 driver...
VM62 Series user s manual English - Page 4
About this manual
This manual provides information about the hardware and software features of your PC, organized through the following chapters: Chapter 1: Getting to know your VivoPC
This chapter details the hardware components of your VivoPC. Chapter 2: Using your VivoPC
This chapter provides you with information on using your VivoPC. Chapter 3: Memory upgrade
This chapter provides you with ...
VM62 Series user s manual English - Page 19
...: • An error message appears on the screen during the system
bootup and requests you to run the BIOS Setup. • You have installed a new system component that requires further
BIOS settings or update.
WARNING! Inappropriate BIOS settings may result to instability or boot failure. We strongly recommend that you change the BIOS settings only with the help of a trained service personnel.
VM62 Series user s manual English - Page 22

... 204pin SO-DIMMs for a maximum of 16 GB memory.
IMPORTANT! You can only install DDR3 SO-DIMM to the VivoPC's DIMM slots. NOTE: Refer to http://www.asus.com for the list of compatible DIMMs. To install or upgrade the memory modules: 1. Turn off your VivoPC. 2. Disconnect all cables and peripherals. 3. Place the VivoPC on a stable and flat surface.
22...